
Crafting Meaning: The Symbolism Behind My Beaded Cross Design
March/16/2025 09:29 AM Filed in: Beading Tutorials | Seed Bead Tutorials
As a jewelry designer, I've always been fascinated by the power of symbols to convey deep meanings and personal stories. Today, I'm excited to share with you the inspiration and symbolism behind my latest beaded cross design. This unique piece isn't just beautiful to look at – it's a tapestry of meaning that I hope will resonate with many of you.

The Elements of the Cross
My cross design combines three main elements, each carrying its own significance:

The Color Story
The colors I chose for this piece are just as meaningful as the symbols themselves:
As I crafted each element of this cross, I realized that it tells a story – one that might resonate with many of you. It's a story of transformation through adversity, suggesting that our challenges and sorrows (represented by the teardrop) can lead to personal growth and positive change (the butterfly), all under the protection and guidance of our faith or higher principles (the Maltese cross).
Whether you're on a spiritual journey, going through a period of personal growth, overcoming challenges, or simply seeking protection and guidance, my hope is that this beaded cross will speak to you. It's more than just a piece of jewelry – it's a symbol of the complex and beautiful journey we call life.
I pour my heart into every piece I create, and this beaded cross is no exception. It's my way of offering not just a beautiful accessory, but a source of comfort, inspiration, and meaning. I hope that as you wear it or gift it to someone special, it will serve as a daily reminder of the transformative power of faith, hope, and perseverance.

Detailed instructions for the Beaded Cross Pendant
YOUTUBE Video: The Symbolism Behind My Beaded Cross Design
The Elements of the Cross
My cross design combines three main elements, each carrying its own significance:
- The Maltese Cross Base: At the heart of our design is the Maltese cross, a symbol with a rich history. It represents protection, courage, and service to others. In creating this piece, I was drawn to the eight virtues associated with the Knights Hospitaller – loyalty, piety, generosity, bravery, glory and honor, contempt of death, helpfulness towards the poor and sick, and respect for the church. These values seem as relevant today as they were centuries ago.
- The Teardrop: Hanging from the bottom of the cross is a pear-shaped teardrop. As I crafted this element, I thought about how it could represent the sorrows we all face in life, but also the purification and cleansing that often comes through difficult times. For some, it might evoke the tears of Christ or Mary, adding a layer of religious significance.
- The Butterfly: Between the cross and the teardrop, you'll find a tiny butterfly. This was perhaps my favorite part to create. Butterflies have long symbolized transformation, change, and rebirth. As I beaded this delicate creature, I thought about how it represents the beauty that can emerge from life's challenges.
The Color Story
The colors I chose for this piece are just as meaningful as the symbols themselves:
- Silver/Palladium/Nickel: These metallic tones represent purity and clarity. As I worked with these beads, I imagined them reflecting light – just as we might hope to reflect goodness in our own lives.
- Pink: I included pink beads to represent love and compassion. In a world that often feels harsh, these soft pink tones remind us of the importance of nurturing and caring for one another.
- Lavender: The lavender beads bring a sense of spirituality and grace to the piece. As I threaded them, I thought about the calmness we often seek in our spiritual journeys.
- Yellow: Finally, the yellow beads add a touch of joy and optimism. They remind me of sunlight, representing enlightenment and hope.
As I crafted each element of this cross, I realized that it tells a story – one that might resonate with many of you. It's a story of transformation through adversity, suggesting that our challenges and sorrows (represented by the teardrop) can lead to personal growth and positive change (the butterfly), all under the protection and guidance of our faith or higher principles (the Maltese cross).
Whether you're on a spiritual journey, going through a period of personal growth, overcoming challenges, or simply seeking protection and guidance, my hope is that this beaded cross will speak to you. It's more than just a piece of jewelry – it's a symbol of the complex and beautiful journey we call life.
I pour my heart into every piece I create, and this beaded cross is no exception. It's my way of offering not just a beautiful accessory, but a source of comfort, inspiration, and meaning. I hope that as you wear it or gift it to someone special, it will serve as a daily reminder of the transformative power of faith, hope, and perseverance.
Detailed instructions for the Beaded Cross Pendant
YOUTUBE Video: The Symbolism Behind My Beaded Cross Design
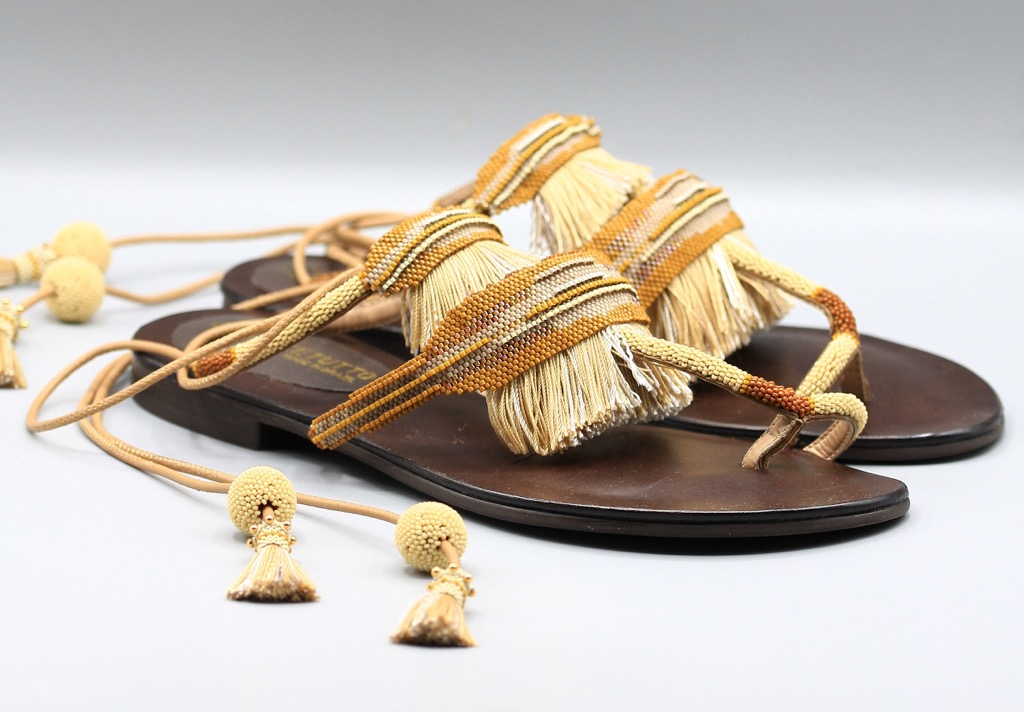
Beading Tutorial: Upcycling Old Sandals with Glass Seed Beads, Leather, and Natural Silk Thread - A Stylish Transformation!
Welcome to my creative journey of transforming old sandals into unique pieces of art! In this blog, I delve into the world of upcycling, where I breathe new life into worn-out sandals using glass seed beads, leather cord, and hand-made silk thread tassels. Join me as we explore the beauty of repurposing, adding a touch of elegance and sustainability to your footwear collection. Get ready to be inspired and learn how to turn simple sandals into stunning fashion statements that reflect your style and creativity.
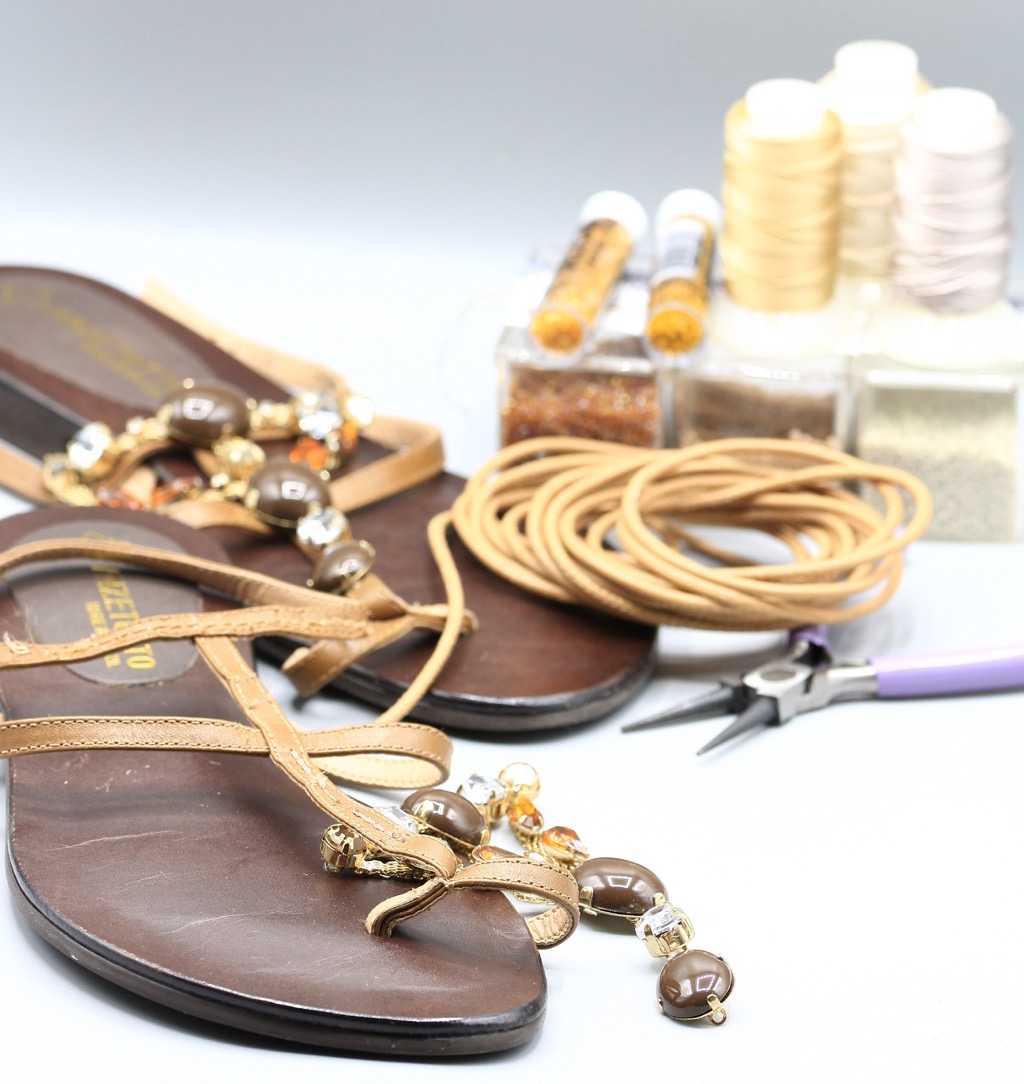
1. Remove Embellishments: Start by removing all embellishments from your shoes, leaving only clean leather as the base for your beading project.
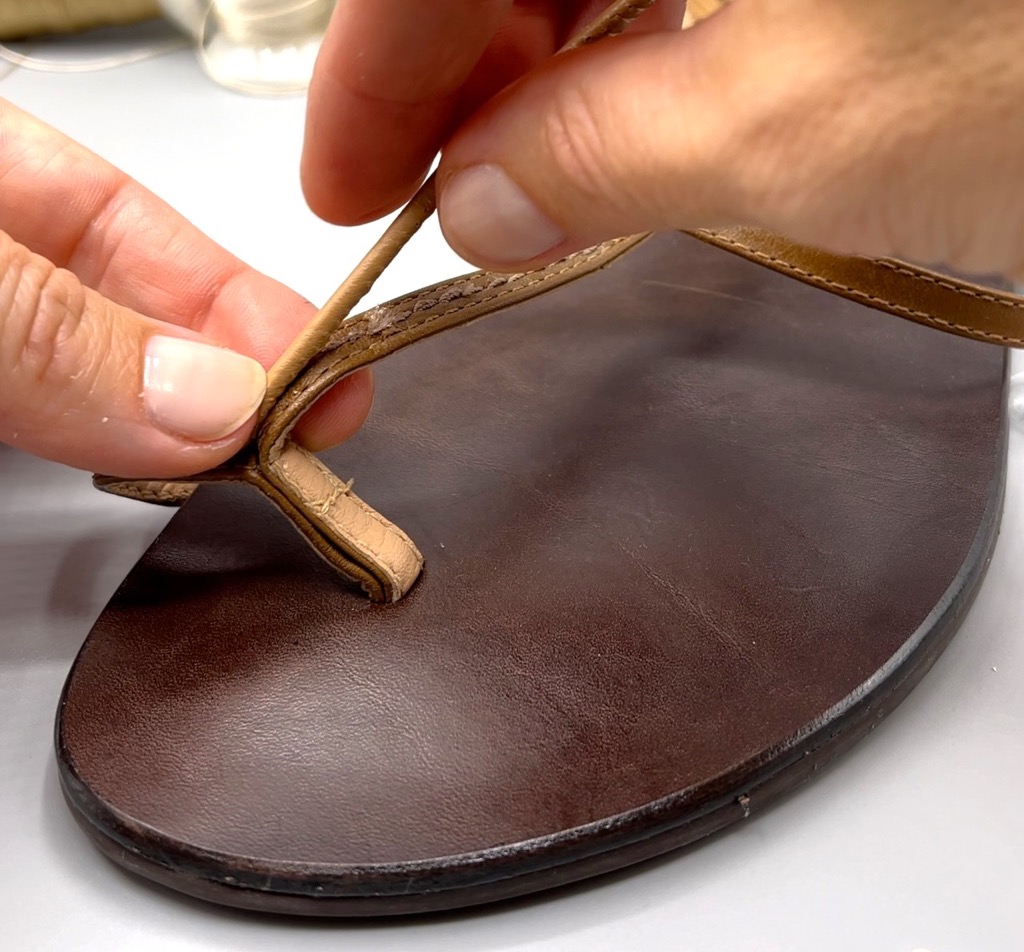
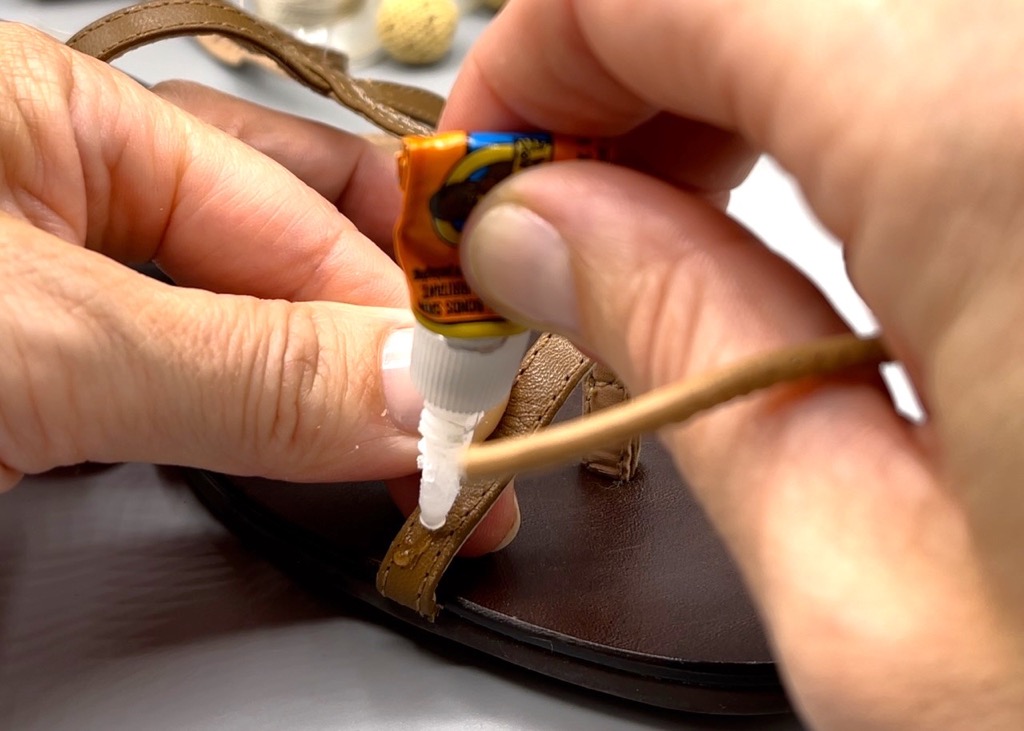
2. Make a beading base for your beads: Pick up the 2.5mm leather cord and glue it to the leather of the sandals. Use E6000 adhesive (allow time to dry) or use super glue.
Materials:
Nylon beading thread, brown color, size D
Cord, leather, and cotton (dyed), taupe, 2.5mm zigzag-stitched.
#15 Rocailles glass seed beads
3. Prepare the Thread: Cut a comfortable length of Nylon beading thread, ensuring it is manageable but long enough for your project.
4. Thread the Needle: Thread one end of the Nylon thread through a beading needle and tie a knot at the other end to secure the beads from slipping off.
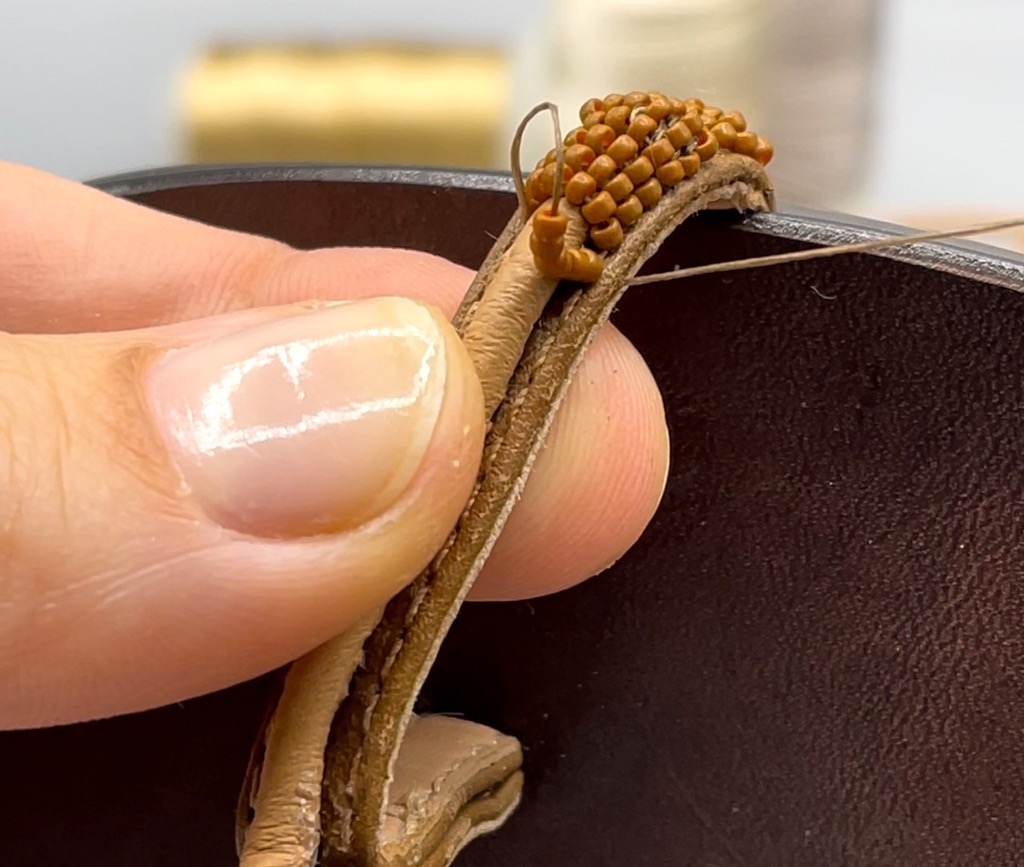
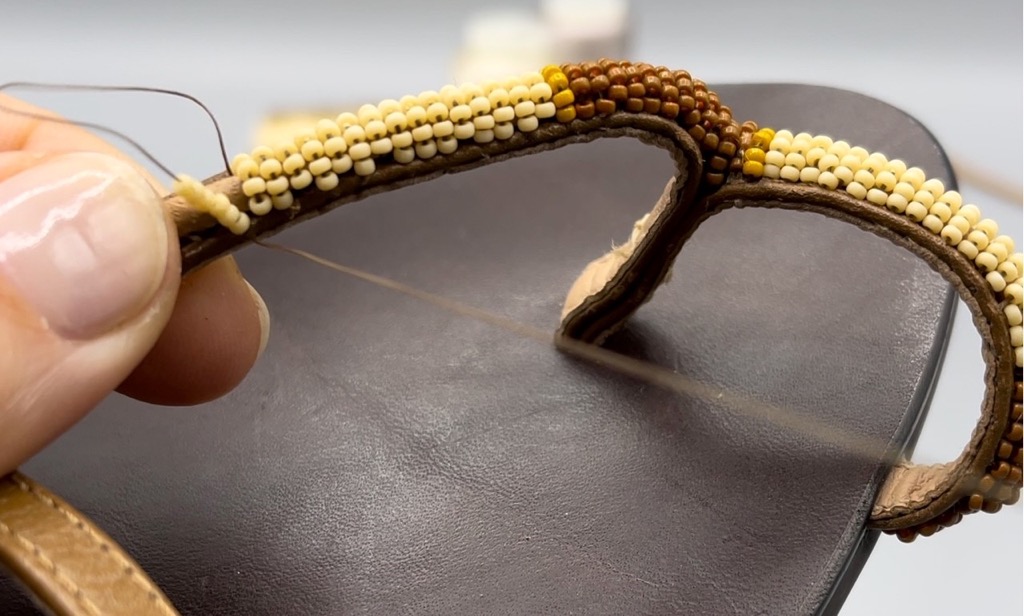
5. Start Beading: Begin by passing the needle through the leather cord to anchor the thread. Add five or six #15 Rocailles glass seed beads onto the needle. Pass the needle back through the leather cord to secure the beads in place. Ensure to maintain even spacing and tension as you bead.
6. Finishing: Once you have embellished the leather cord to your desired length, secure the thread by weaving it back through previous beads. Tie off the thread securely and trim any excess.
7. Make a flat silk tassel:
Materials:
Nylon beading thread, brown color, size D.
Thread, Purely Silk™, gold, size F. Sold per 20-yard card, 2 cards.
Thread, Purely Silk™, light gray, size F. Sold per 20-yard card, 2 cards.
Scrap, leather (dyed), tan, 9-1/4 x 3-1/2 inches.
Lacy’s Stiff Stuff Beading Foundation
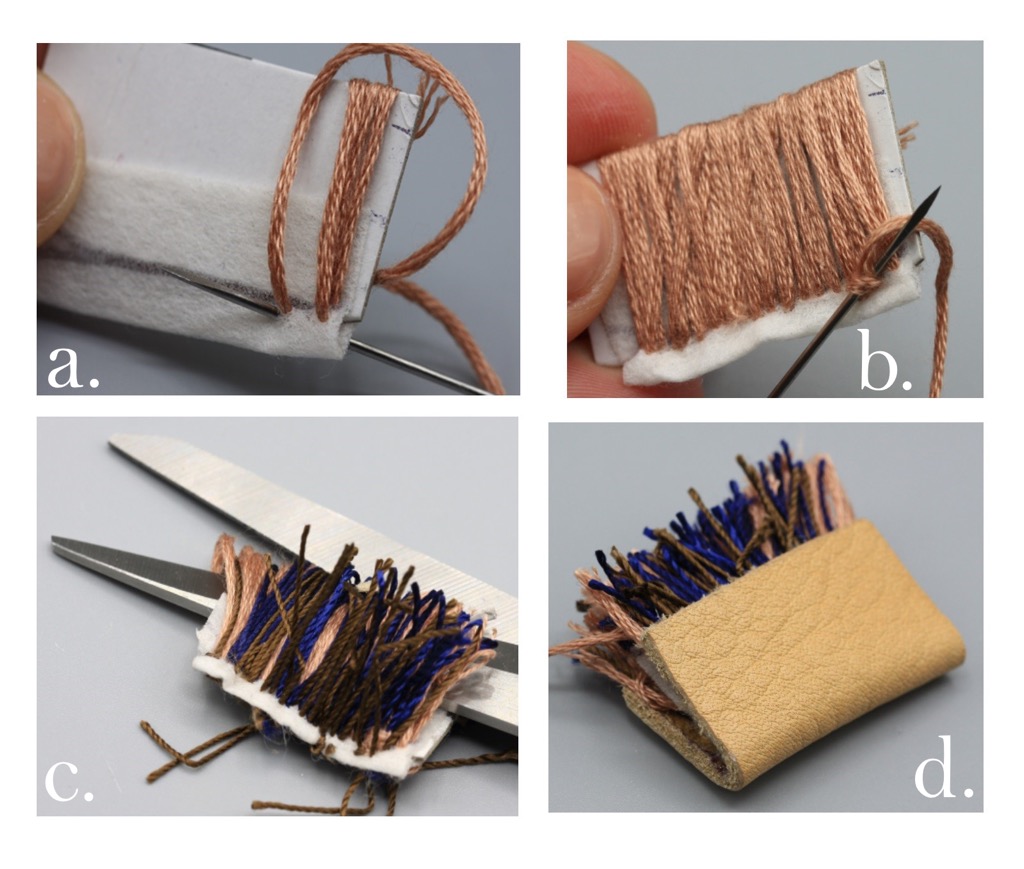
Cut a 70x25mm Lacy’s Stiff Stuff Beading Foundation or any other thin fabric. Fold it in half and draw the line 5,7mm from the bottom (this line will be the directional line, where you going to slide your needle through the fabric. Then cut the 70x80mm thick paper or cardboard, slide it inside the Lacy’s stiff beading foundation (till directional line).
Picture a and b: Wind thread around the board in loops going through the beading foundation with the needle, until you reach desired fullness (as you work, you can change thread colors if you wish – start with light gray color silk and on top put the gold color silk). In pictures I’m showing different colors from different projects.
Picture c: Cut through the looped ends.
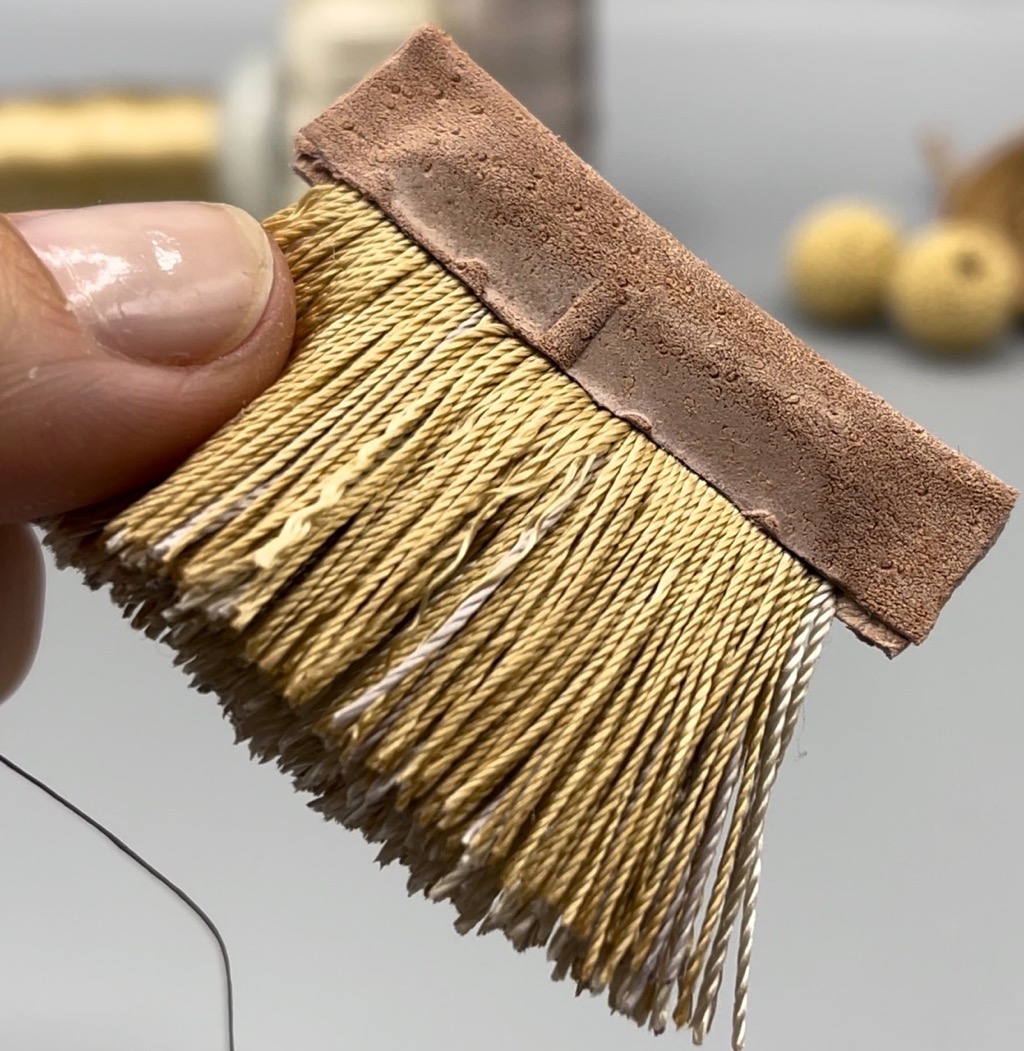
Picture d: Put some glue on the top of the silk thread and on the beading foundation and fold the top of it the leather strip.
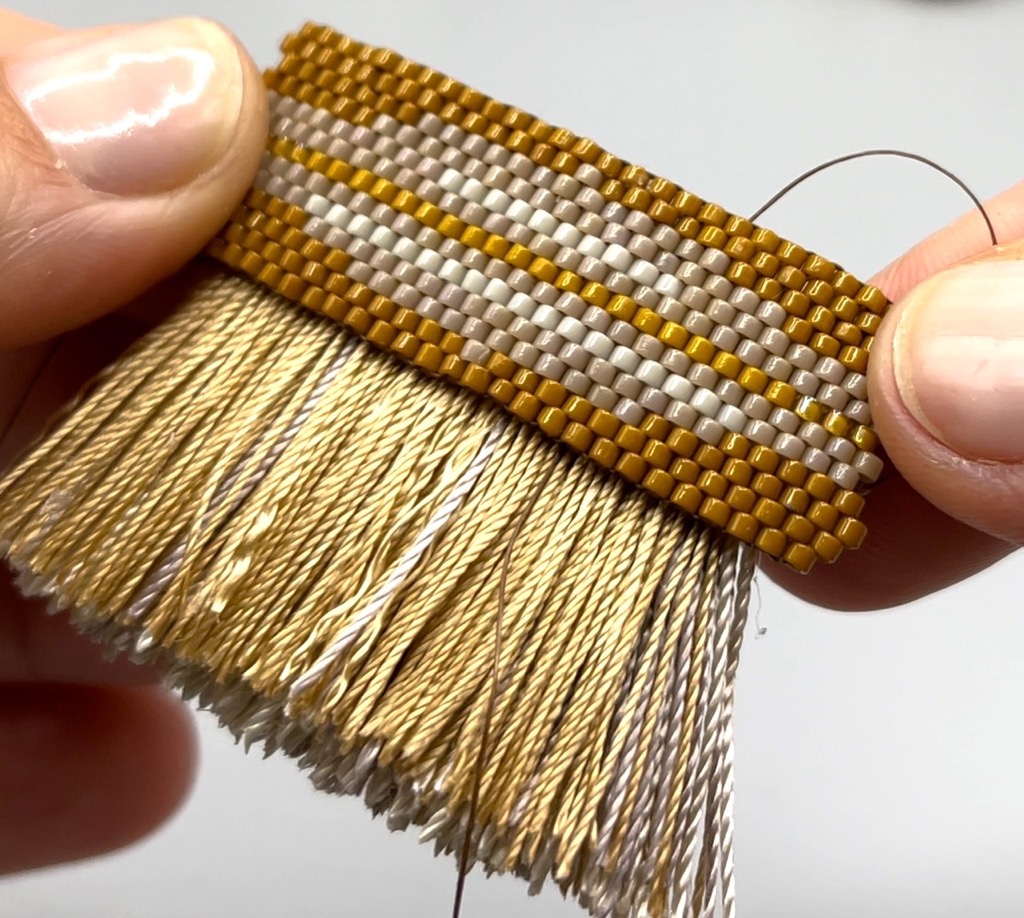
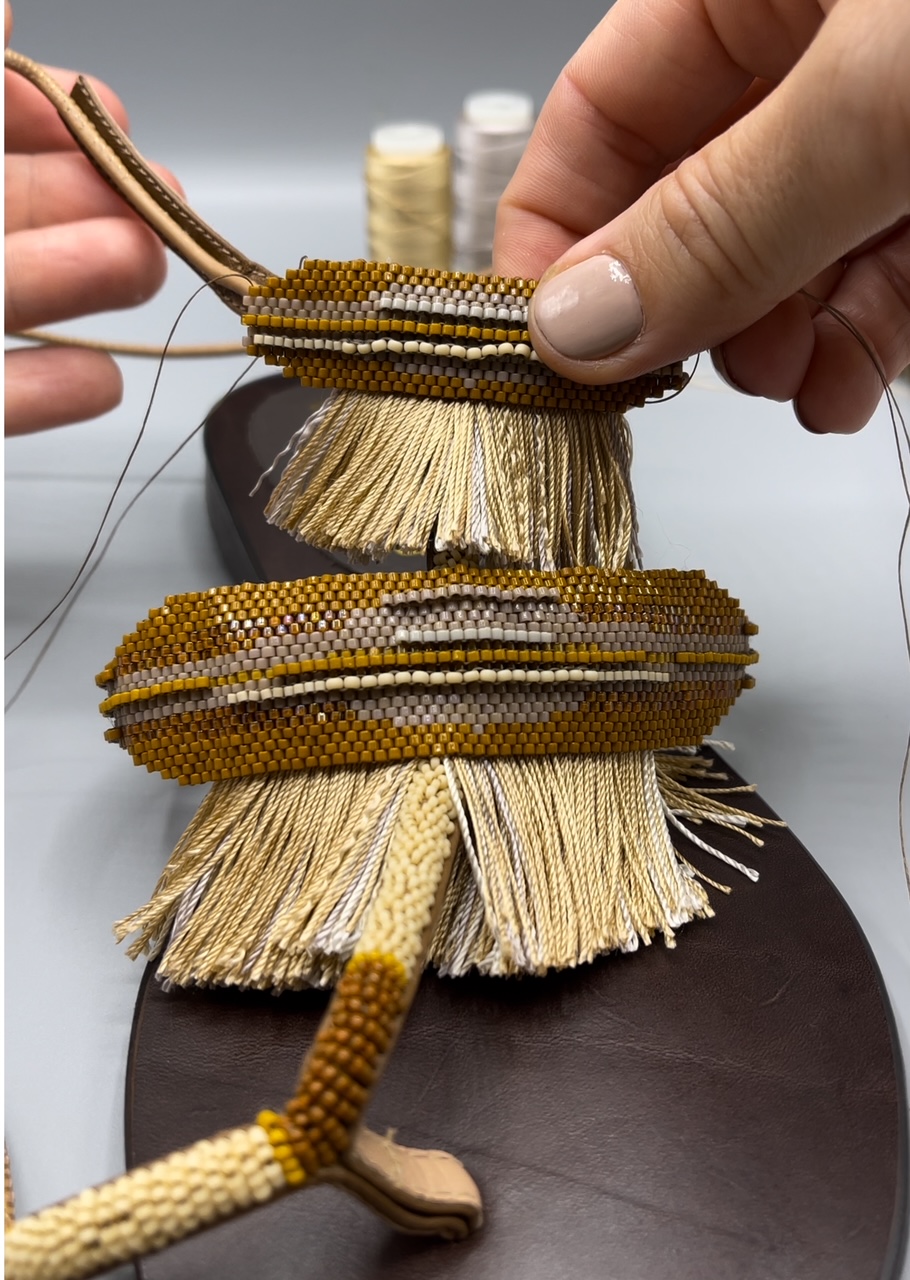
8. Make a beaded seed bead strip using flat peyote stitch:
Materials:
Delica glass seed beads #11
Opaque beige (DB2105), Opaque dark brown (DB2142), opaque toast (DB2110), opaque glazed luster linen (DB0261-1).
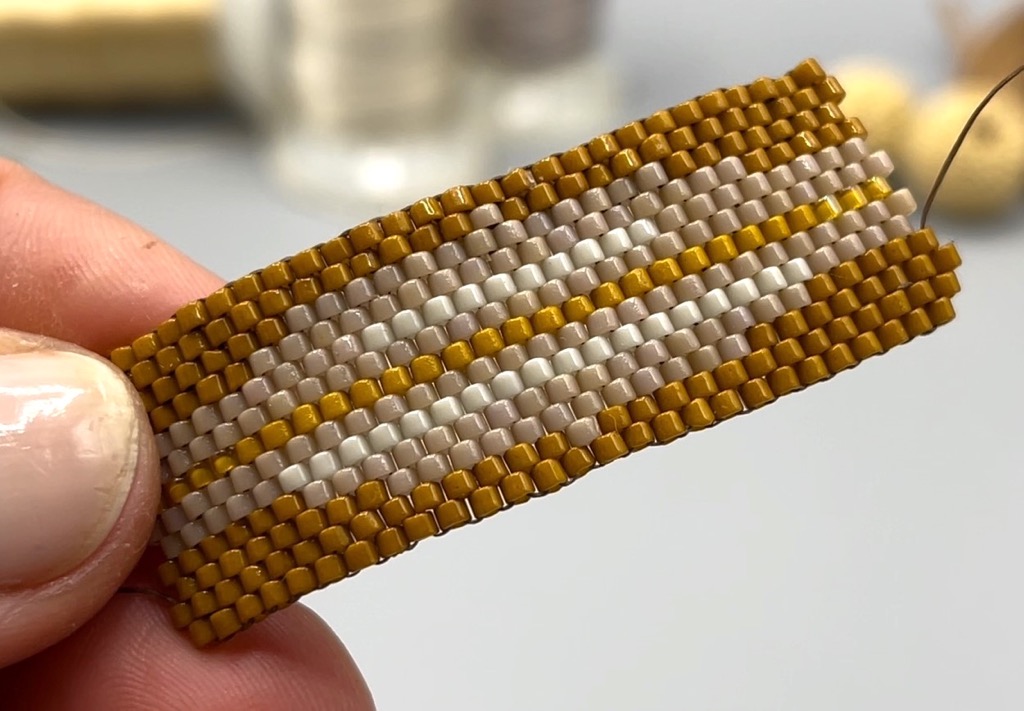
Make a beaded strip and attach it to the flat tassel’s leather: sew the needle through the leather, sew through the beadwork and weave the thread through the couple beads, sew back through the leather and repeat.
Finish the top beaded strip edge with #15 Rocailles: exiting one #11 Delica edge bead string five rocailles and sew the needle through the leather base and go up through the beaded strip beadwork. Weave the thread through the beads and exit next top edge Delica seed bead and repeat.
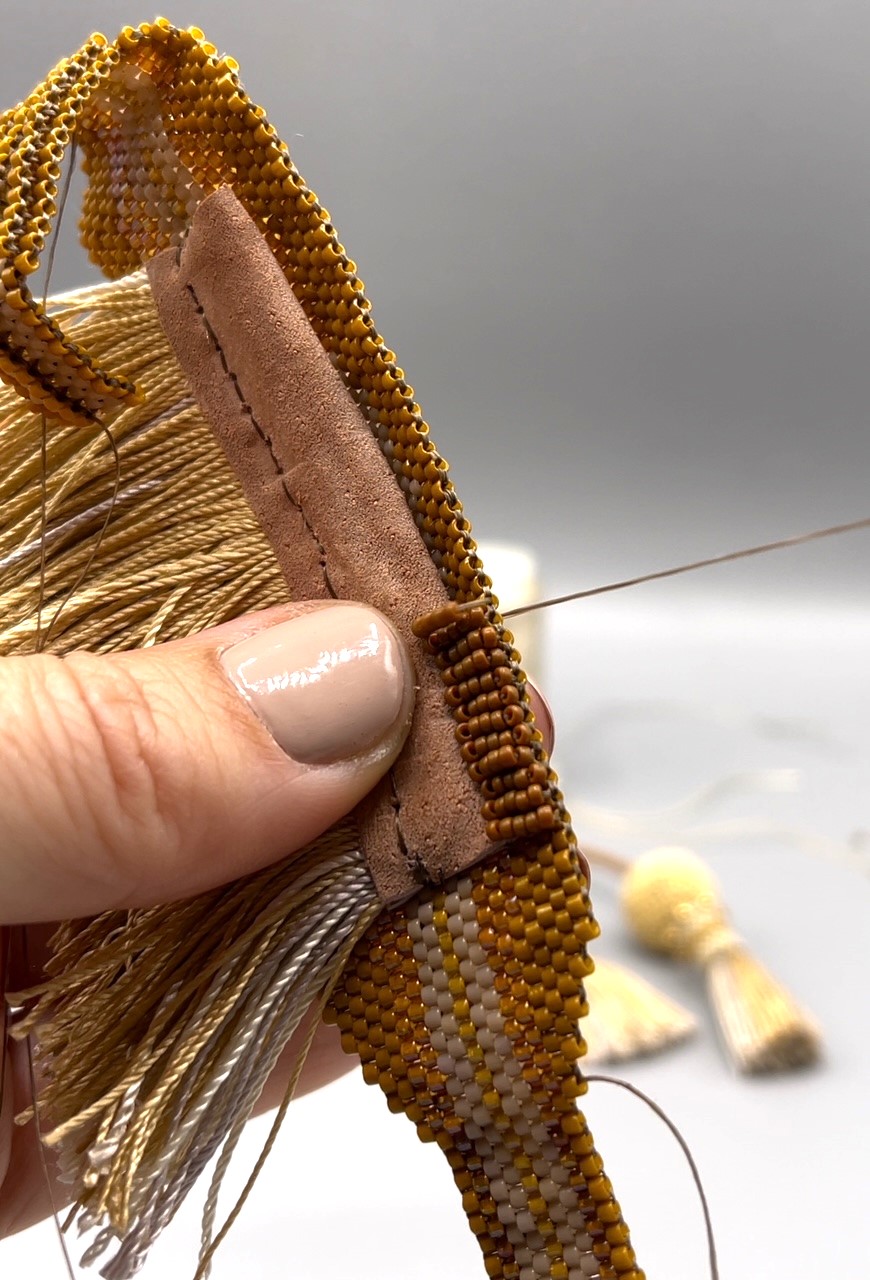
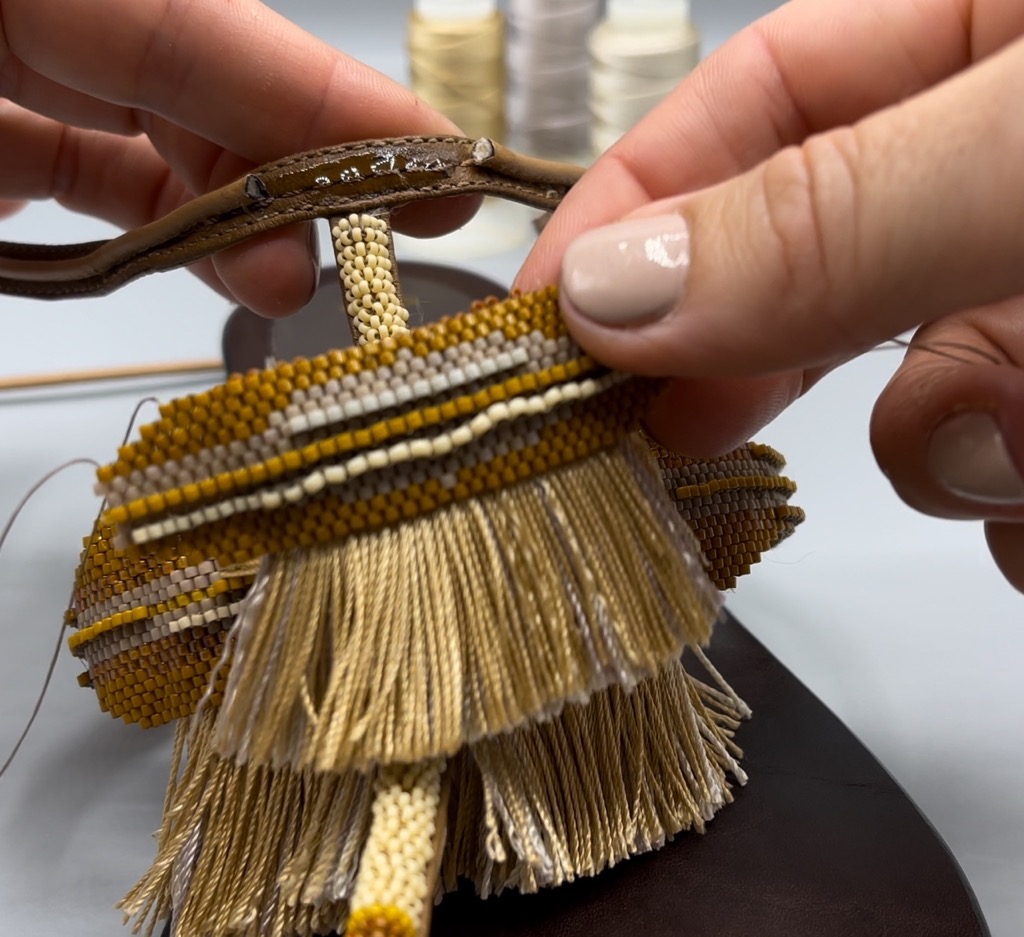
After you finish making the flat silk beaded tassel, put some glue on the sandal leather strip and attach the beadwork to the sandals. Make a total of four flat tassels (I used one bigger and one little bit smaller to each sandal).
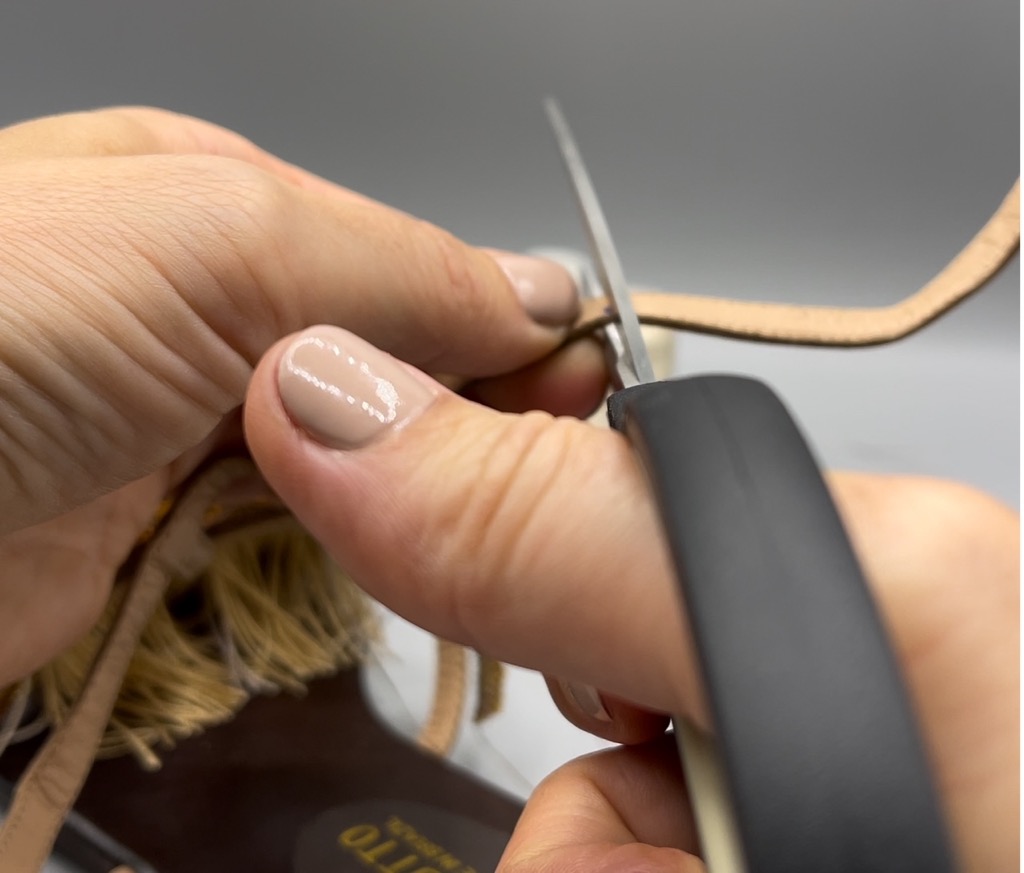
9. Final Touches: Cut the sandal straps and attach to both leather ends (glue on it) the 26-inches (2.5mm diameter) leather cords.
Then make a simple silk around 1.5-inch (40mm) tassel or use pre-made ones. Make a beaded strip with #11 Delicas, wrap it around the tassel and finish it working around the top of it in circular peyote stitch.
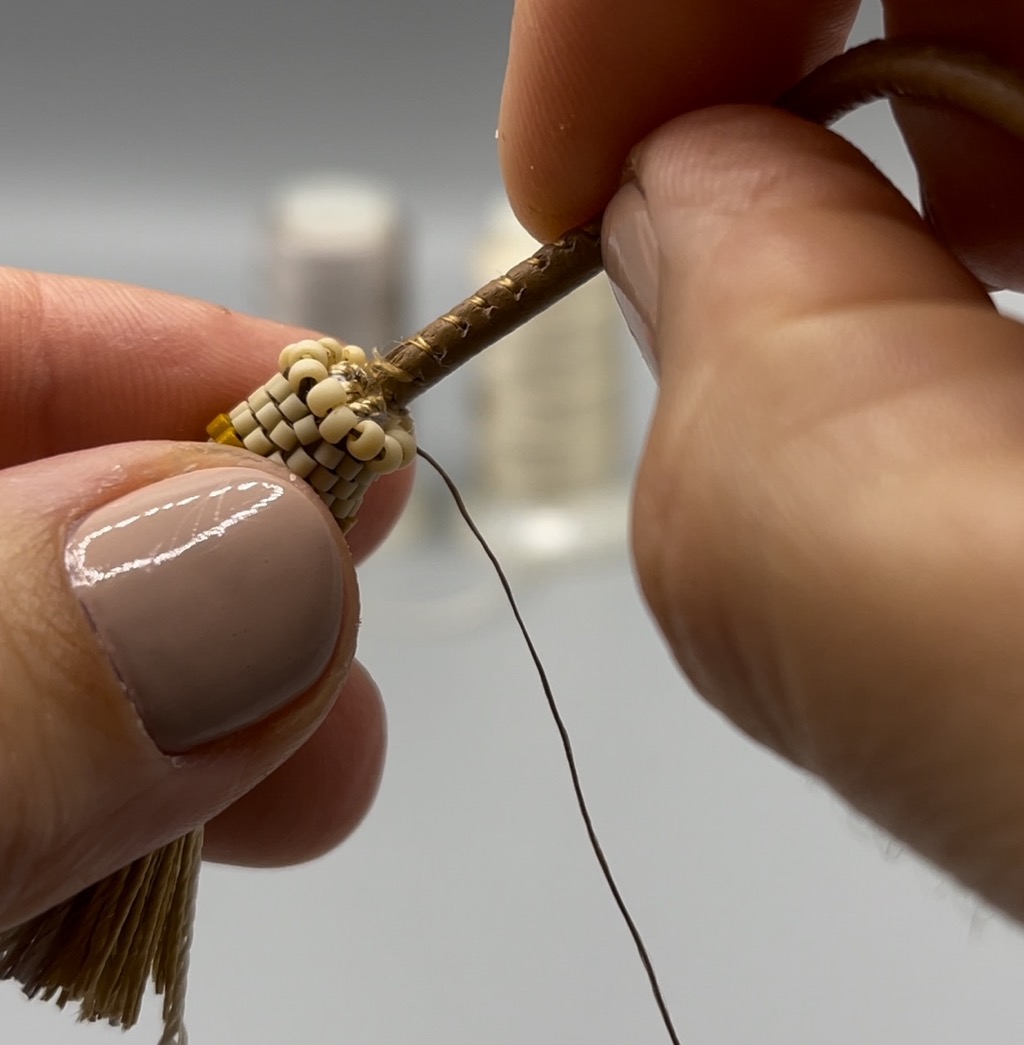
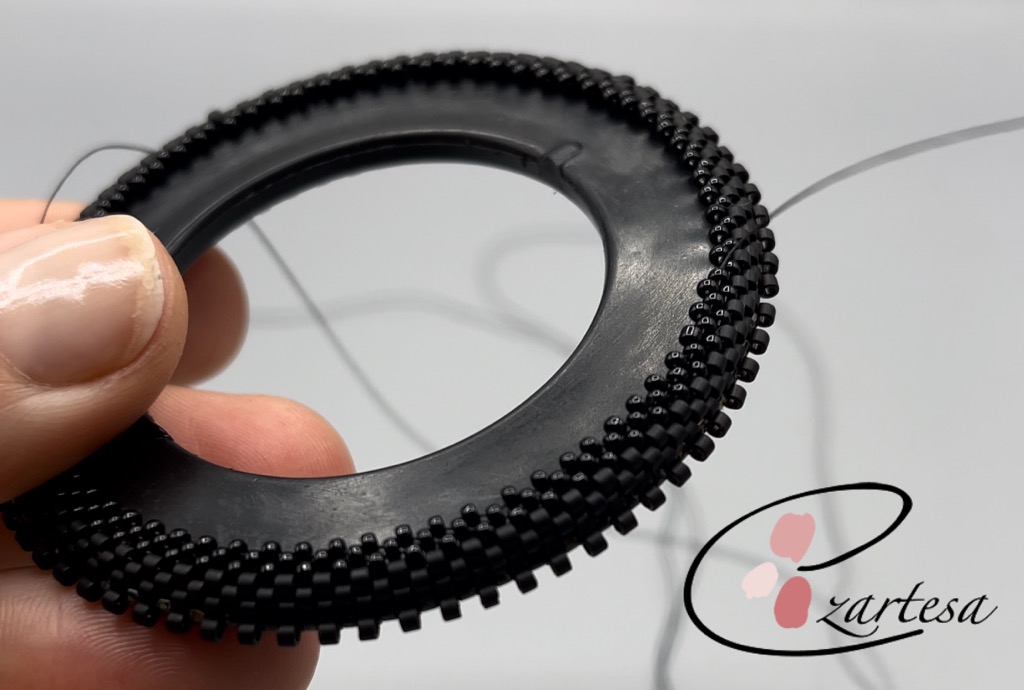
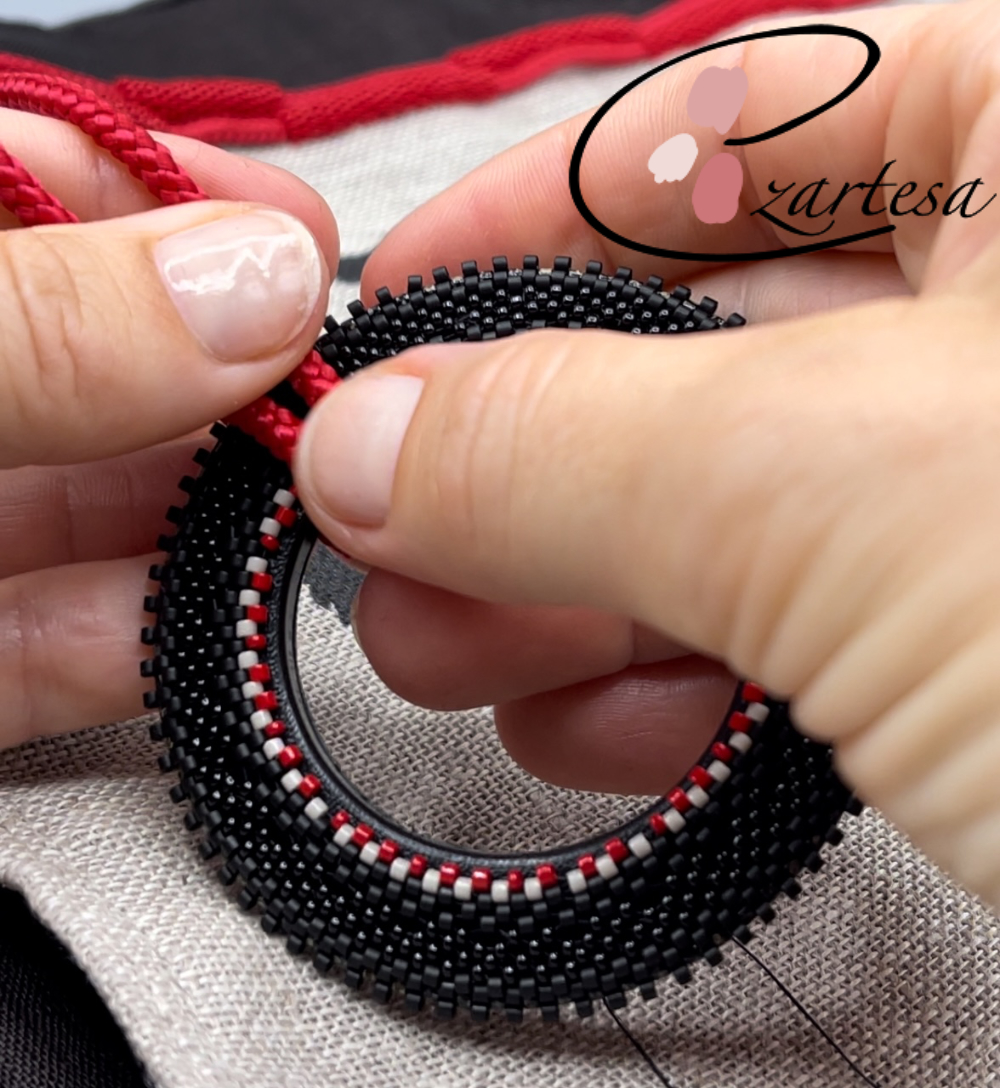
Next if you wish you can add to the leather cords the beaded round beads. I used for this project 18mm round rubberized acrylic with a large hole and used #15 Rocaille beads.
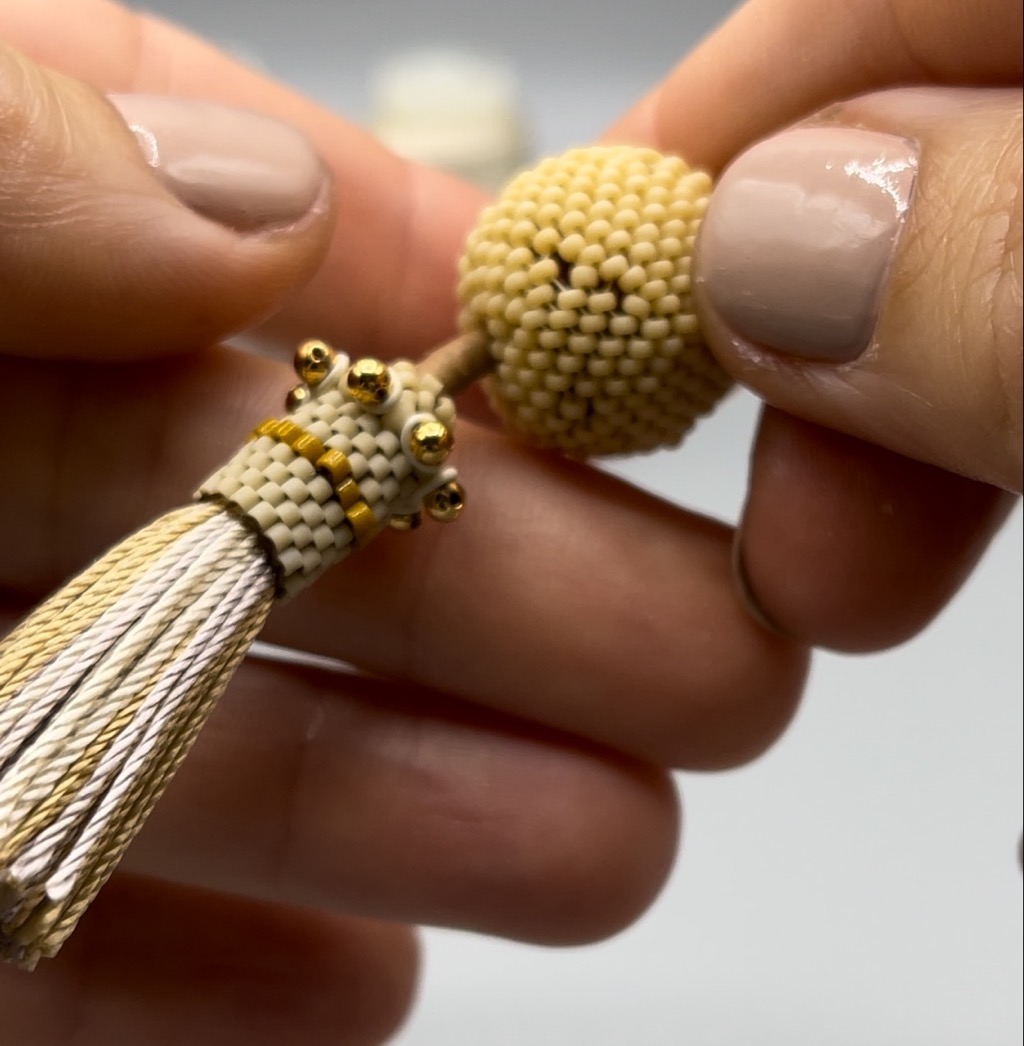
Then pick up one end of the leather cord (which is attached to the sandal leather strap), slide on it the beaded bead, next add some glue on the top of the tassel and on the end of the leather cord and glue them together. I would suggest sewing them together too. And using the peyote tubular stitch, bead around the top of the tassel and the leather cord.
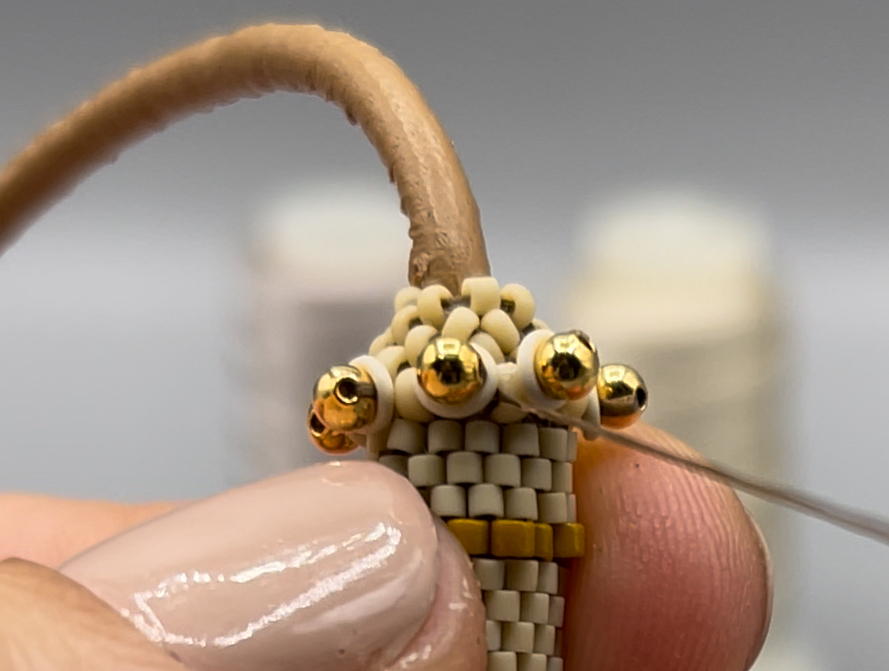
If you wish you can embellish the tassel with beads (for embellishments I used the Oh! 3mm Ring, rubber, white with 2mm hole and 2.5mm gold plated brass round beads). And repeat to the other side.
By Following these steps, you can transform your old sandals into stunning pieces that showcase your style and creativity. Embrace upcycling to add uniqueness and sustainability to your fashion accessories!
1. Remove Embellishments: Start by removing all embellishments from your shoes, leaving only clean leather as the base for your beading project.
2. Make a beading base for your beads: Pick up the 2.5mm leather cord and glue it to the leather of the sandals. Use E6000 adhesive (allow time to dry) or use super glue.
Materials:
Nylon beading thread, brown color, size D
Cord, leather, and cotton (dyed), taupe, 2.5mm zigzag-stitched.
#15 Rocailles glass seed beads
3. Prepare the Thread: Cut a comfortable length of Nylon beading thread, ensuring it is manageable but long enough for your project.
4. Thread the Needle: Thread one end of the Nylon thread through a beading needle and tie a knot at the other end to secure the beads from slipping off.
5. Start Beading: Begin by passing the needle through the leather cord to anchor the thread. Add five or six #15 Rocailles glass seed beads onto the needle. Pass the needle back through the leather cord to secure the beads in place. Ensure to maintain even spacing and tension as you bead.
6. Finishing: Once you have embellished the leather cord to your desired length, secure the thread by weaving it back through previous beads. Tie off the thread securely and trim any excess.
7. Make a flat silk tassel:
Materials:
Nylon beading thread, brown color, size D.
Thread, Purely Silk™, gold, size F. Sold per 20-yard card, 2 cards.
Thread, Purely Silk™, light gray, size F. Sold per 20-yard card, 2 cards.
Scrap, leather (dyed), tan, 9-1/4 x 3-1/2 inches.
Lacy’s Stiff Stuff Beading Foundation
Cut a 70x25mm Lacy’s Stiff Stuff Beading Foundation or any other thin fabric. Fold it in half and draw the line 5,7mm from the bottom (this line will be the directional line, where you going to slide your needle through the fabric. Then cut the 70x80mm thick paper or cardboard, slide it inside the Lacy’s stiff beading foundation (till directional line).
Picture a and b: Wind thread around the board in loops going through the beading foundation with the needle, until you reach desired fullness (as you work, you can change thread colors if you wish – start with light gray color silk and on top put the gold color silk). In pictures I’m showing different colors from different projects.
Picture c: Cut through the looped ends.
Picture d: Put some glue on the top of the silk thread and on the beading foundation and fold the top of it the leather strip.
8. Make a beaded seed bead strip using flat peyote stitch:
Materials:
Delica glass seed beads #11
Opaque beige (DB2105), Opaque dark brown (DB2142), opaque toast (DB2110), opaque glazed luster linen (DB0261-1).
Make a beaded strip and attach it to the flat tassel’s leather: sew the needle through the leather, sew through the beadwork and weave the thread through the couple beads, sew back through the leather and repeat.
Finish the top beaded strip edge with #15 Rocailles: exiting one #11 Delica edge bead string five rocailles and sew the needle through the leather base and go up through the beaded strip beadwork. Weave the thread through the beads and exit next top edge Delica seed bead and repeat.
After you finish making the flat silk beaded tassel, put some glue on the sandal leather strip and attach the beadwork to the sandals. Make a total of four flat tassels (I used one bigger and one little bit smaller to each sandal).
9. Final Touches: Cut the sandal straps and attach to both leather ends (glue on it) the 26-inches (2.5mm diameter) leather cords.
Then make a simple silk around 1.5-inch (40mm) tassel or use pre-made ones. Make a beaded strip with #11 Delicas, wrap it around the tassel and finish it working around the top of it in circular peyote stitch.
Next if you wish you can add to the leather cords the beaded round beads. I used for this project 18mm round rubberized acrylic with a large hole and used #15 Rocaille beads.
Then pick up one end of the leather cord (which is attached to the sandal leather strap), slide on it the beaded bead, next add some glue on the top of the tassel and on the end of the leather cord and glue them together. I would suggest sewing them together too. And using the peyote tubular stitch, bead around the top of the tassel and the leather cord.
If you wish you can embellish the tassel with beads (for embellishments I used the Oh! 3mm Ring, rubber, white with 2mm hole and 2.5mm gold plated brass round beads). And repeat to the other side.
By Following these steps, you can transform your old sandals into stunning pieces that showcase your style and creativity. Embrace upcycling to add uniqueness and sustainability to your fashion accessories!
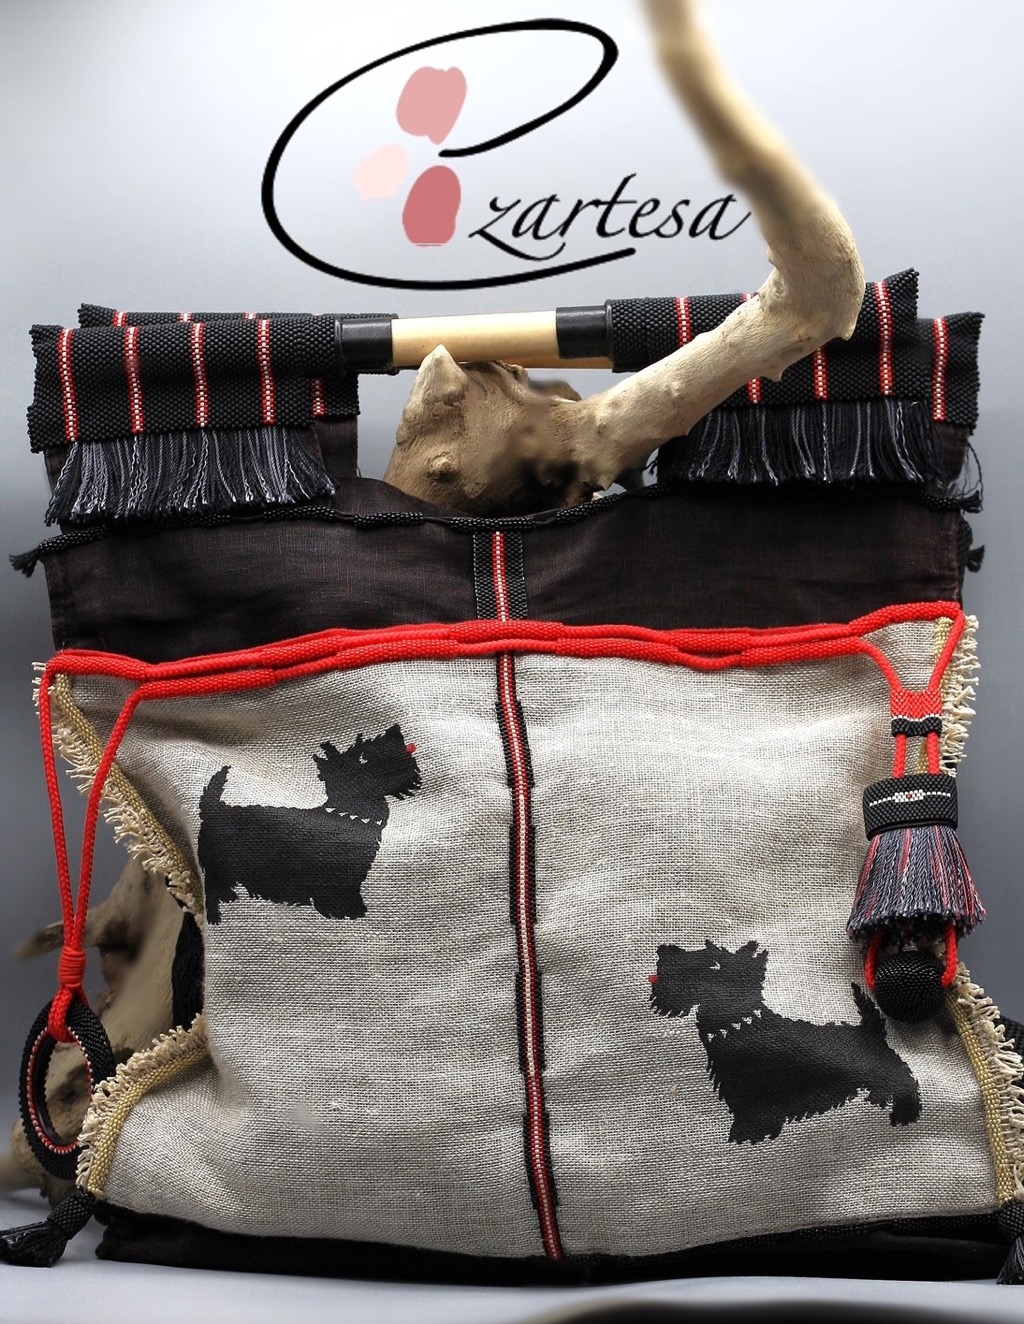
Reviving Fashion: Transforming an Old Bag with Glass Seed Beads
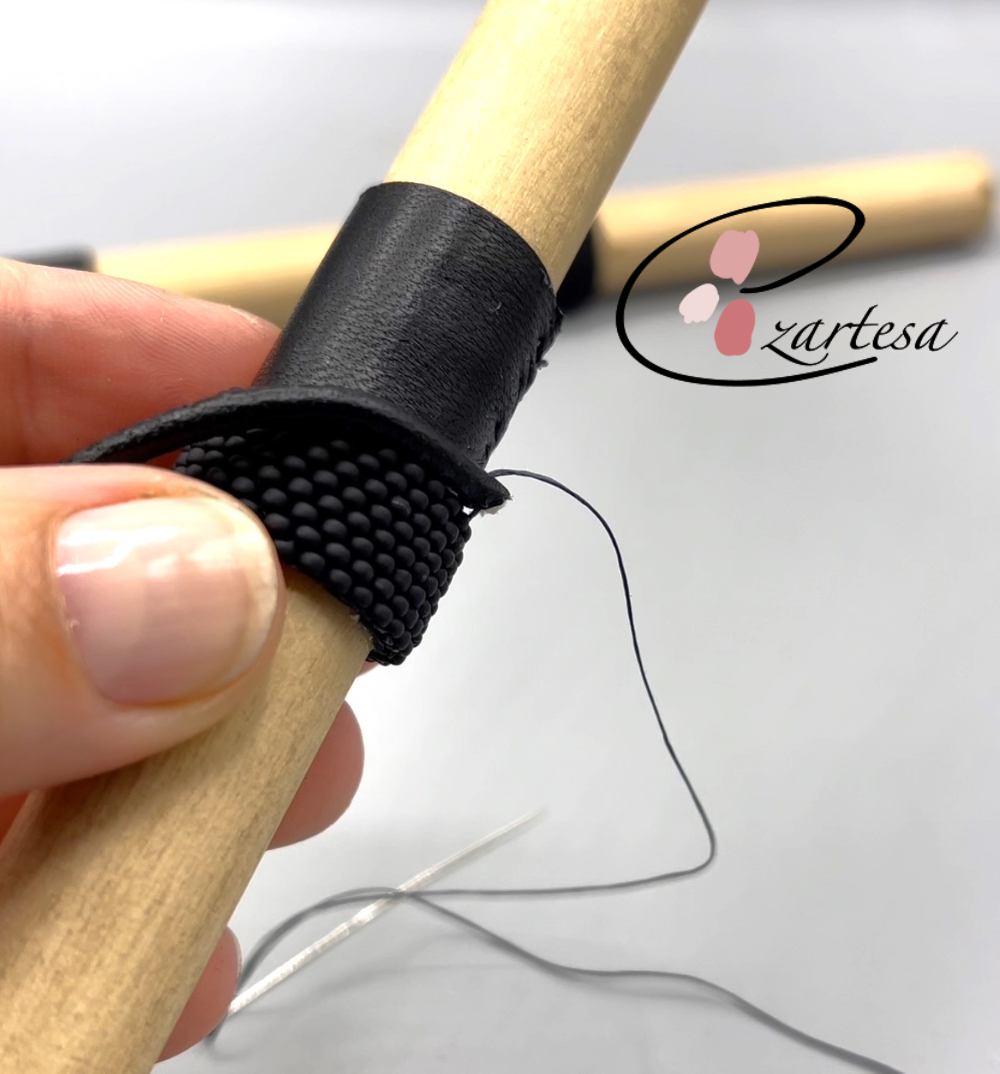
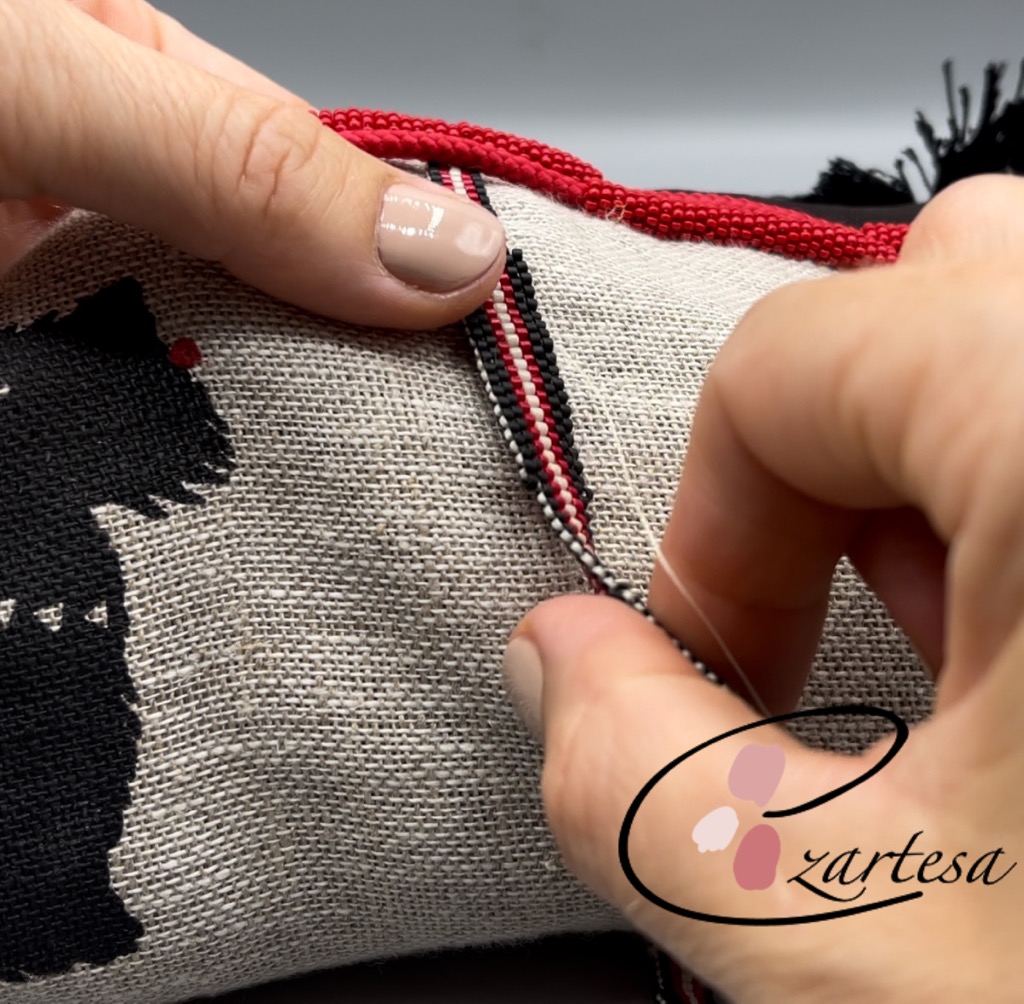
As a passionate crafter working with glass seed beads, I find immense joy in breathing new life into old items. Recently, I had the pleasure of remaking an old bag using tiny glass seed beads, leather, cotton cord, and silk thread, incorporating embroidery and embellishments to create a stunning transformation. Join me on this creative journey as I share the process of reviving fashion through the art of beadwork.
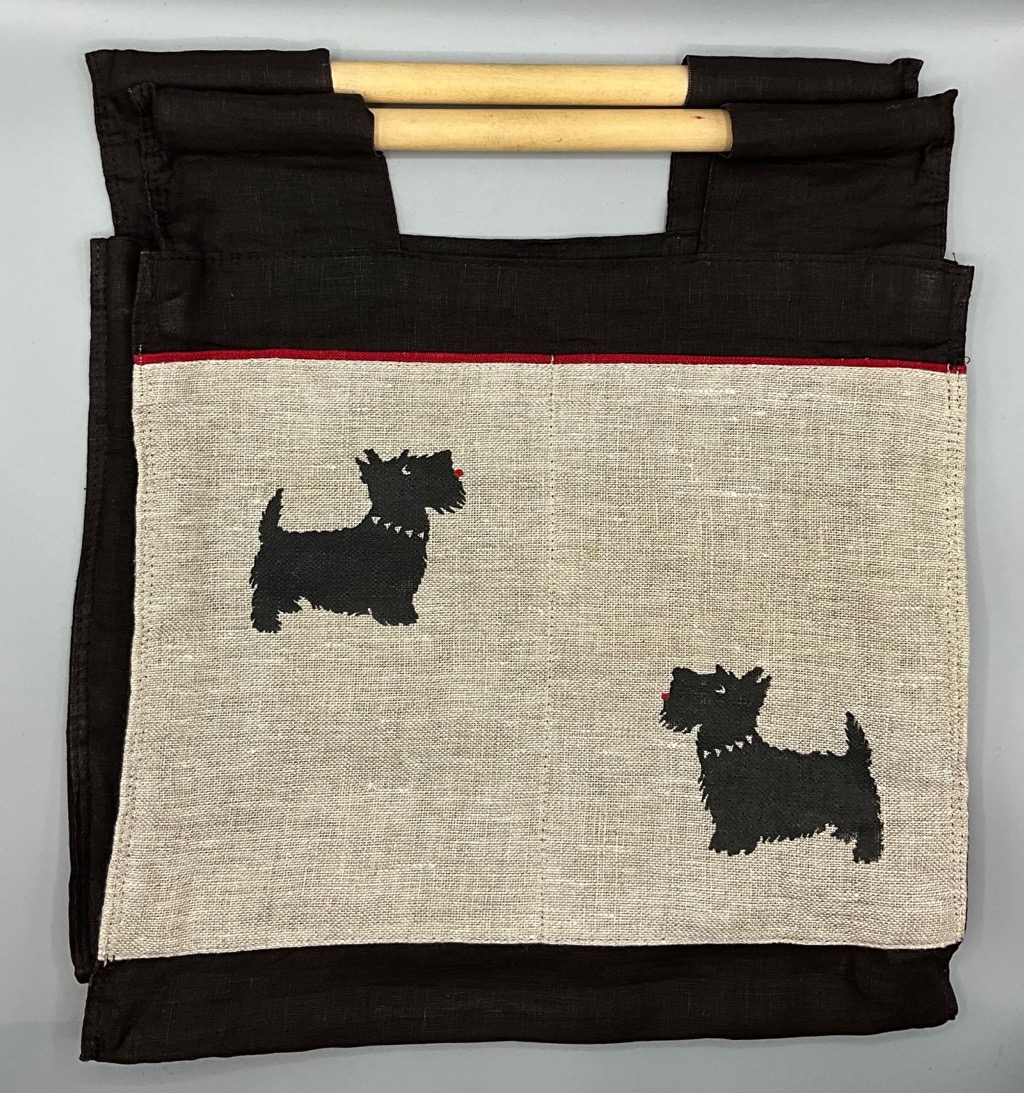
The old bag that served as the canvas for this project held sentimental value but had lost its luster over the years. To begin the transformation, I carefully assessed the bag's structure and material, envisioning how the addition of glass seed beads could elevate its aesthetic appeal.
Materials:
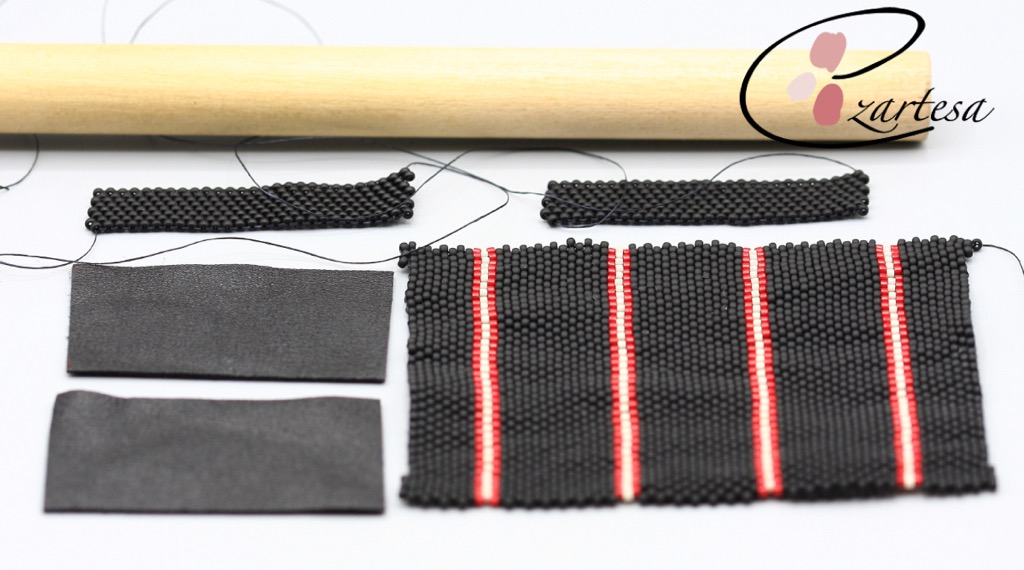

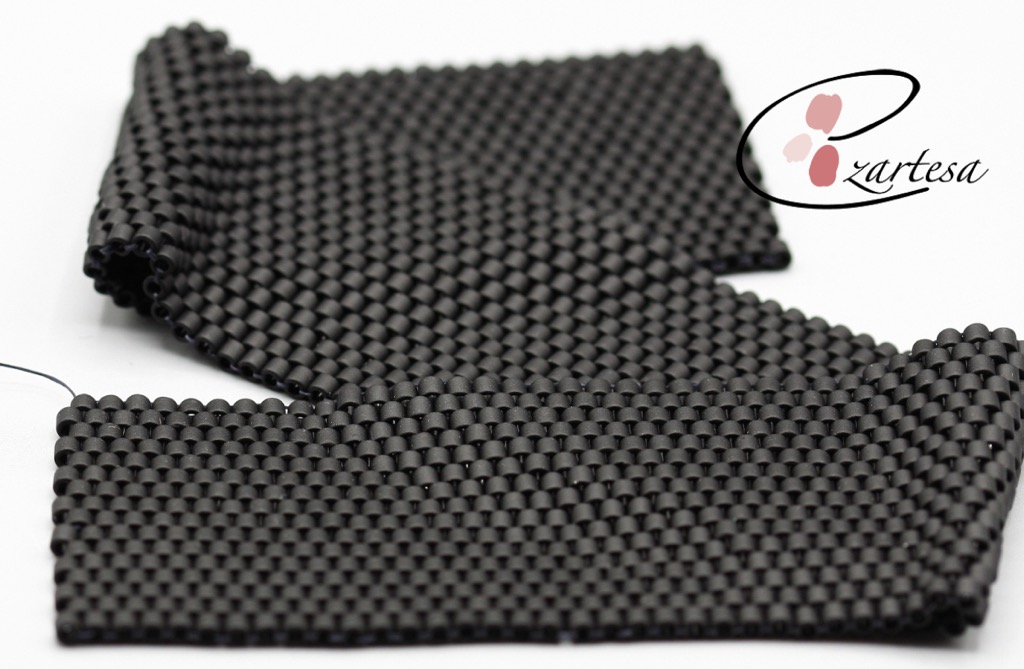
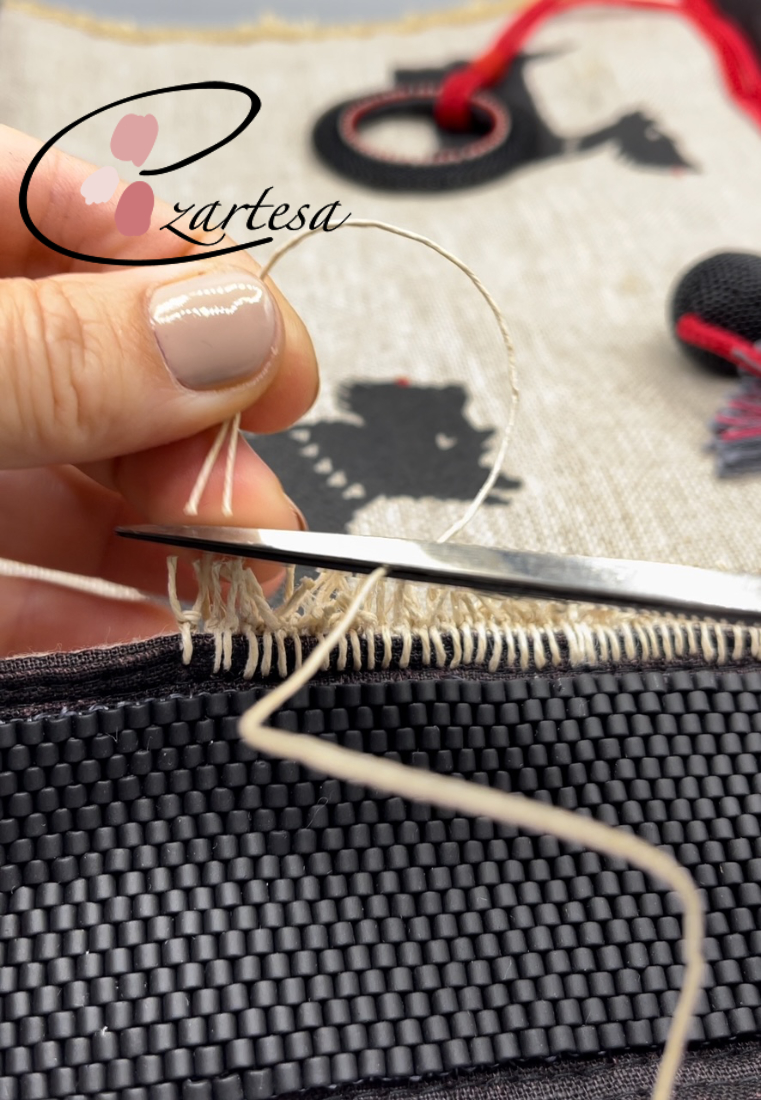
First, I meticulously selected a color palette of glass seed beads that would complement the bag's existing tones. The delicate nature of these beads allowed me to create intricate patterns and designs, adding a touch of elegance to the bag's surface. Using a fine needle and Nylon beading thread, I embarked on the meticulous task of hand-embroidering the glass seed beads onto the bag, layer by layer, to ensure a seamless and captivating finish.
Glass seed beads colors and sizes I used for this bag:
Delica glass seed beads #11
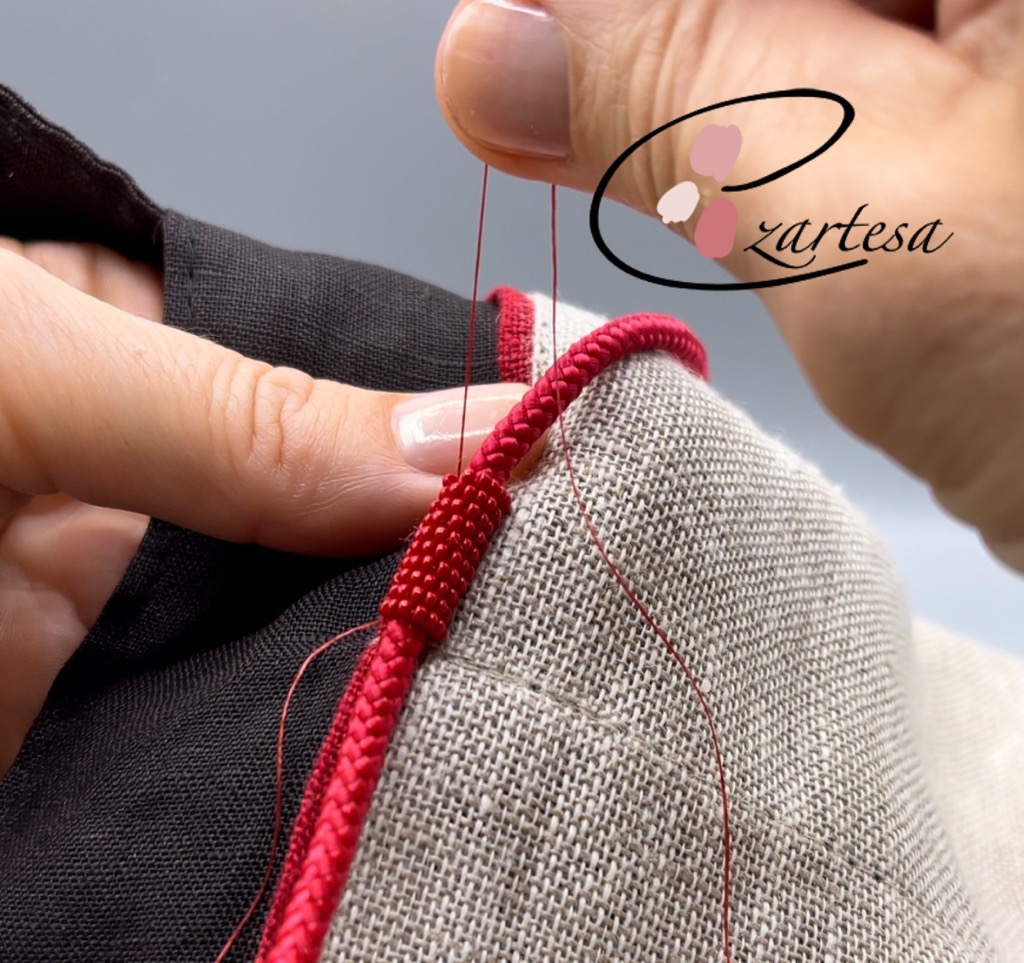

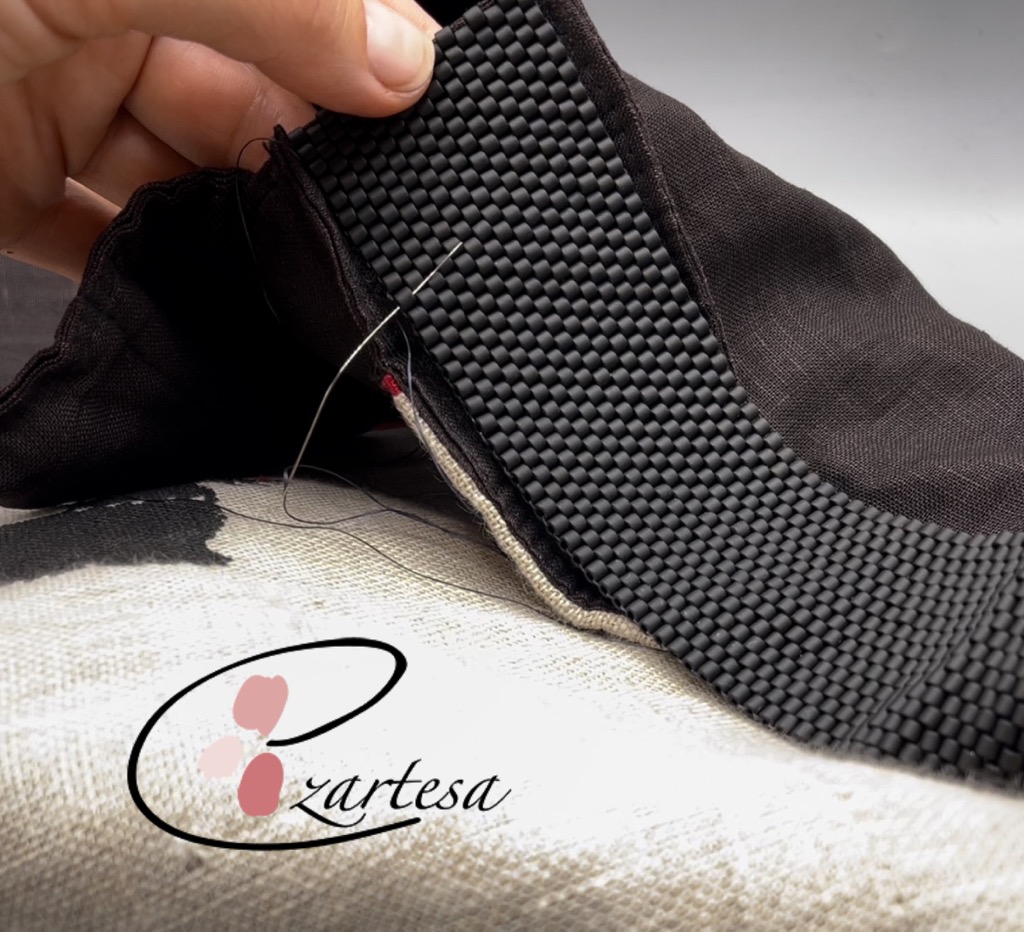
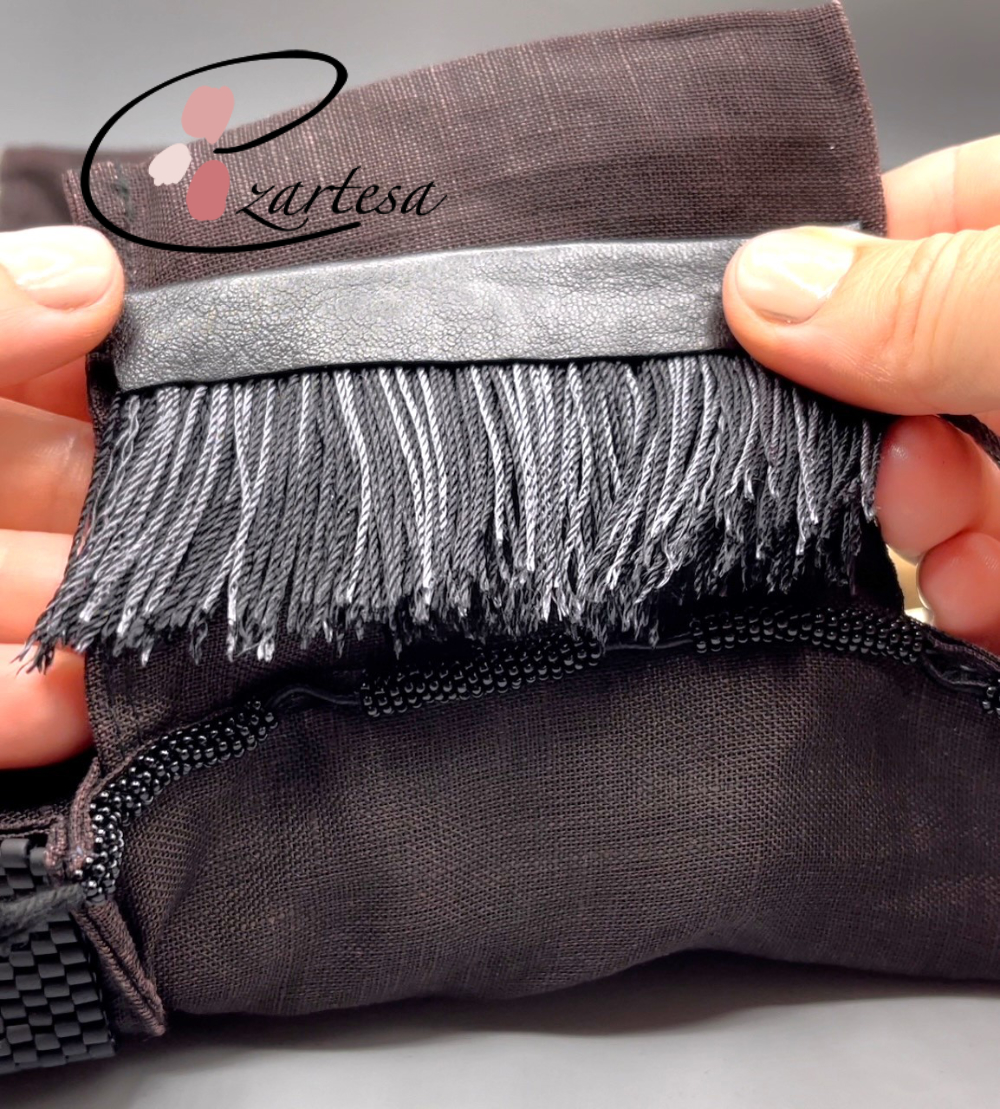
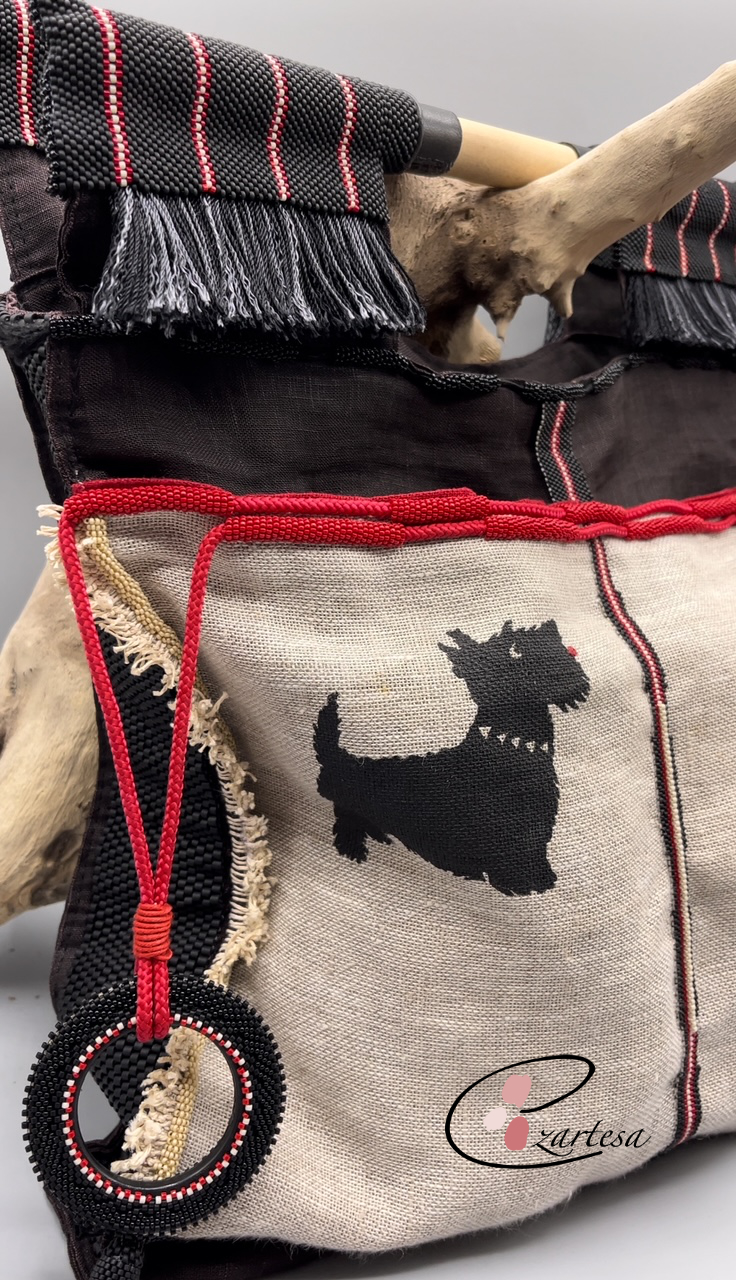
Incorporating leather and cotton cord, I introduced tactile elements that enhanced the bag's texture and durability. The black leather accents provided a striking contrast to the glass seed beads, while the cotton cord added a rustic charm, harmonizing with the overall design.
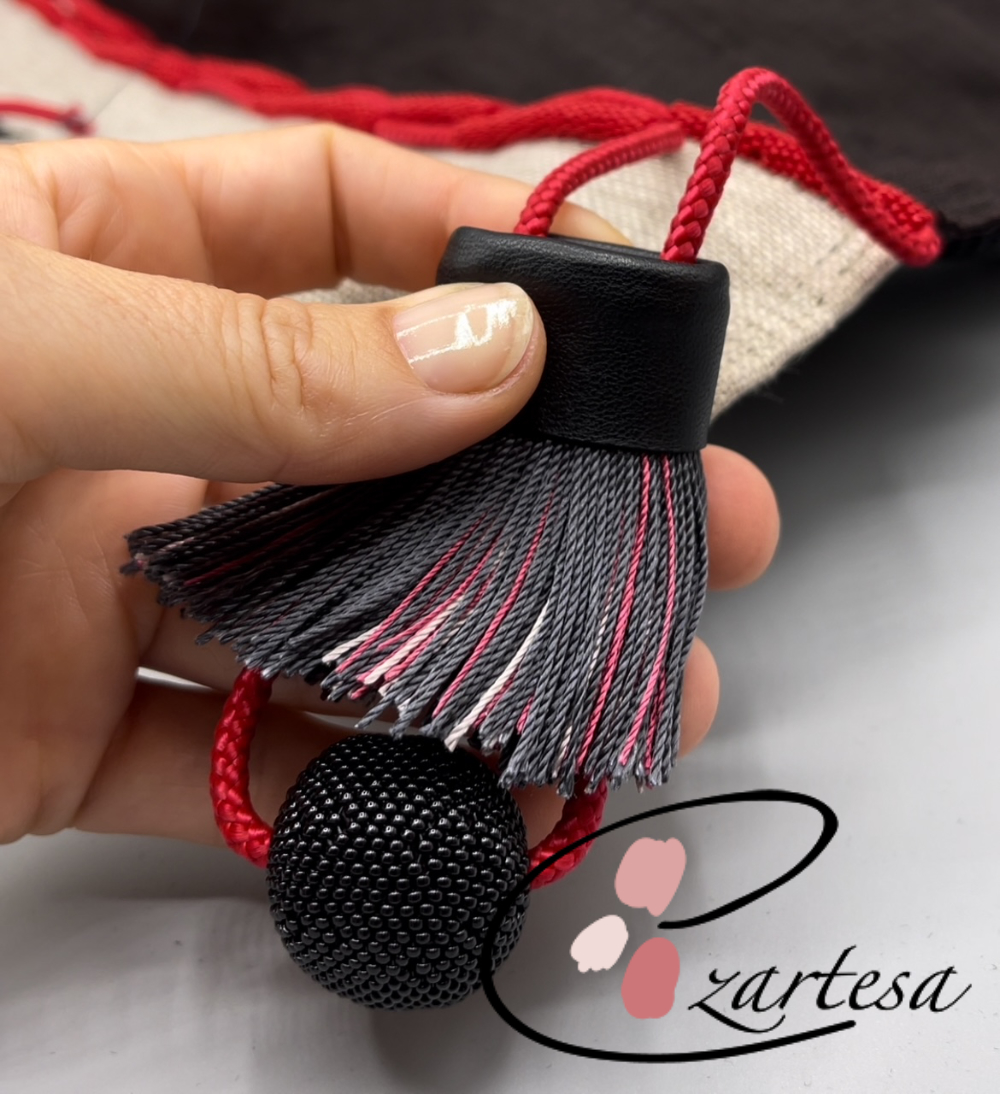
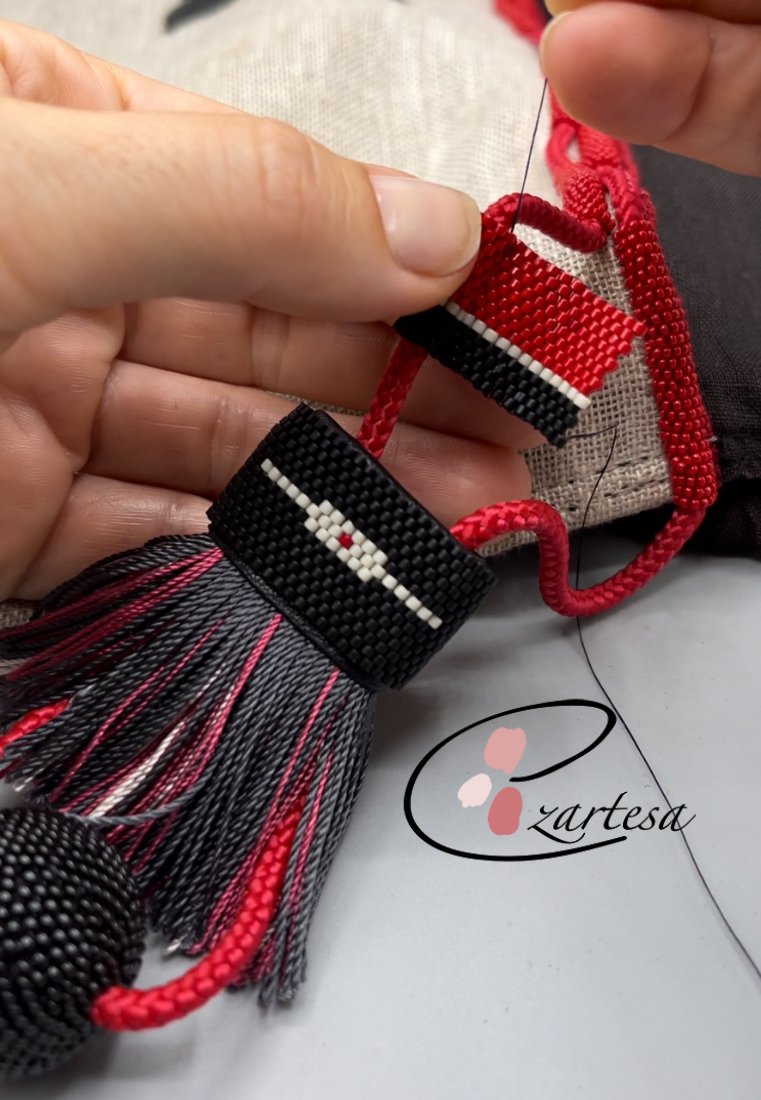
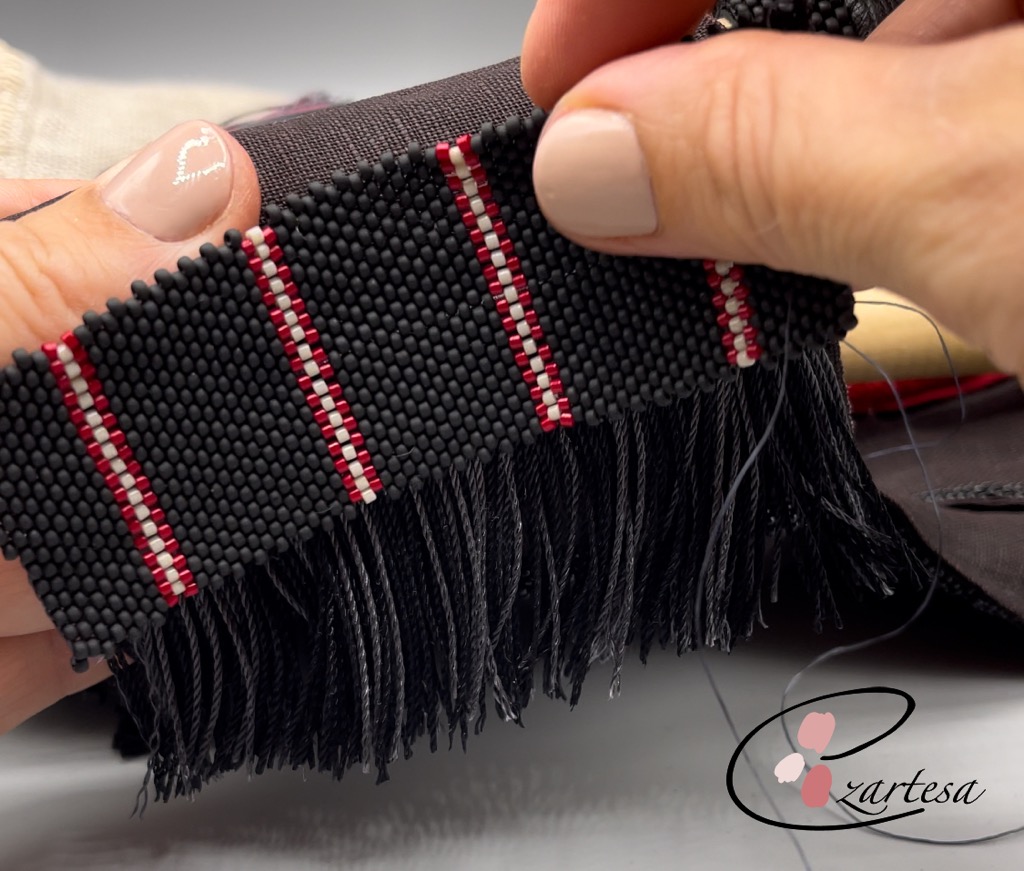
I created a handmade natural silk tassel, wrapped it with natural leather and embellished it with tiny glass seed beads. The beaded round dangle bead adds to a bag a fun feel.
Add additional large, beaded charms to your bag and make it more unique and interesting.
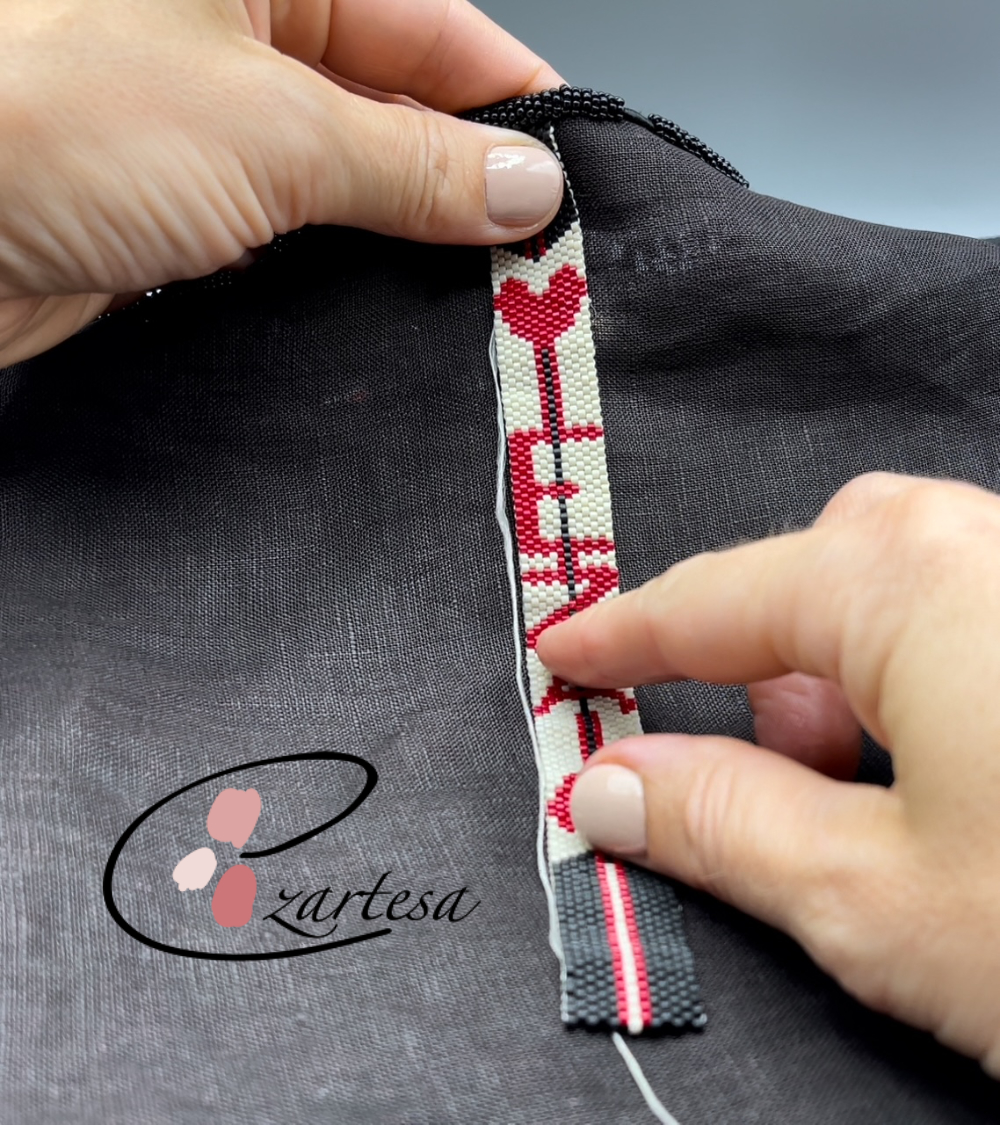
Hand beaded strip with letters or other motives from glass seed beads make your bag super personalized and cool.

As the final touches were added, the old bag underwent a remarkable metamorphosis. The once-faded accessory was now adorned with a symphony of glass seed beads, exuding a timeless allure that captured the essence of traditional craftsmanship and contemporary elegance.
In conclusion, the process of remaking the old bag with glass seed beads, leather, cotton cord, and silk thread was a testament to the transformative power of creativity. By infusing new life into forgotten pieces through meticulous craftsmanship, we not only honor their history but also celebrate their potential for reinvention. This project exemplifies the beauty of sustainable fashion and the artistry of beadwork, inspiring us to look at everyday items with fresh eyes and embrace the magic of reinvention.
May this journey serve as a reminder that within every worn-out treasure lies the opportunity for a dazzling revival, waiting to be unveiled through the artful mastery of glass seed beads and creative ingenuity.
Free Beading Tutorials with Instructions for Beginners | Ezartesa
This is a super easy beading tutorial with basic stitches and is suitable for beginners.
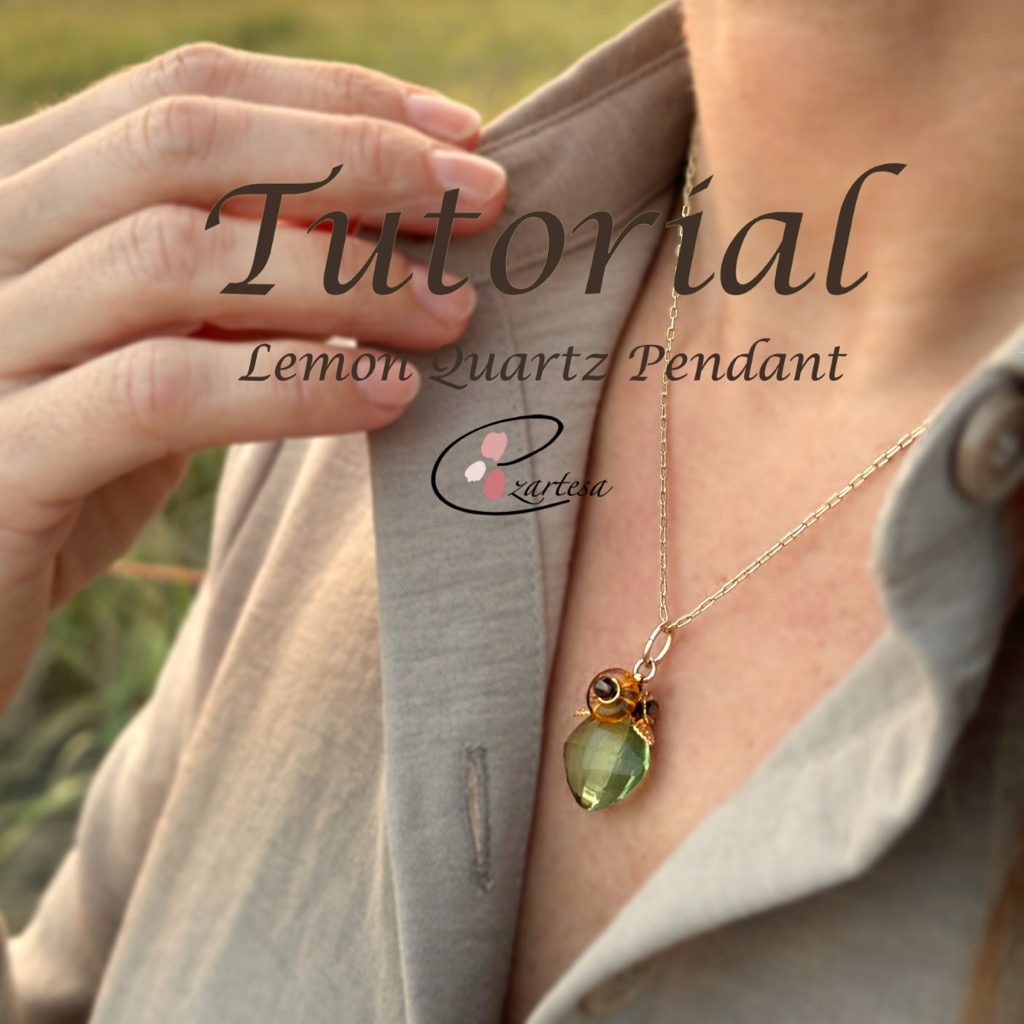
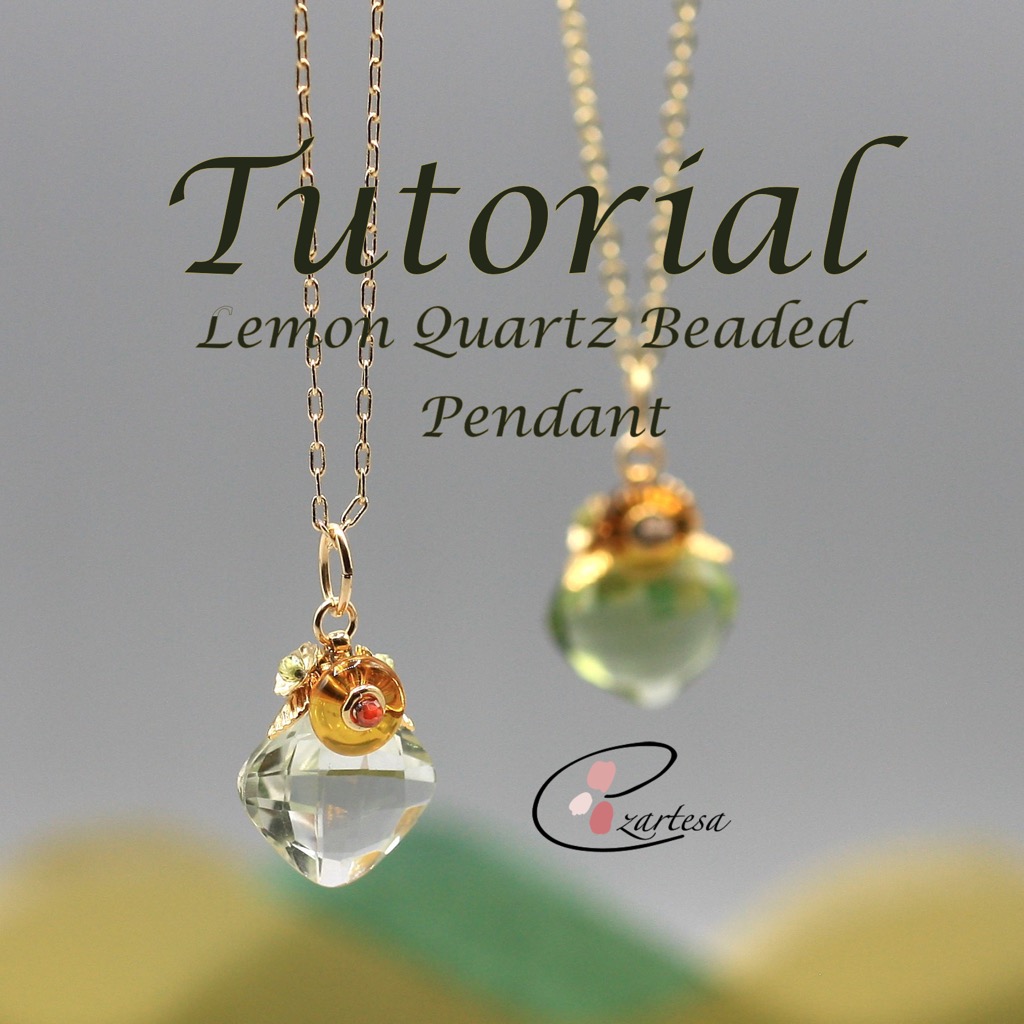
Lemon Quartz Beaded Pendant
Materials for a pendant.
This is a step-by-step beading and jewelry making tutorial for beginners that will teach you how to make a very simple but super cute pendant.
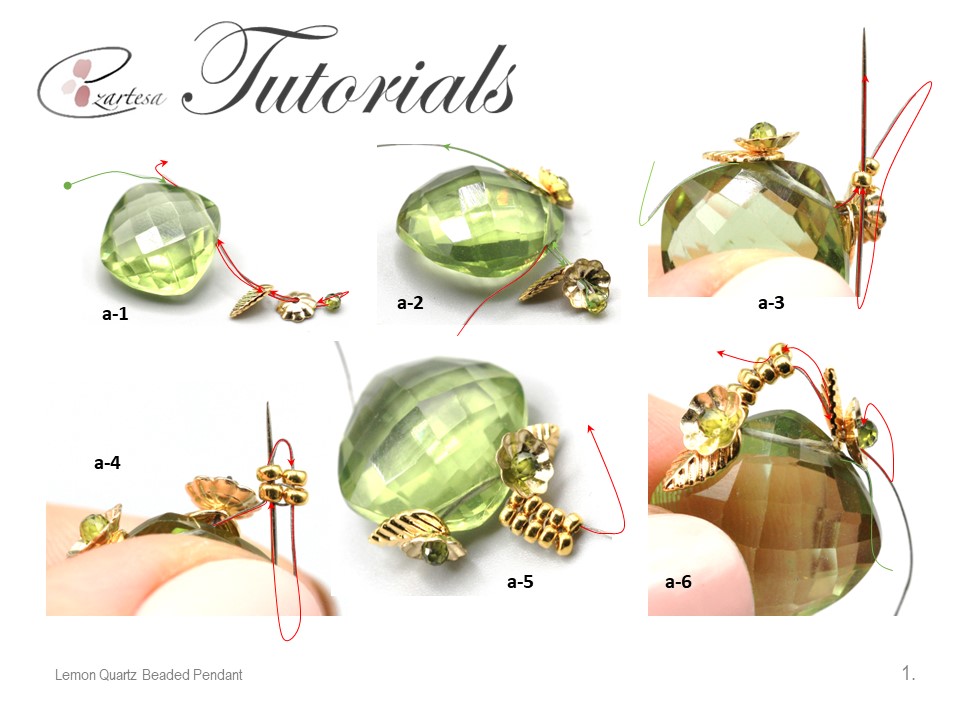
Beaded Lemon Quartz Bead
Step 1: On 1.5yd. of fireline and leaving a 12” tale, string 17x17mm puffed diamond lemon quartz bead, one 6.5x4mm leaf bead, one 5x1mm flower bead cap, one 2mm avocado Zircon bead (photo a-1) and sew the needle back through the 5x1mm flower bead, leaf bead and exit through the other end of the quartz bead (photo a-1).
Step 2: Then secure the other end (tale) of the thread and string one 6.5x4mm leaf bead, one 5x1mm flower bead cap, one 2mm avocado Zircon bead and sew the needle back through the 5x1mm flower bead, 6.5x4mm leaf bead and exit through the other end of the quartz bead (photo a-2).
Step 3: Next secure the other end of the thread, string two 15o As and sew the needle up through the first bead added to this step (photo a-3). Position the beads the closest you can near the quartz bead on the right side. Then use the square stitch:
Step 5: Then pick up the other end of the thread and sew the needle up through the two 15oAs (at the left) of the beaded strip (photo a-8).
Step 6: Secure the other end of the thread, string one 15o A, skip one bead and sew the needle through the next two 15oAs (photo a-9). Then sew the needle up through the leaf bead, flower bead, 2mm zircon (photo a-10), then sew back through the leaf bead, flower and exit through the opposite 15o A bead. Then secure the other end of the thread, string one 15o A, skip one bead and sew the needle through the next two 15oAs (photo a-11).
Step 7: Next exiting 15o A bead string one 15o A bead and sew the needle to the left through the 15o A bead you added at the step 6, then string 15o A bead and sew the needle to the right through the last 15o A (photo a-12).
Step 8: Secure the other end of the thread and repeat step 7 at the opposite side (photo a-13).
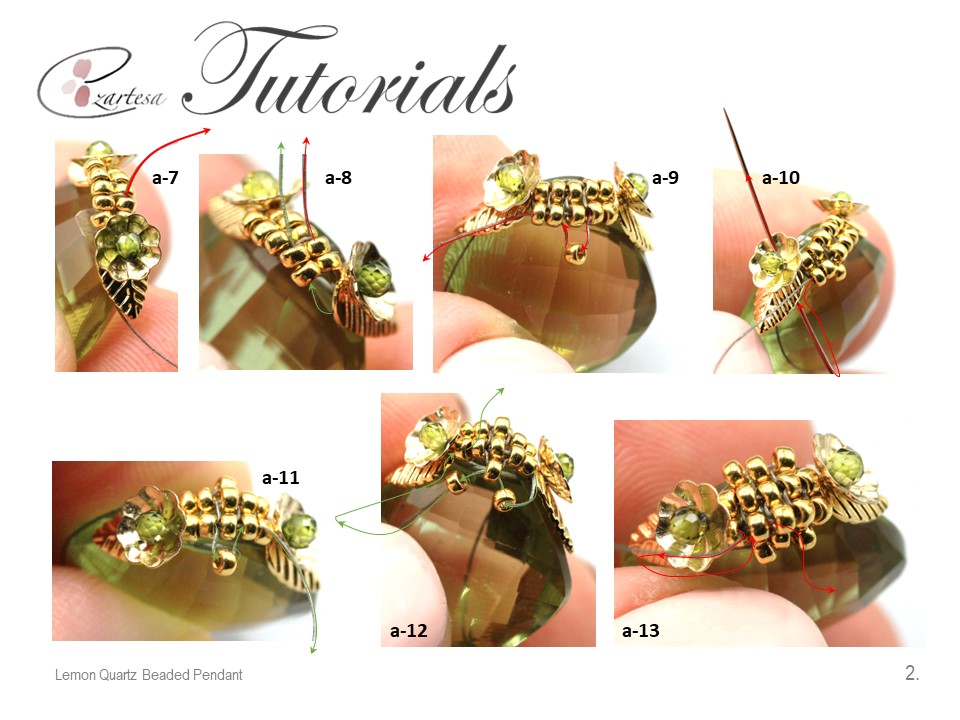
Step 9: Next exiting 15o A bead sew the needle up through the next 15o A bead (photo a-13) then string one 2x1.5mm micro round bead, skip the middle bead and sew the needle diagonally through the other rows 15o A bead (photo a-14). Then sew the needle to the left through the opposite 15o A bead, go diagonally through the 2x1.5mm micro bead (photo a-15) and exit through the 15o A bead (opposite 15o A bead you started) (photo a-15).
Step 10: Next sew the needle down to the left through the opposite 15o A, then string one 8x2.5mm glass honey ring, one soldered 4mm jump-ring, one 3mm smoky quartz bead and sew the needle back through the jump-ring, glass ring and exit through the opposite 15o A bead (photo a-16). Secure the thread tale in the beadwork and trim.
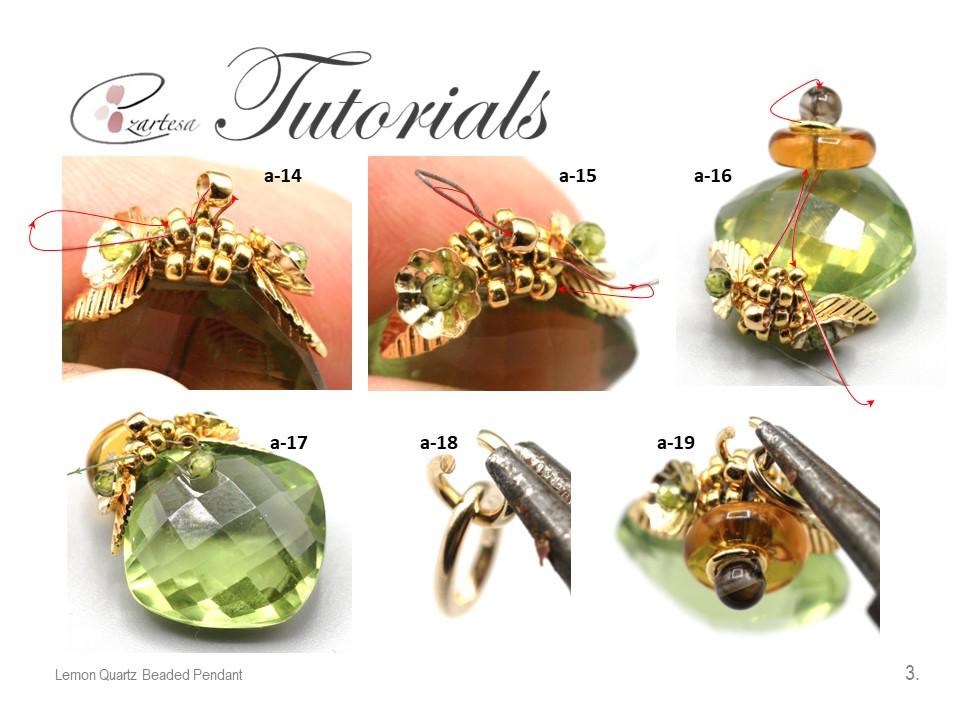
Step 11: Next secure the other end of the thread, exit one lower 15o A bead, string one 2mm avocado Zircon bead and exit through the next 15o A bead (photo a-17). Secure the thread tale in the beadwork with a few half-hitch knots and trim.
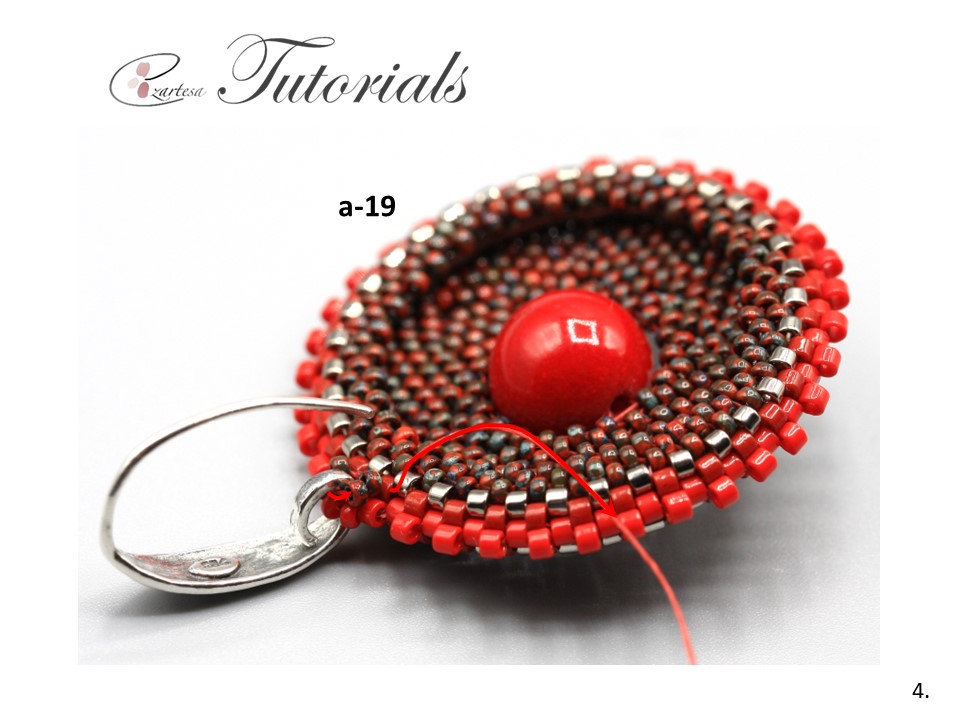
Step 12: Next pick up the 4mm jump-ring, open it, slide on it the 7.5x5mm oval jump-ring (photo a-18). Then slide the 4mm jump-ring through the micro bead and close the 4mm jump-ring (photo a-19,20).
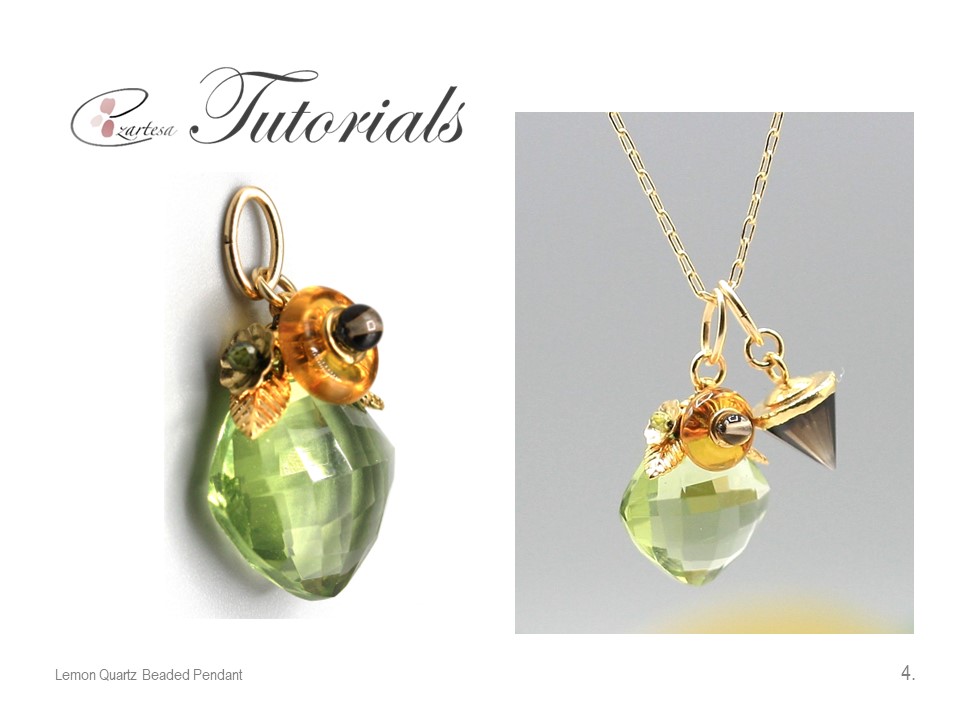
Suggestion: Instead of the 3mm Smoky Quartz bead you can add any other gemstone bead like amethyst or cranberry color 3mm zircon bead. Play with the pendant and add to the golden chain other pendants like the smoky quartz, gold-finished sterling silver, 9x8mm-11x8mm hand-cut faceted cone drop.
You can purchase and download this tutorial at my Etsy shop https://ezartesajewelry.etsy.com
Don’t forget to search in my shop for more advanced beading patterns.
Lemon Quartz Beaded Pendant
Materials for a pendant.
- Nylon beading thread, green color (conditioned with beeswax) or Fireline 6lb.test
- Beading needles #12.
- Scissors.
- Pliers.
- Jump-ring tool.
- Bead, lemon quartz (heated), 17x17mm hand-cut top-drilled faceted puffed diamond, B grade, 1 bead.
- Bead, smoky quartz (heated / irradiated), light to medium, 3mm round, B grade, 1 bead.
- Bead, Czech pressed glass, honey, 8x2.5mm ring, 1bead.
- Bead, Zircon, avocado, 2mm faceted round, 3 beads.
- Bead cap, 14Kt gold-filled, 5x1mm flower, 2 beads
- Charm gold-plated brass, 6.5x4mm leaf, 2 beads.
- Jump ring, gold-plated brass, 4mm soldered round, 2.4mm inside diameter, 20 gauge, 1 bead.
- Jump ring, 14Kt gold-filled, 4mm round, 2.4mm inside diameter, 20 gauge, 1 bead.
- Jumpring – 14Kt golf-filled, open, 7.5x5mm oval, 6x3.3mm inside diameter, 18 gauge, 1 ring.
- Chain, gold-finished brass, 2mm cable.
- Bead, gold-plated brass, 2x1.5mm micro round, 2 beads.
- Rocailles Seed Beads
This is a step-by-step beading and jewelry making tutorial for beginners that will teach you how to make a very simple but super cute pendant.
Beaded Lemon Quartz Bead
Step 1: On 1.5yd. of fireline and leaving a 12” tale, string 17x17mm puffed diamond lemon quartz bead, one 6.5x4mm leaf bead, one 5x1mm flower bead cap, one 2mm avocado Zircon bead (photo a-1) and sew the needle back through the 5x1mm flower bead, leaf bead and exit through the other end of the quartz bead (photo a-1).
Step 2: Then secure the other end (tale) of the thread and string one 6.5x4mm leaf bead, one 5x1mm flower bead cap, one 2mm avocado Zircon bead and sew the needle back through the 5x1mm flower bead, 6.5x4mm leaf bead and exit through the other end of the quartz bead (photo a-2).
Step 3: Next secure the other end of the thread, string two 15o As and sew the needle up through the first bead added to this step (photo a-3). Position the beads the closest you can near the quartz bead on the right side. Then use the square stitch:
- Be sure the working thread is emerging from the top of the first bead and pick up two 15o A beads.
- Pass down through the next bead to the right on the row below and up through the following two beads (photo a-4). Add a total of five rows of 15o A beads (photo a-5).
Step 5: Then pick up the other end of the thread and sew the needle up through the two 15oAs (at the left) of the beaded strip (photo a-8).
Step 6: Secure the other end of the thread, string one 15o A, skip one bead and sew the needle through the next two 15oAs (photo a-9). Then sew the needle up through the leaf bead, flower bead, 2mm zircon (photo a-10), then sew back through the leaf bead, flower and exit through the opposite 15o A bead. Then secure the other end of the thread, string one 15o A, skip one bead and sew the needle through the next two 15oAs (photo a-11).
Step 7: Next exiting 15o A bead string one 15o A bead and sew the needle to the left through the 15o A bead you added at the step 6, then string 15o A bead and sew the needle to the right through the last 15o A (photo a-12).
Step 8: Secure the other end of the thread and repeat step 7 at the opposite side (photo a-13).
Step 9: Next exiting 15o A bead sew the needle up through the next 15o A bead (photo a-13) then string one 2x1.5mm micro round bead, skip the middle bead and sew the needle diagonally through the other rows 15o A bead (photo a-14). Then sew the needle to the left through the opposite 15o A bead, go diagonally through the 2x1.5mm micro bead (photo a-15) and exit through the 15o A bead (opposite 15o A bead you started) (photo a-15).
Step 10: Next sew the needle down to the left through the opposite 15o A, then string one 8x2.5mm glass honey ring, one soldered 4mm jump-ring, one 3mm smoky quartz bead and sew the needle back through the jump-ring, glass ring and exit through the opposite 15o A bead (photo a-16). Secure the thread tale in the beadwork and trim.
Step 11: Next secure the other end of the thread, exit one lower 15o A bead, string one 2mm avocado Zircon bead and exit through the next 15o A bead (photo a-17). Secure the thread tale in the beadwork with a few half-hitch knots and trim.
Step 12: Next pick up the 4mm jump-ring, open it, slide on it the 7.5x5mm oval jump-ring (photo a-18). Then slide the 4mm jump-ring through the micro bead and close the 4mm jump-ring (photo a-19,20).
Suggestion: Instead of the 3mm Smoky Quartz bead you can add any other gemstone bead like amethyst or cranberry color 3mm zircon bead. Play with the pendant and add to the golden chain other pendants like the smoky quartz, gold-finished sterling silver, 9x8mm-11x8mm hand-cut faceted cone drop.
You can purchase and download this tutorial at my Etsy shop https://ezartesajewelry.etsy.com
Don’t forget to search in my shop for more advanced beading patterns.
What Can You Do With Glass Seed Beads Other Than Jewelry?
I like using colorful glass seed beads to create elaborate jewelry pieces like necklaces, earrings, and bracelets. But there are many other ways you can use those tiny and super beautiful glass seed beads.
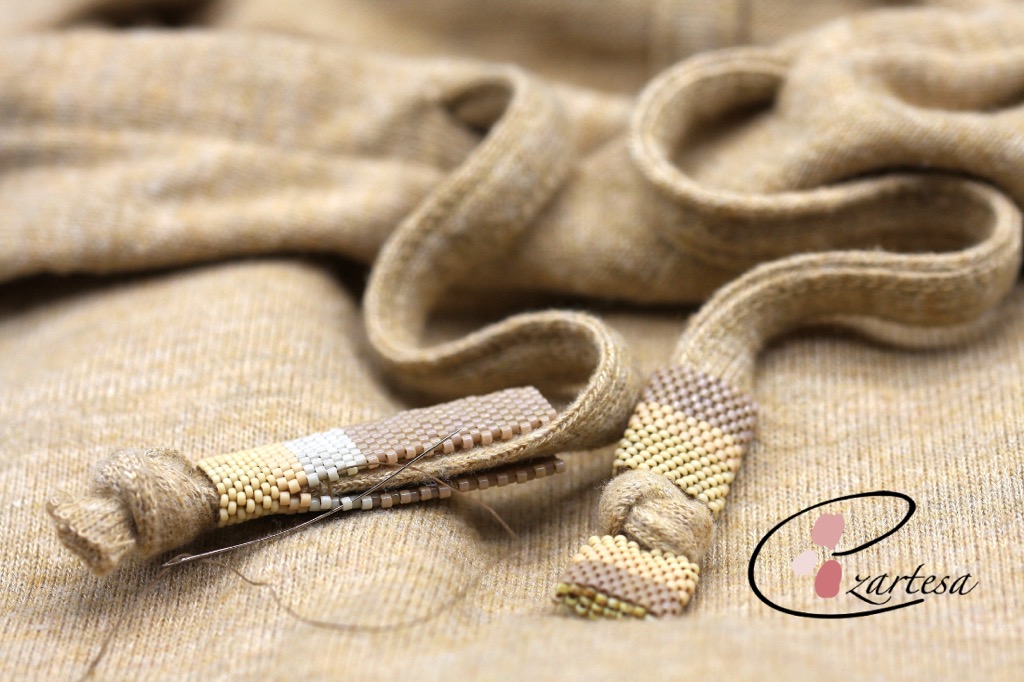
Today I’m embellishing my old hoodie drawstrings with sand, beige and linen glazed opaque and matte glass seed beads. I’m using neutral color palette just because I wanted to add to my hoodie a little bit of texture.
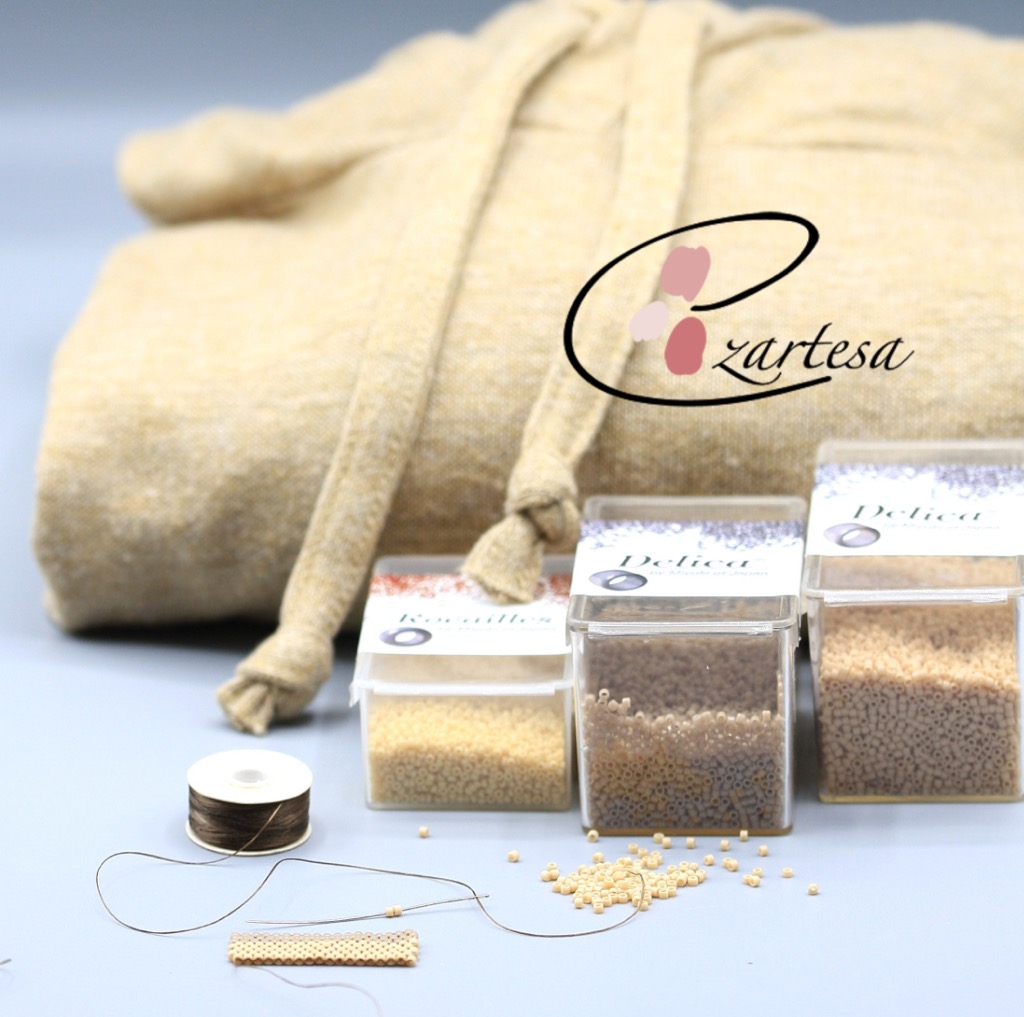
The Materials:
approx. 1g size 11o B – Opaque beige (DB2105).
approx. 1g size 11o C – Linen glazed (DB0261).
approx. 0,5g size 15o E – Mate pear (RR4512).
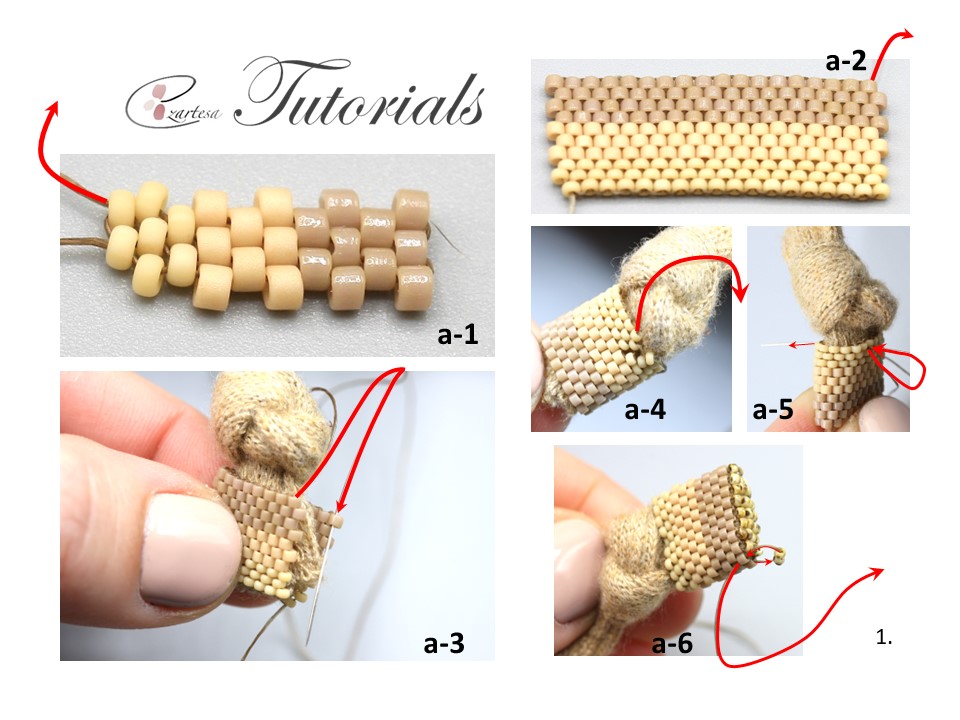
Step 1. Make a peyote strip (flat peyote stitch) that is the 10 beads wide and 36 rows long (photo a-1,2). Start by stringing three 15o Es, three 11o As, four 11o Bs.
Step 2. After you finished the strip, wrap it around the one end of the drawstring. Next Zipp-up the jagged edges of the strip (photo a-3,4). Then sew with the needle through the beadwork and the drawstring (repeat couple times) (photo a-5).
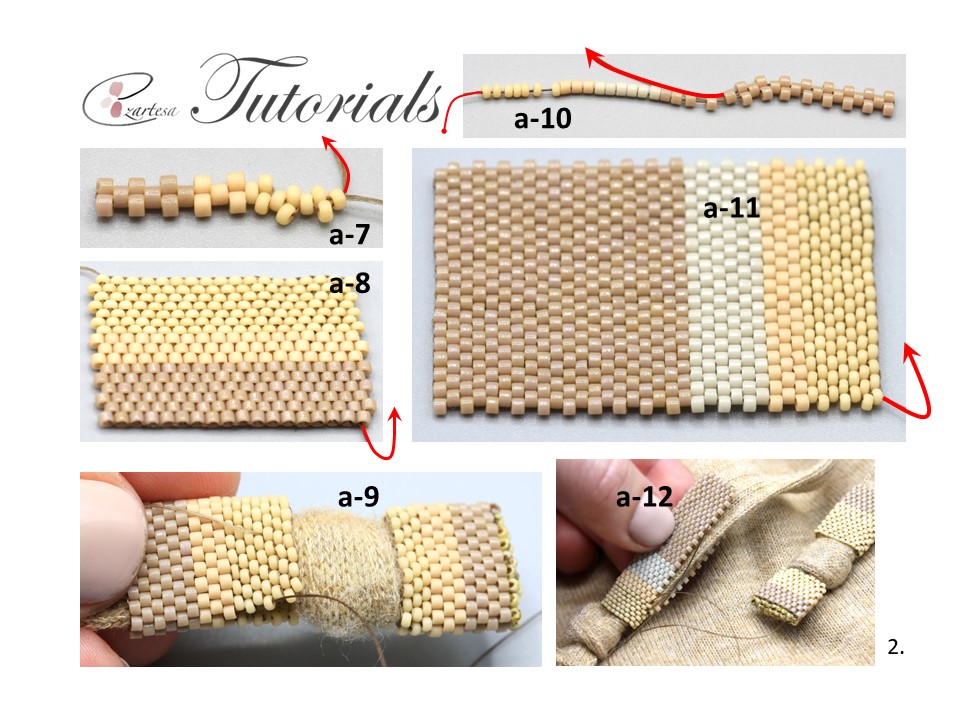
Step 3. Next weave the working thread through the beadwork and exit one edge 11oB bead, pick up the two 15o Ds, and sew down through the opposite 11oB bead of the front side beadwork. Come back through the next 11oB bead and repeat using four 15o Ds per stitch, work till the end and finish with two 15o Ds (photo a-6). Secure the thread tales in the beadwork with a few half hitch knots and trim.
Step 4. Make a peyote strip (flat peyote stitch) that is the 16 beads wide and 36 rows long (photo a-7,8). Start by stringing seven 15o Es, three 11o As, six 11o Bs.
Step 5. After you finished the strip, wrap it around the drawstring you are already working on. Zipp-up the jagged edges of the strip (photo a-9). Then sew with the needle through the beadwork and the drawstring (repeat couple times).
Step 6. Make a peyote strip (flat peyote stitch) that is the 36 beads wide and 36 rows long (photo a-10,11). Start by stringing seven 15o Es, three 11o As, six 11o Cs, twenty 11o Bs.
Step 5. After you finished the strip, wrap it around the second drawstring. Zipp-up the jagged edges of the strip (photo a-12). Then sew with the needle through the beadwork and the drawstring (repeat couple times). Secure the thread tales in the beadwork with a few half-hitch knots and trim.
This is a supper simple idea what you can do with glass seed beads other than jewelry.
Discover the art of beading with my beading tutorials!Learn the basics and create beautiful peaces.
Today I’m embellishing my old hoodie drawstrings with sand, beige and linen glazed opaque and matte glass seed beads. I’m using neutral color palette just because I wanted to add to my hoodie a little bit of texture.
The Materials:
- Nylon beading thread color brown (conditioned with beeswax).
- Beading needles #12.
- Scissors.
- Japanese Cylinder, Delica Seed Beads
approx. 1g size 11o B – Opaque beige (DB2105).
approx. 1g size 11o C – Linen glazed (DB0261).
- Rocailles Seed Beads
approx. 0,5g size 15o E – Mate pear (RR4512).
Step 1. Make a peyote strip (flat peyote stitch) that is the 10 beads wide and 36 rows long (photo a-1,2). Start by stringing three 15o Es, three 11o As, four 11o Bs.
Step 2. After you finished the strip, wrap it around the one end of the drawstring. Next Zipp-up the jagged edges of the strip (photo a-3,4). Then sew with the needle through the beadwork and the drawstring (repeat couple times) (photo a-5).
Step 3. Next weave the working thread through the beadwork and exit one edge 11oB bead, pick up the two 15o Ds, and sew down through the opposite 11oB bead of the front side beadwork. Come back through the next 11oB bead and repeat using four 15o Ds per stitch, work till the end and finish with two 15o Ds (photo a-6). Secure the thread tales in the beadwork with a few half hitch knots and trim.
Step 4. Make a peyote strip (flat peyote stitch) that is the 16 beads wide and 36 rows long (photo a-7,8). Start by stringing seven 15o Es, three 11o As, six 11o Bs.
Step 5. After you finished the strip, wrap it around the drawstring you are already working on. Zipp-up the jagged edges of the strip (photo a-9). Then sew with the needle through the beadwork and the drawstring (repeat couple times).
Step 6. Make a peyote strip (flat peyote stitch) that is the 36 beads wide and 36 rows long (photo a-10,11). Start by stringing seven 15o Es, three 11o As, six 11o Cs, twenty 11o Bs.
Step 5. After you finished the strip, wrap it around the second drawstring. Zipp-up the jagged edges of the strip (photo a-12). Then sew with the needle through the beadwork and the drawstring (repeat couple times). Secure the thread tales in the beadwork with a few half-hitch knots and trim.
This is a supper simple idea what you can do with glass seed beads other than jewelry.
Discover the art of beading with my beading tutorials!Learn the basics and create beautiful peaces.
Learn to Bead with my Step-By-Step Free Beading Tutorial.
March/14/2023 09:05 AM Filed in: Seed Bead Tutorials | Jewelry Patterns | Beading Tutorials | How To | DIY
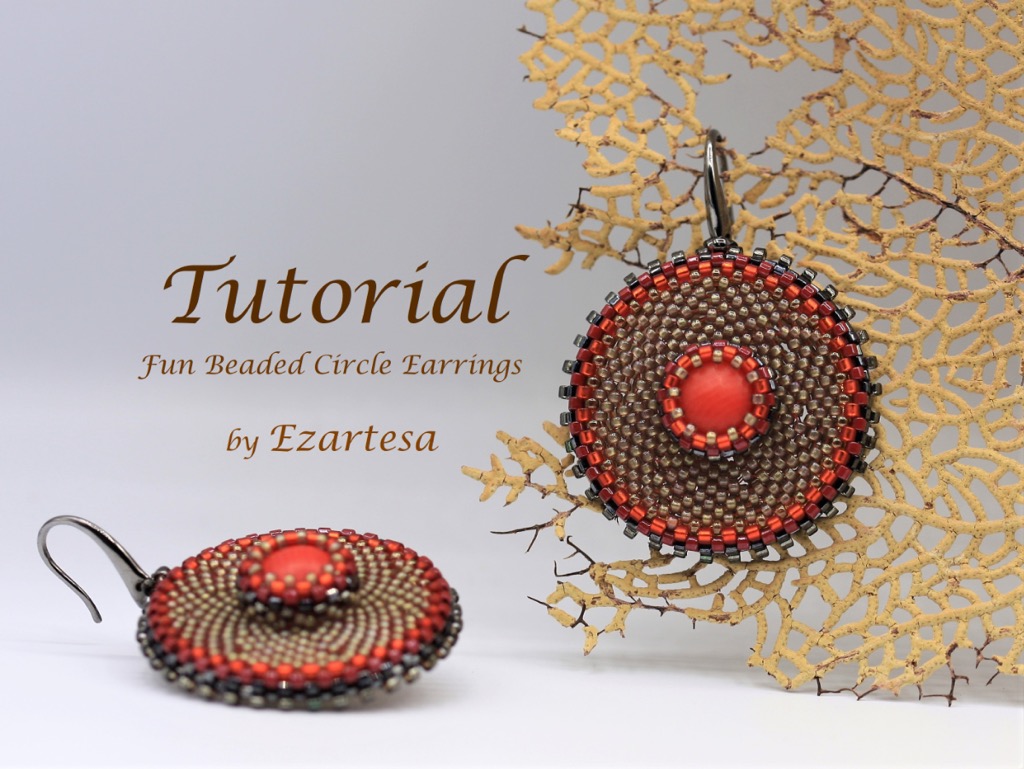
Get started on your beading journey with my step-by-step tutorial. Create stunning jewelry in no time!
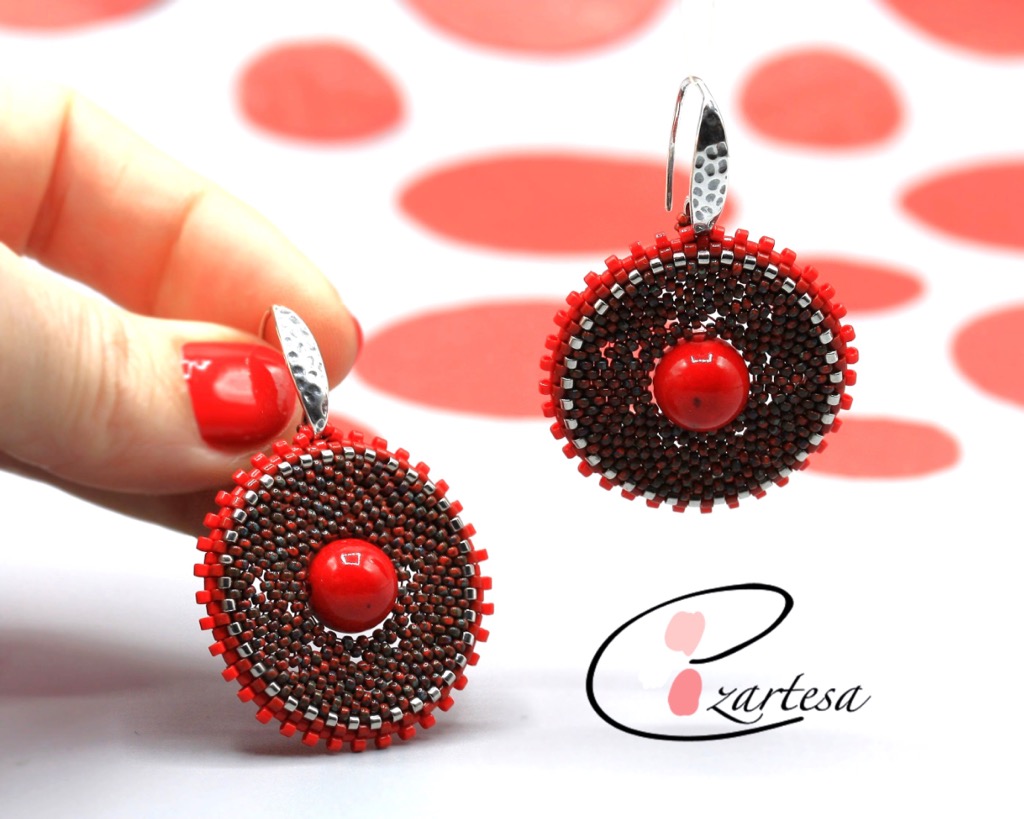
Materials For a Pair of Beaded Circle Earrings.
- Nylon beading thread color red (conditioned with beeswax).
- Beading needles #12.
- Scissors.
- 30mm Gold-Plated, Cooper-Plated or Steel, Double-Sided Hammered Open Round, 2 rings.
- 10mm round, red coral bead or any other material bead, 2 beads.
- Japanese Cylinder, Delica Seed Beads
approx. 0,5g size 11o B – Opaque brick red (DB0654).
approx. 0,5g size 11o C – Opaque vermillion red (DB0727).
- Rocailles Seed Beads
approx. 1g size 15o E – Opaque red (RR408).
- Ear-wire, sterling silver 18mm fishhook with open loop.
Step-by-step instruction
Beaded Circle Earrings
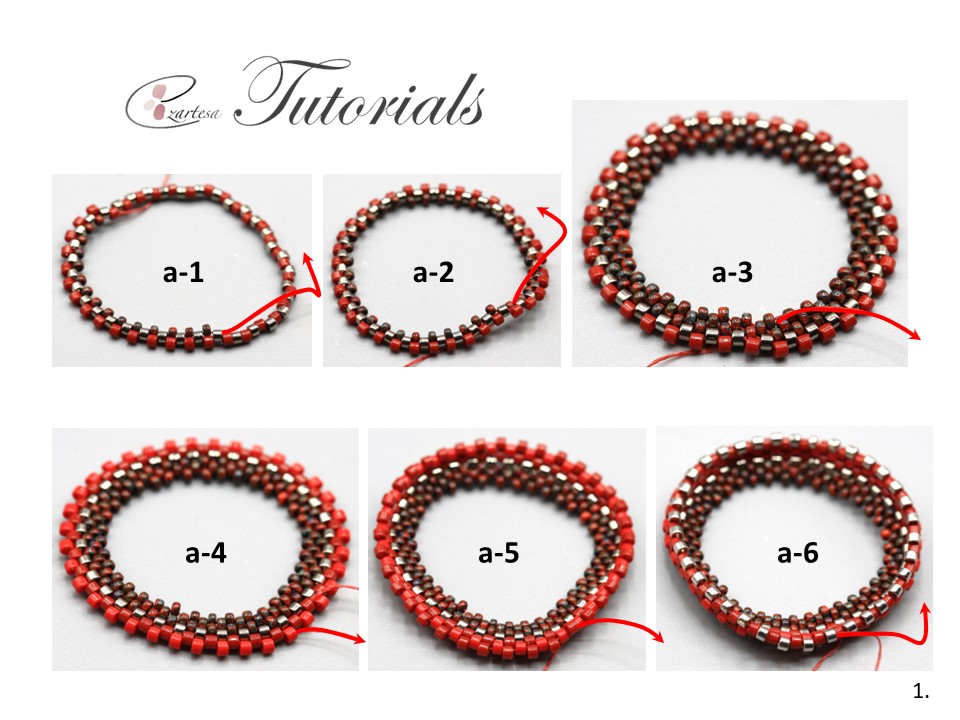
Step (1) On 2yd. of conditioned thread pick up seventy-two Delicas (changing between one 11o A and one 11o B bead) and form a ring in the middle of thread (photo a-1).
Step (2) Working in peyote stitch, exiting one 11o A pick up a 15o D, and sew through the next 11o A (photo a-2). Repeat around the ring for a total of thirty-six stitches and step up.
Step (3) Work two rounds with 15o D s, of tubular-peyote stitch around the ring and step up (photo a-3).
Step (4) Pick up the thread at the other end of the beadwork an existing one edge 11o B bead work one round with 11o Cs of tubular-peyote stitch around the ring and step up (photo a-4).
Step (5) Exiting 11o C bead work one round with 11o B s of tubular-peyote stitch around the ring and step up (photo a-5).
Step (6) Exiting 11o B bead work one round with 11o A s of tubular-peyote stitch around the ring and step up (photo a-6).
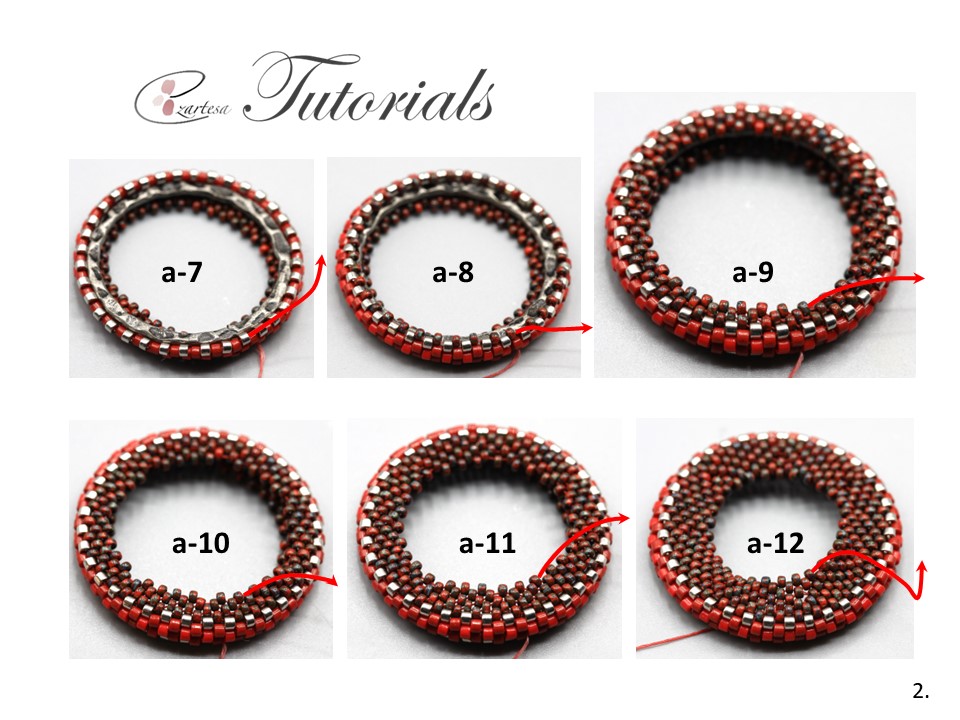
Step (7) Next pick up 30mm open round component, and put on the beadwork, and holding the ring on the beadwork (photo a-7) work one round with 15o D s pulling tight so that the beadwork begins to come up around the ring (photo a-8).
Step (8) Work two rounds with 15o D s, of tubular-peyote stitch around the ring and step up (photo a-9).
Step (9) Start to decrease the width of a piece and work one round with 15o D s skipping fifth space without adding a bead, repeat around the ring (you will have a total of 29 beads around the ring), (photo a-10). Pull the thread firmly to narrow the gap between beads.
Step (10) On the following round work a single 15o D bead above the decrease (you will have a total of 29 beads around the ring), (photo a-11).
Step (11) Work two rounds with 15oD s of peyote and step up (photo a-12).
Step (12) Start to decrease the width of a piece and work one round with 15o D s skipping third space without adding a bead, repeat around the ring (you will have a total of 19 beads around the ring), (photo a-13). Pull the thread firmly to narrow the gap between beads.
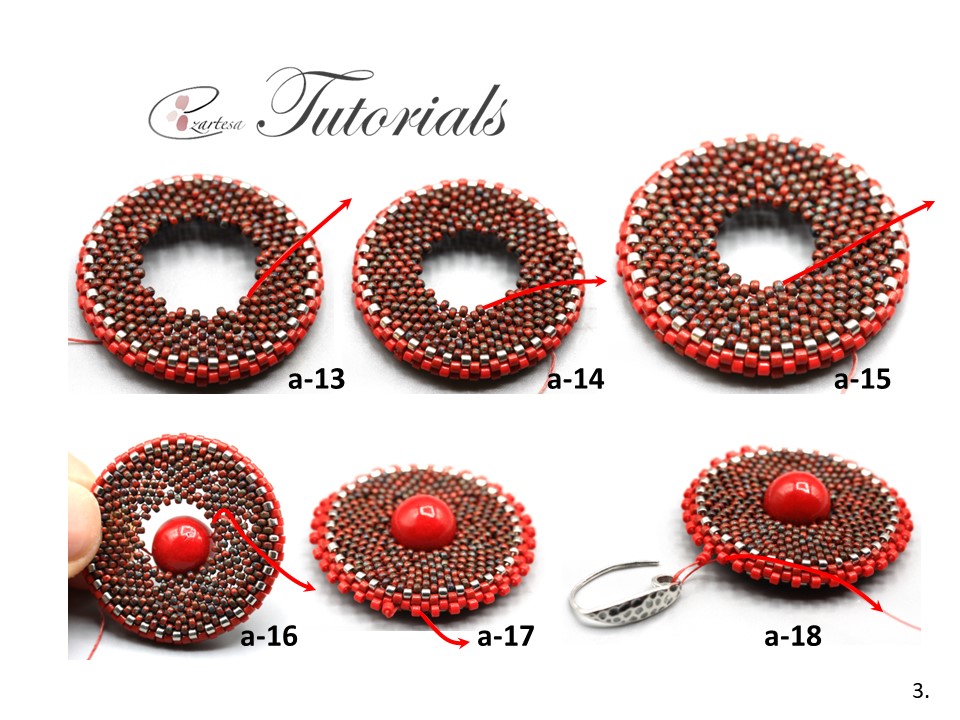
Step (13) Work two rounds of peyote with 15o Ds (photo a-14,15).
Step (14) Next string one 10mm round coral bead and exit through the nineth opposite 15o D bead, weave the thread through the couple beads, sew the needle through the next tenth 15o D bead, sew the needle back through the 10mm coral bead and exit through the opposite 15o D bead at the other side (photo a-16).
Step (15) Then weave the thread through the beads to the one edge 11o C bead. Work one round of peyote around the beaded circle edge with 11o Cs (photo a-17).
Step (16) Next exiting one edge 11o C bead string one 15oE bead, ear-wire, one 15o E bead and sew through the next 11o C bead (photo a-18).
Step (17) Weave the thread through the beadwork and exit through the opposite 11o B bead (opposite to 11o C bead where you added the ear-wire) at the back side of the earring. Then string two 15oD beads, sew the needle through the ear-wire, string two 15o D beads and exit through the next 11o B bead (photo a-19). Secure the thread tales in the beadwork with a few half-hitch knots and trim. Make the second earring.
I made this free beading pattern just to share with you my passion for the beaded jewelry. I hope to show you that it is easy to make your own jewelry.
If you loved this free beading pattern and would like to learn and discover more of my creations, you can visit my Etsy shop.
Wonderful DIY ways to transform your old jeans.
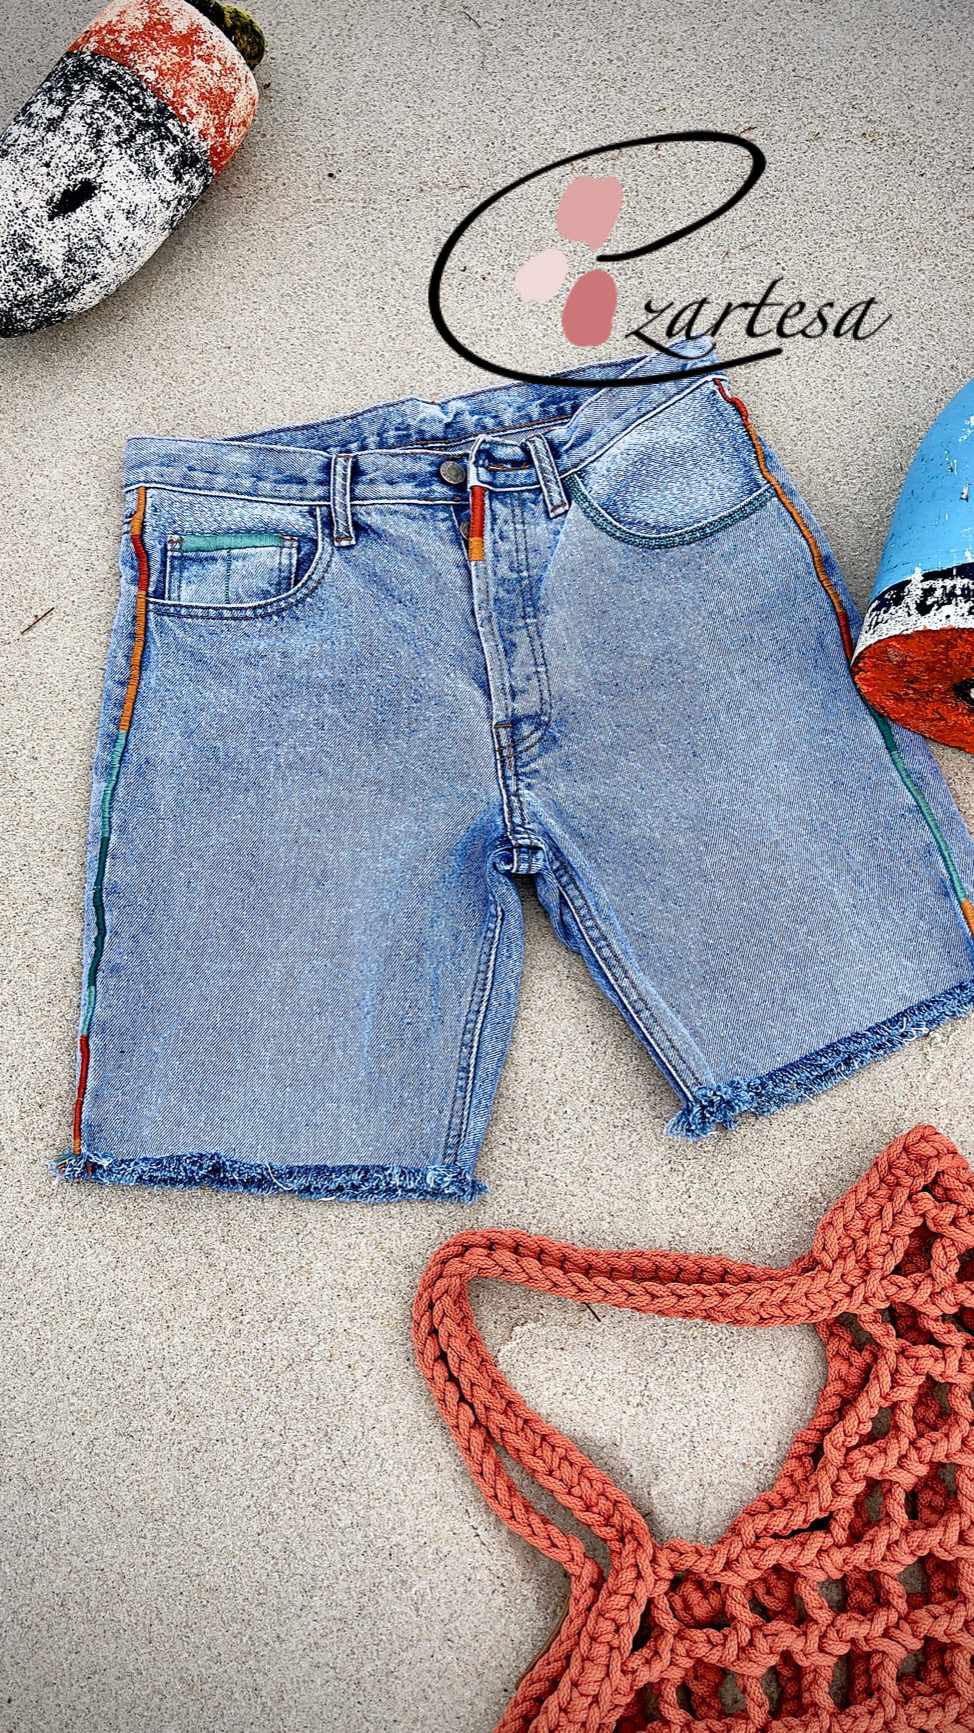
For some time, l had this awesome idea to make fun and artsy shorts from my old jeans. Finally, I did it! I had these oversized and slouchy jeans which were perfect for this project.
First, measure, mark, and cut one leg. Then folding in half and matching out seams from waistband down, mark and cut the second leg.
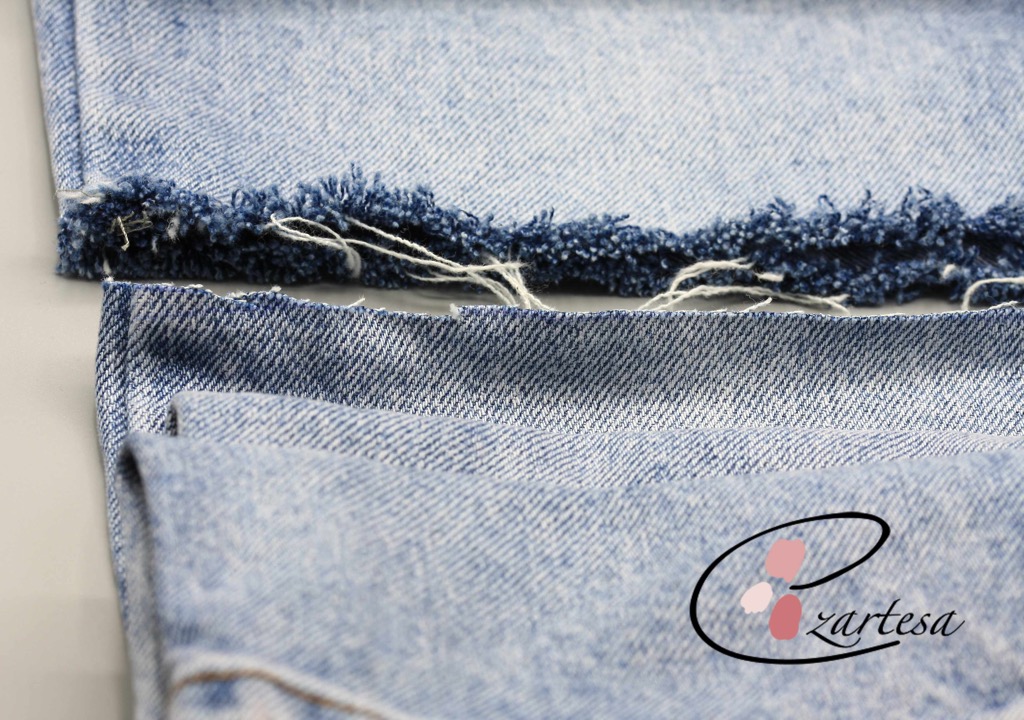
Second, distress your shorts and wash.
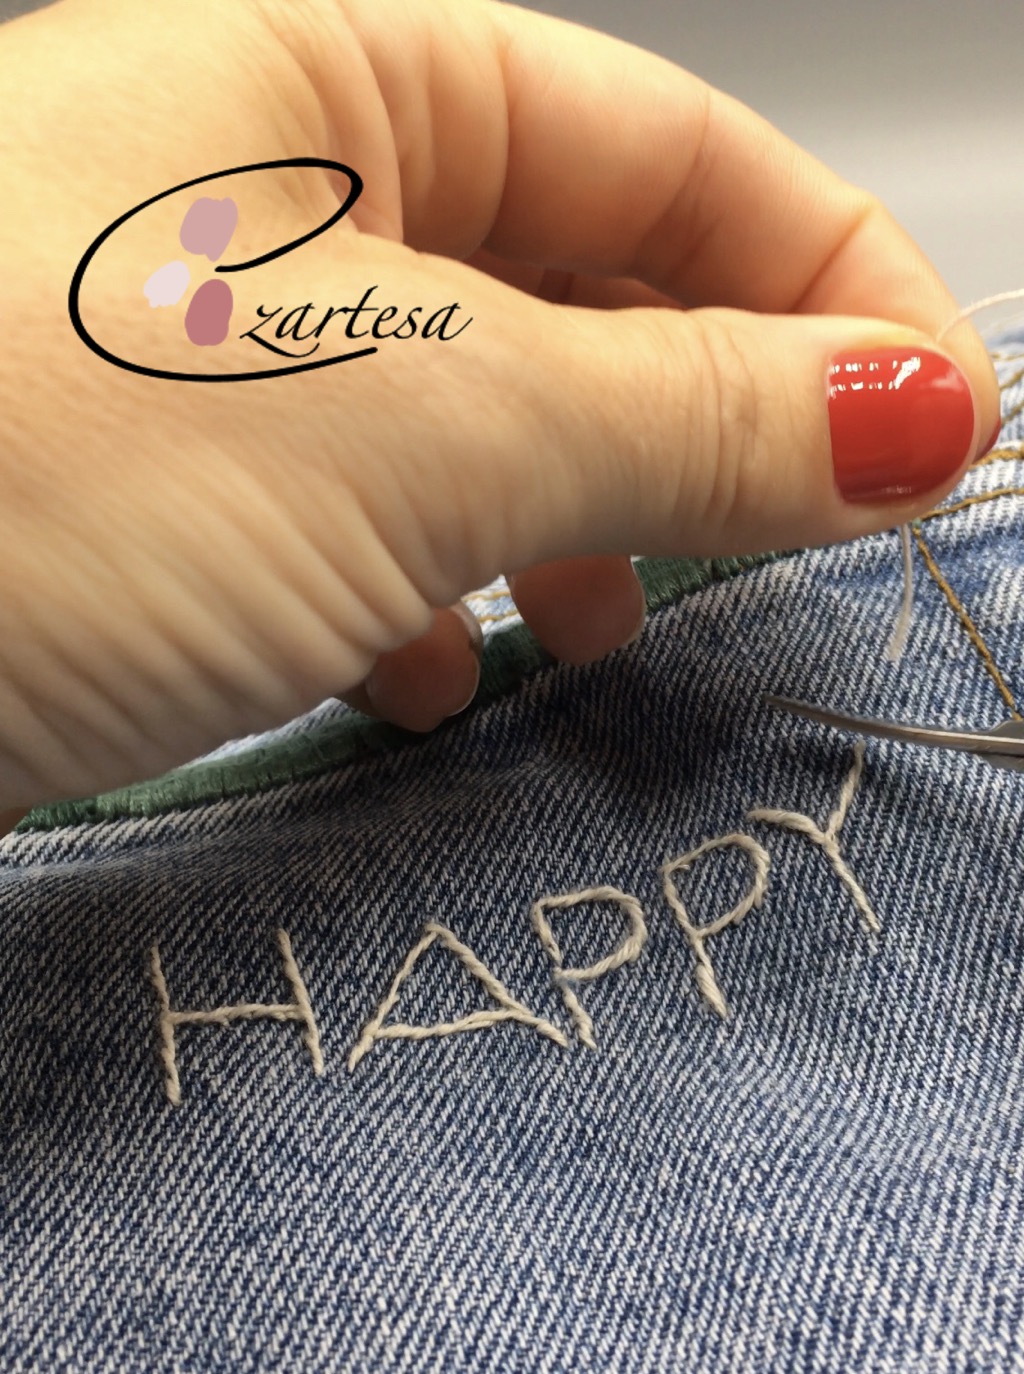
Third, have fun embroidering, patching & mending if you wish…
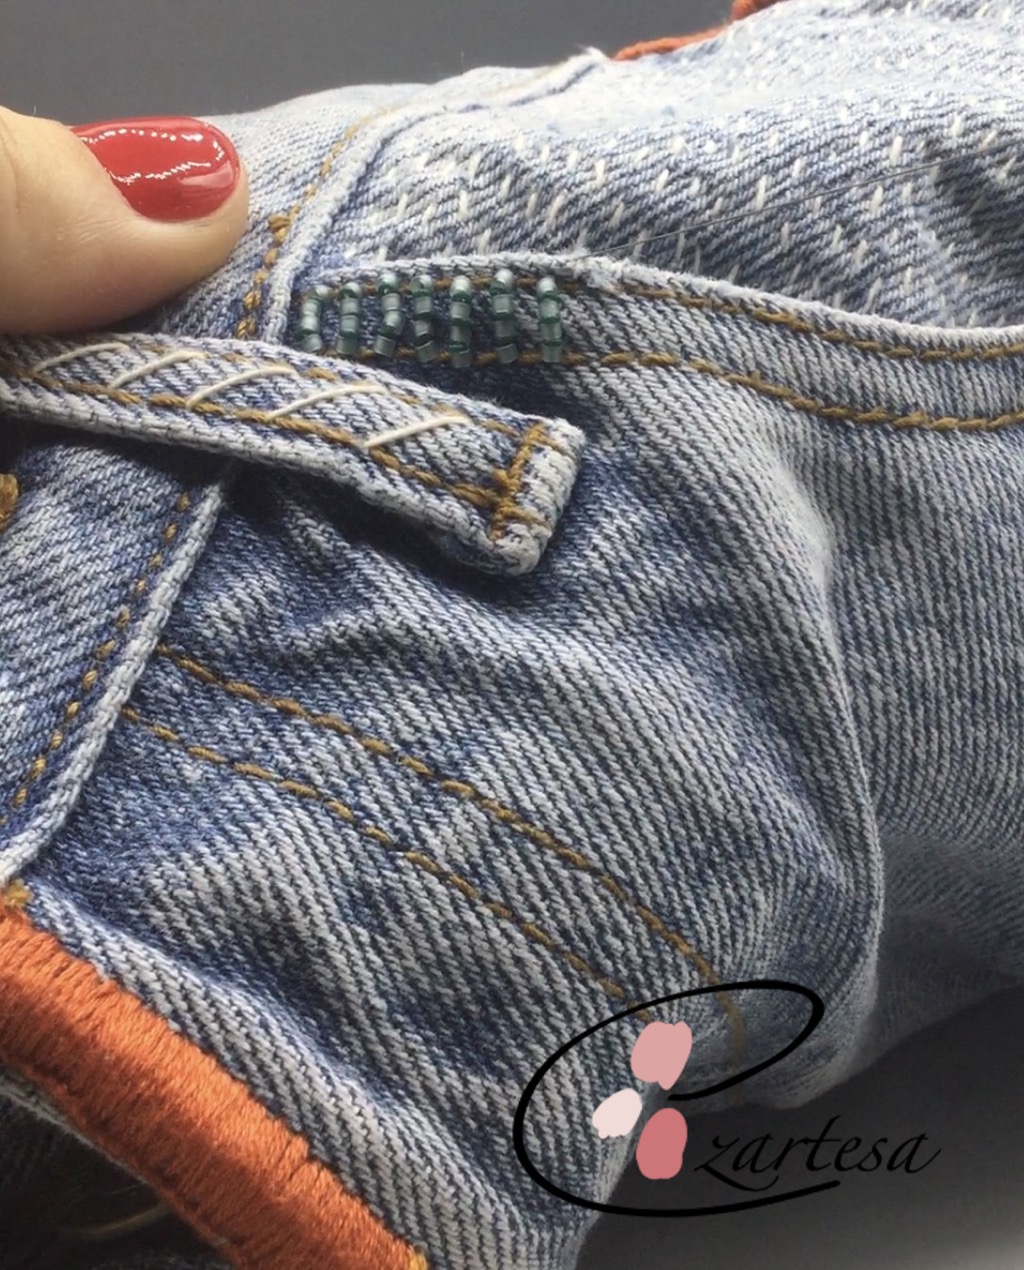
I used the matte finish glass seed beads, tiny rubber rings and embroidery cotton thread to embellish my shorts.
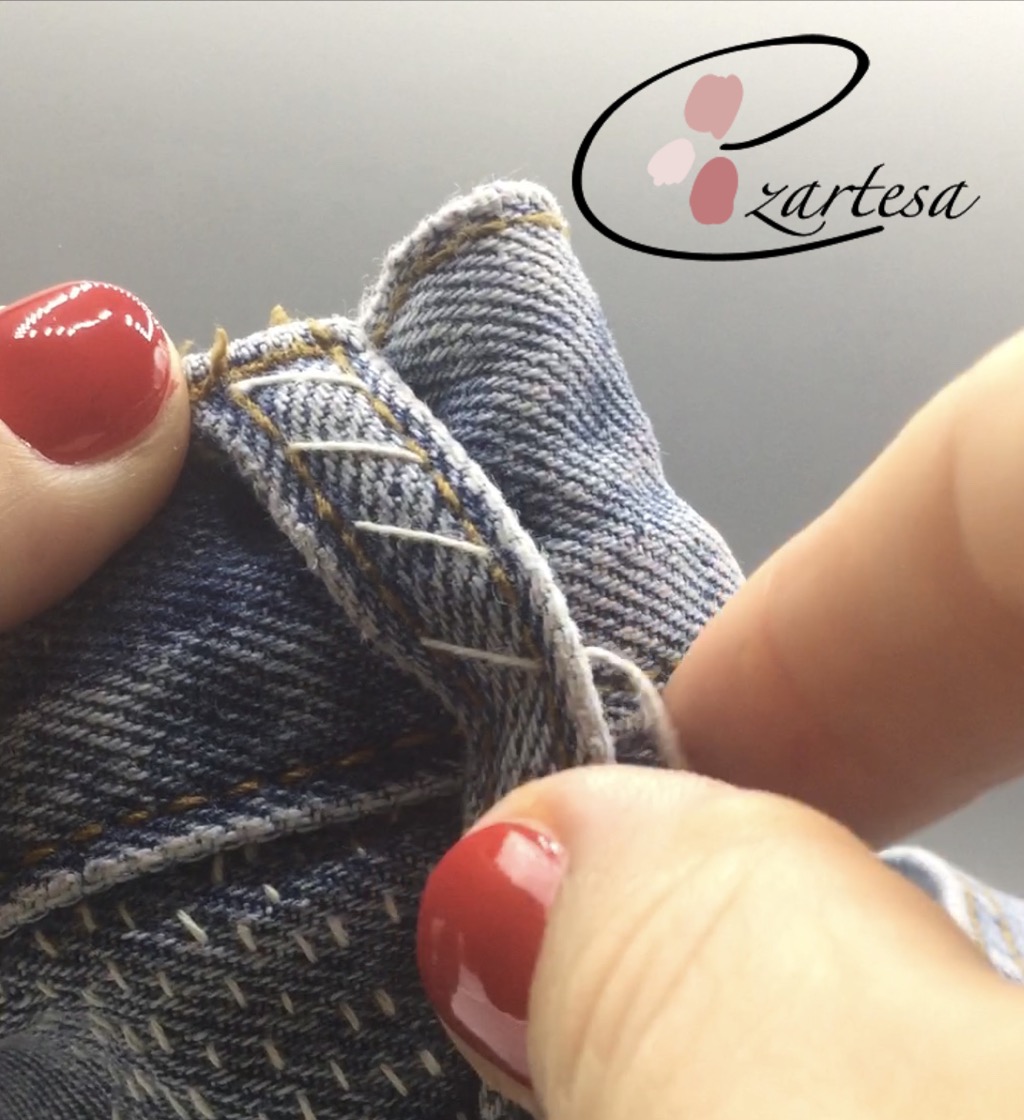
The basic Sachiko stitch was perfect for adding some texture to the jeans.

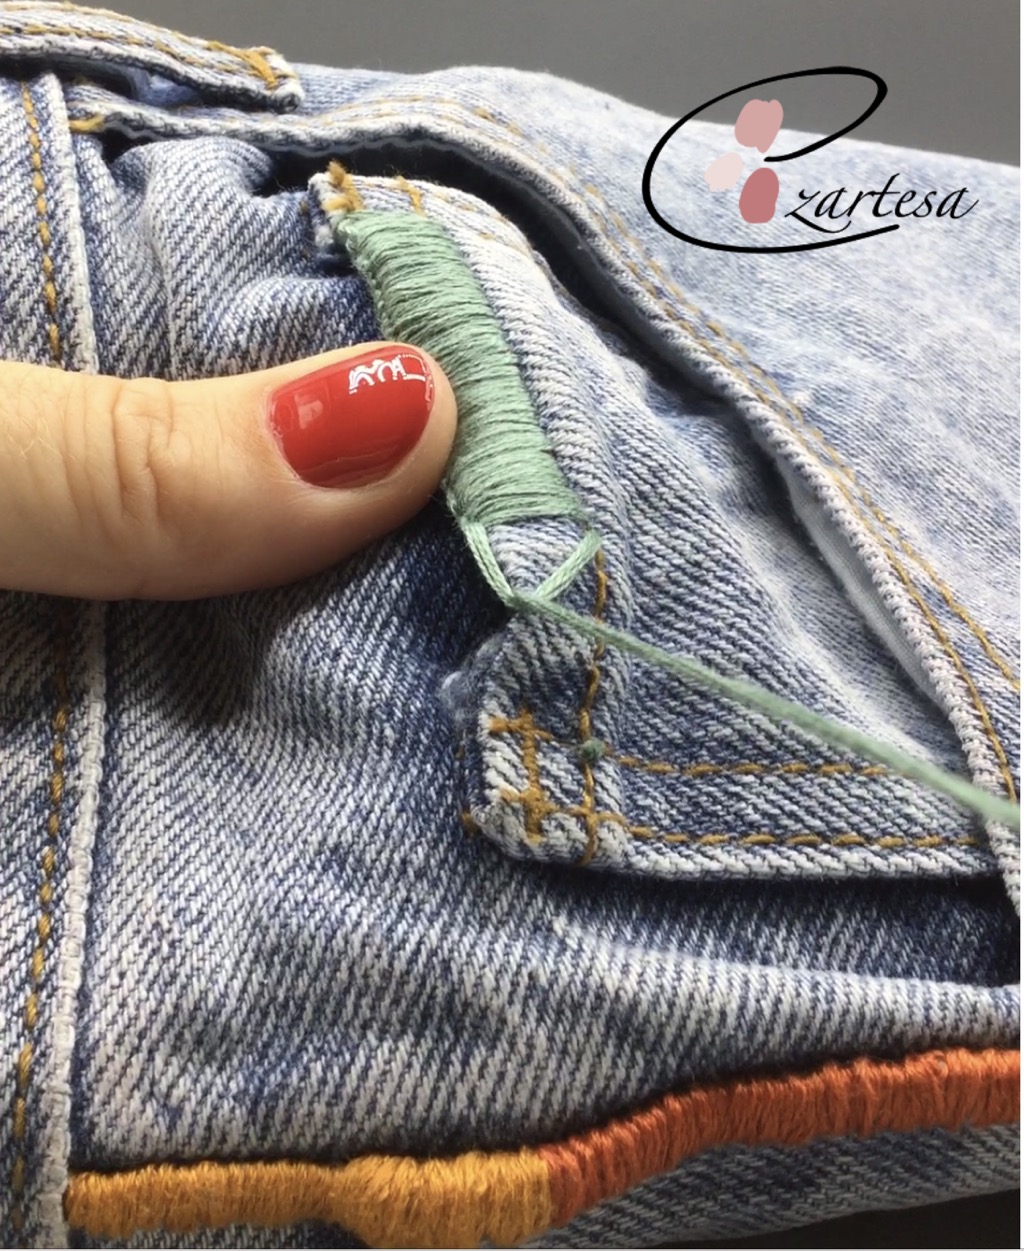
For the edging I used the blanket and satin stitches.
The gorgeous and tiny mate glass seed beads added the fun and artsy feeling to the jean shorts.
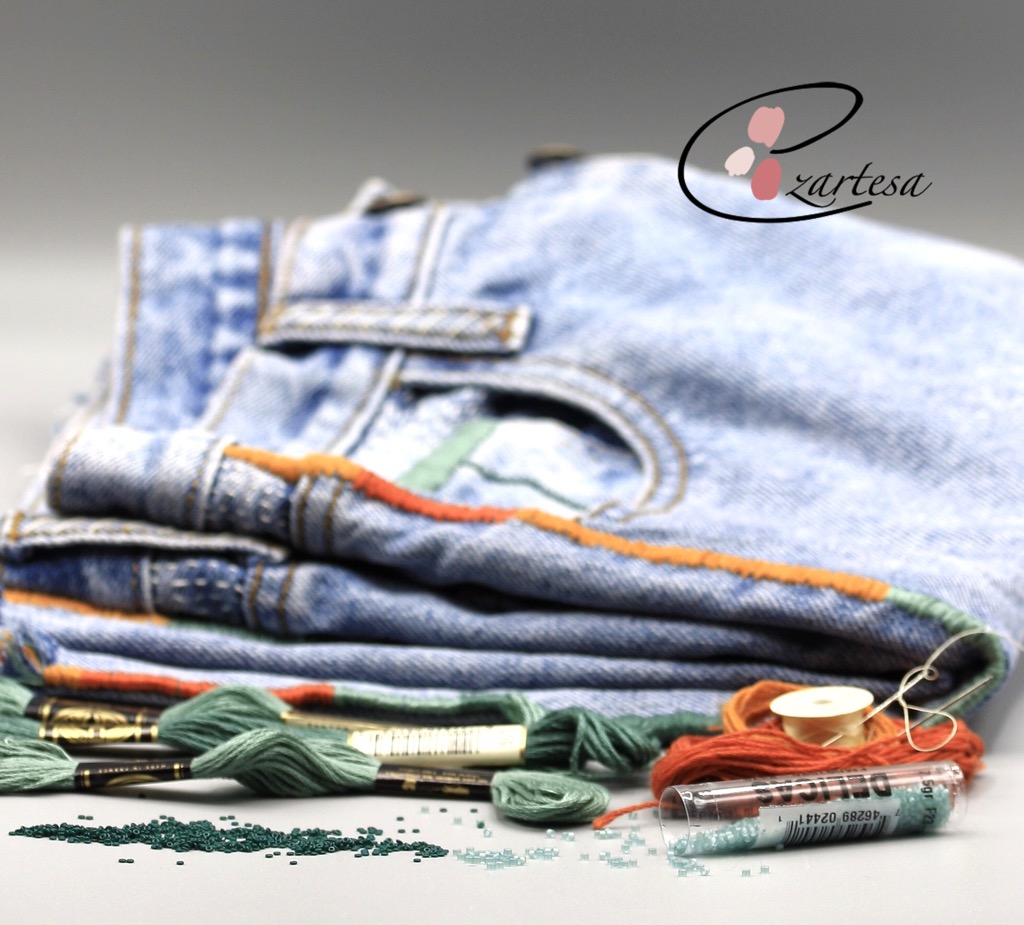
Materials:
Old jeans Delica glass seed beads #11 matte sea glass green DB0385
Oh! Rubber rings, dark green, 1.5mm round with 0.5mm hole.
DMC cotton embroidery floss:
Sea green 502
Dark sea green 501
Burnt sienna 921
Ochre 817
White 3033
FireLine 6lb smoke
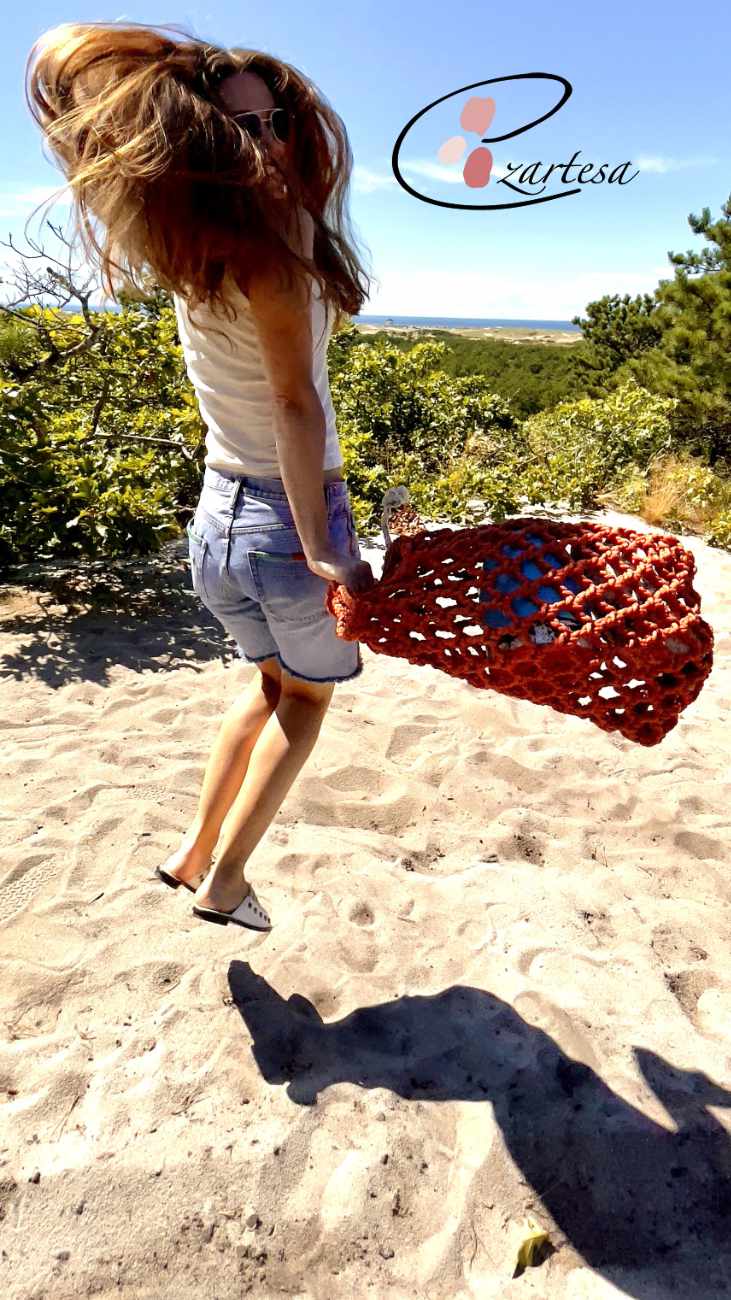
I’m so happy to have these well-loved jeans back in rotation!