
Crafting Meaning: The Symbolism Behind My Beaded Cross Design

The Elements of the Cross
My cross design combines three main elements, each carrying its own significance:
- The Maltese Cross Base: At the heart of our design is the Maltese cross, a symbol with a rich history. It represents protection, courage, and service to others. In creating this piece, I was drawn to the eight virtues associated with the Knights Hospitaller – loyalty, piety, generosity, bravery, glory and honor, contempt of death, helpfulness towards the poor and sick, and respect for the church. These values seem as relevant today as they were centuries ago.
- The Teardrop: Hanging from the bottom of the cross is a pear-shaped teardrop. As I crafted this element, I thought about how it could represent the sorrows we all face in life, but also the purification and cleansing that often comes through difficult times. For some, it might evoke the tears of Christ or Mary, adding a layer of religious significance.
- The Butterfly: Between the cross and the teardrop, you'll find a tiny butterfly. This was perhaps my favorite part to create. Butterflies have long symbolized transformation, change, and rebirth. As I beaded this delicate creature, I thought about how it represents the beauty that can emerge from life's challenges.

The Color Story
The colors I chose for this piece are just as meaningful as the symbols themselves:
- Silver/Palladium/Nickel: These metallic tones represent purity and clarity. As I worked with these beads, I imagined them reflecting light – just as we might hope to reflect goodness in our own lives.
- Pink: I included pink beads to represent love and compassion. In a world that often feels harsh, these soft pink tones remind us of the importance of nurturing and caring for one another.
- Lavender: The lavender beads bring a sense of spirituality and grace to the piece. As I threaded them, I thought about the calmness we often seek in our spiritual journeys.
- Yellow: Finally, the yellow beads add a touch of joy and optimism. They remind me of sunlight, representing enlightenment and hope.
As I crafted each element of this cross, I realized that it tells a story – one that might resonate with many of you. It's a story of transformation through adversity, suggesting that our challenges and sorrows (represented by the teardrop) can lead to personal growth and positive change (the butterfly), all under the protection and guidance of our faith or higher principles (the Maltese cross).
Whether you're on a spiritual journey, going through a period of personal growth, overcoming challenges, or simply seeking protection and guidance, my hope is that this beaded cross will speak to you. It's more than just a piece of jewelry – it's a symbol of the complex and beautiful journey we call life.
I pour my heart into every piece I create, and this beaded cross is no exception. It's my way of offering not just a beautiful accessory, but a source of comfort, inspiration, and meaning. I hope that as you wear it or gift it to someone special, it will serve as a daily reminder of the transformative power of faith, hope, and perseverance.

Detailed instructions for the Beaded Cross Pendant
YOUTUBE Video: The Symbolism Behind My Beaded Cross Design
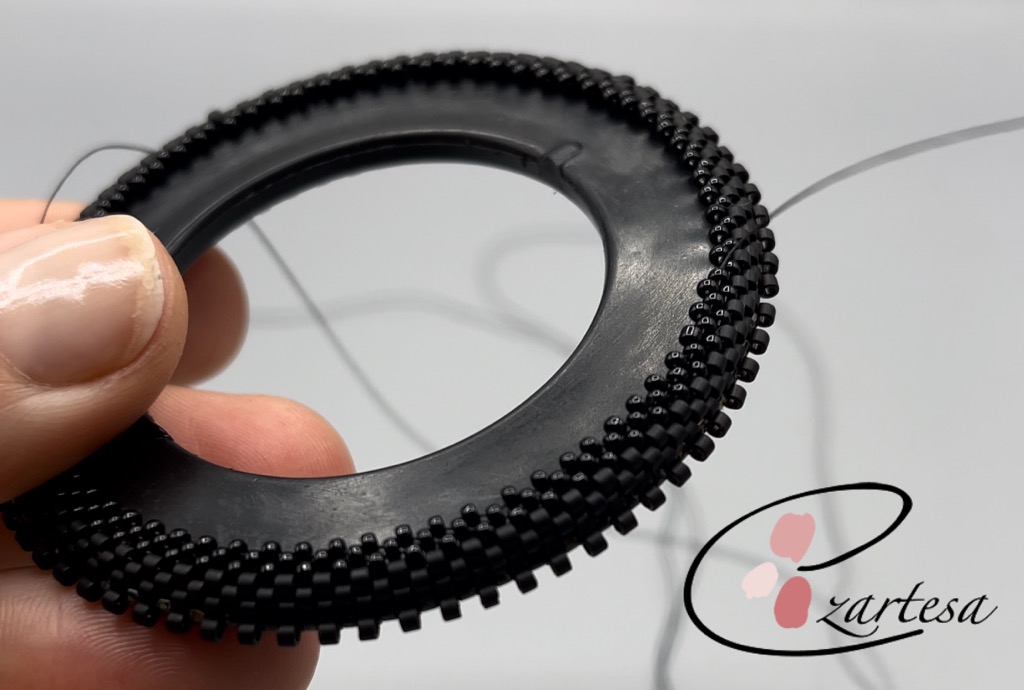
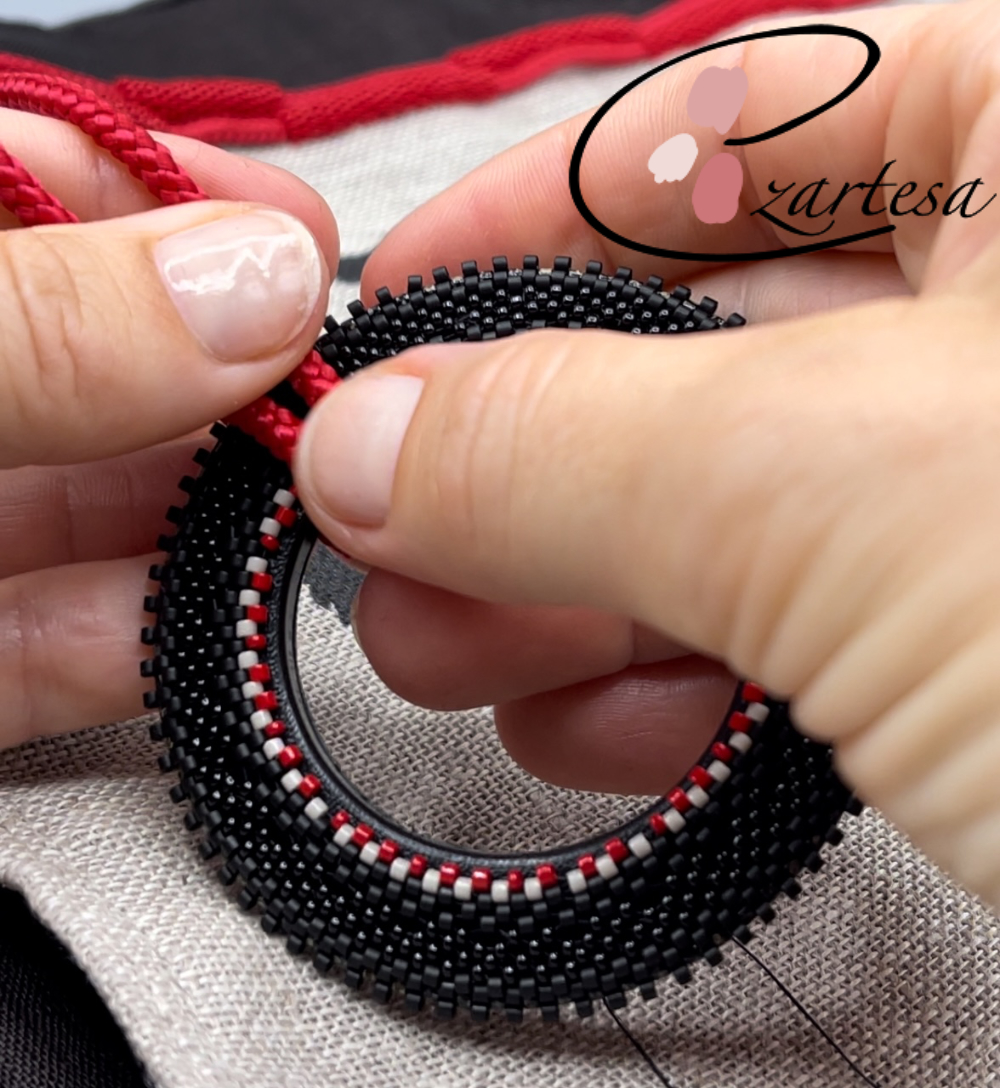
Create Your Own Duality Seed Bead Bracelet: Step-by-Step Tutorial
🔗 Watch My Comprehensive YouTube Tutorial:
🎨 What You'll Learn in This Tutorial:
- Master essential beading stitches: ladder, herringbone, peyote, and squared.
- Discover techniques for attaching beaded beadwork to a wire bracelet.
- Create a mesmerizing pattern with an eclectic mix of glass seed beads.
- Nylon beading thread in black or Fireline 6lb test
- Beading needles (#12)
- Scissors
- 14K Gold Plated Cuff Bangle with Wire Hook and Magnetic Clasp
- # 11A 24Kt Gold Plated DB0034
- # 11B Palladium Plated DB0038
- # 11C Silver Lined Smoke DB0613
- # 11D Opaque Beige DB2105
- # 11E Luster Linen DB0261
- # 11F Opaque White DB0200
- # 11G Opaque BLK Picasso DB2261
- # 11H Opaque Black DB0010
- # 11L Matte Black DB0310
- # 15I Chalk White RR402FR
- # 11J Opaque Jet TR-11-49
- # 11K Opaque Lt Beige TR-11-51

This tutorial is more than just a crafting session—it's a chance to embrace mindfulness. As you weave your bracelet, contemplate the balance of light and dark in life and within yourself. Let this time be a meditative journey towards inner peace and creative fulfillment.
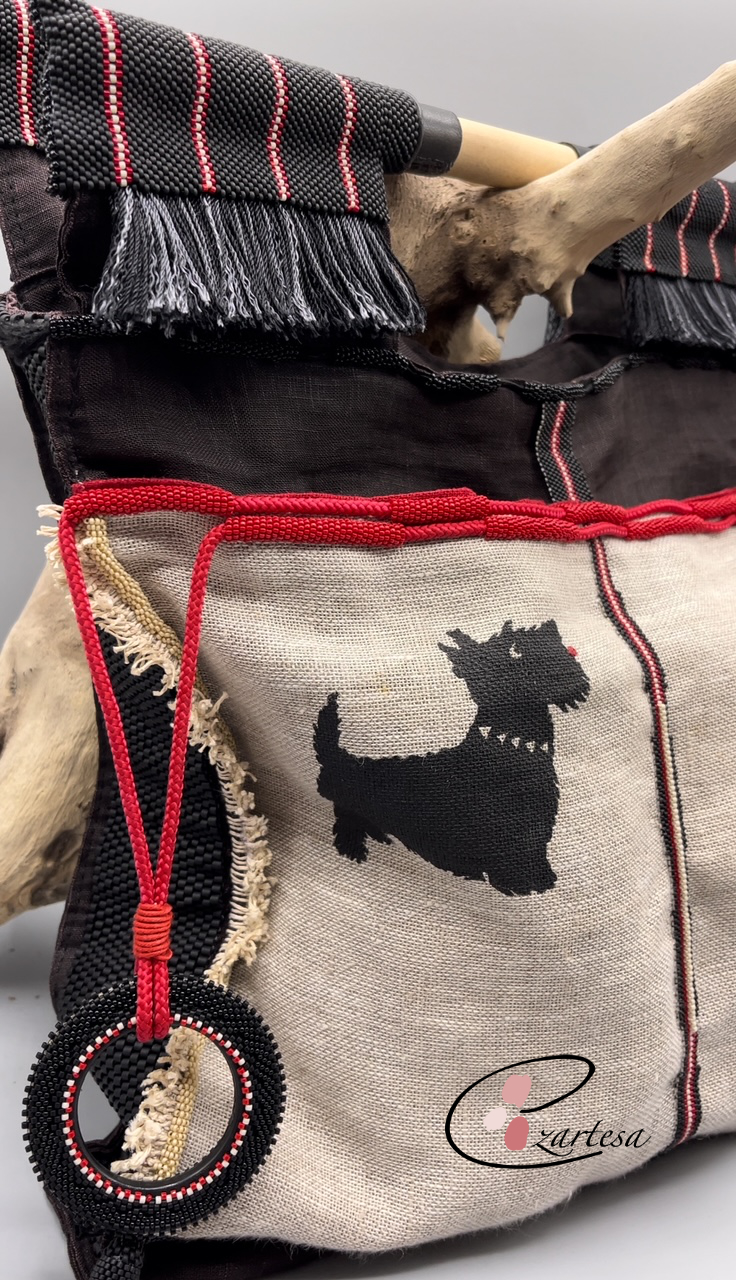
Reviving Fashion: Transforming an Old Bag with Glass Seed Beads
As a passionate crafter working with glass seed beads, I find immense joy in breathing new life into old items. Recently, I had the pleasure of remaking an old bag using tiny glass seed beads, leather, cotton cord, and silk thread, incorporating embroidery and embellishments to create a stunning transformation. Join me on this creative journey as I share the process of reviving fashion through the art of beadwork.
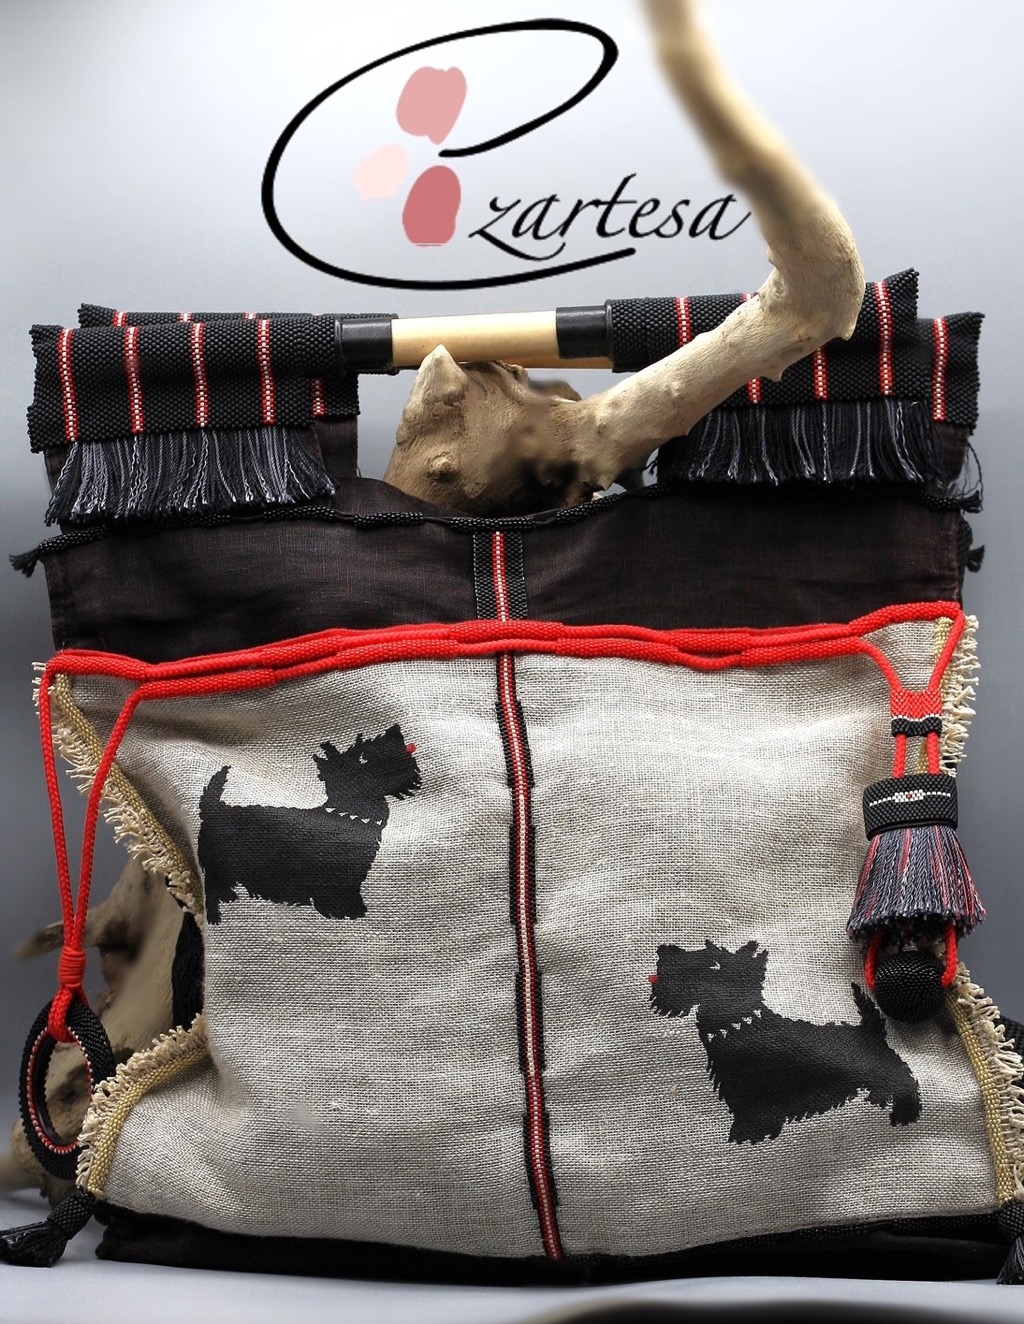
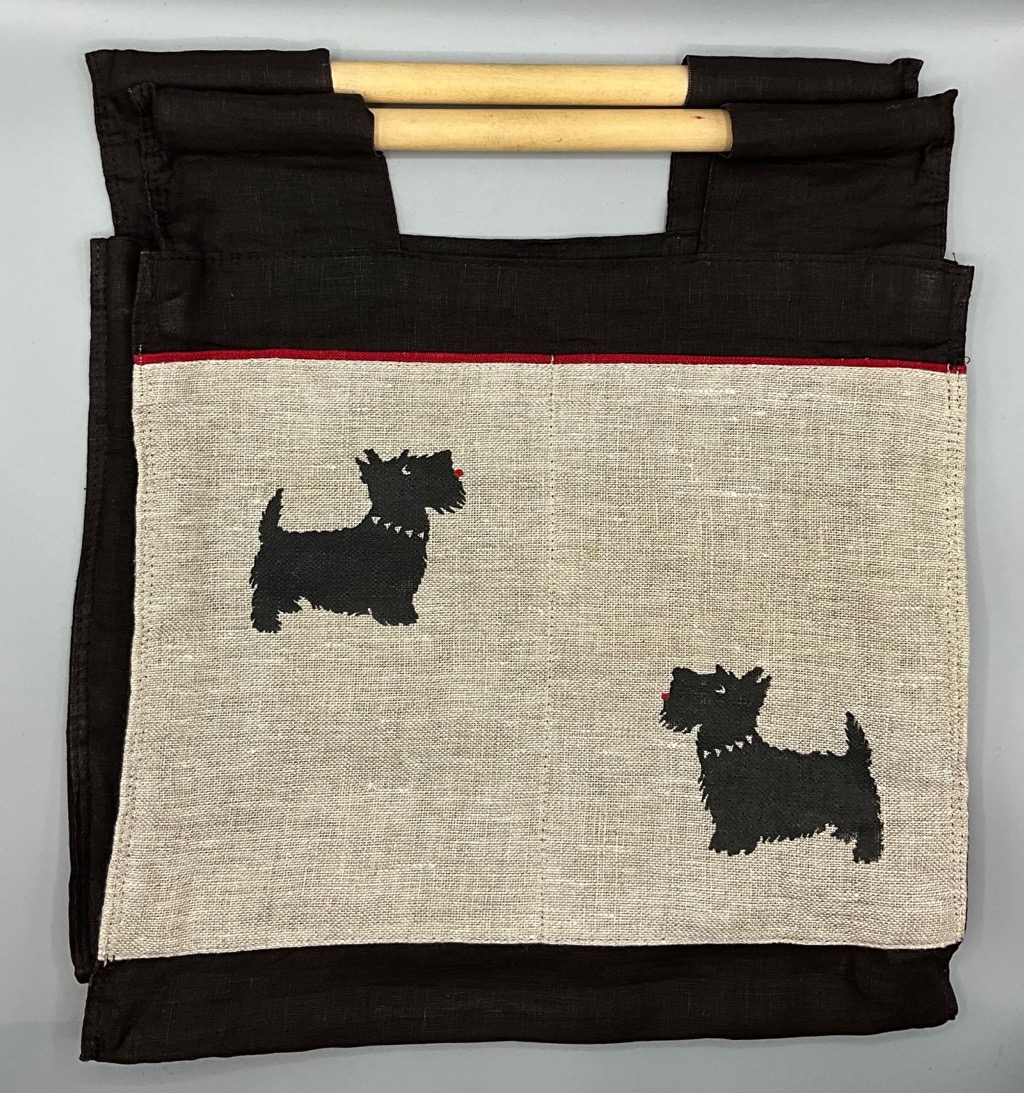
The old bag that served as the canvas for this project held sentimental value but had lost its luster over the years. To begin the transformation, I carefully assessed the bag's structure and material, envisioning how the addition of glass seed beads could elevate its aesthetic appeal.
Materials:

First, I meticulously selected a color palette of glass seed beads that would complement the bag's existing tones. The delicate nature of these beads allowed me to create intricate patterns and designs, adding a touch of elegance to the bag's surface. Using a fine needle and Nylon beading thread, I embarked on the meticulous task of hand-embroidering the glass seed beads onto the bag, layer by layer, to ensure a seamless and captivating finish.
Glass seed beads colors and sizes I used for this bag:
Delica glass seed beads #11

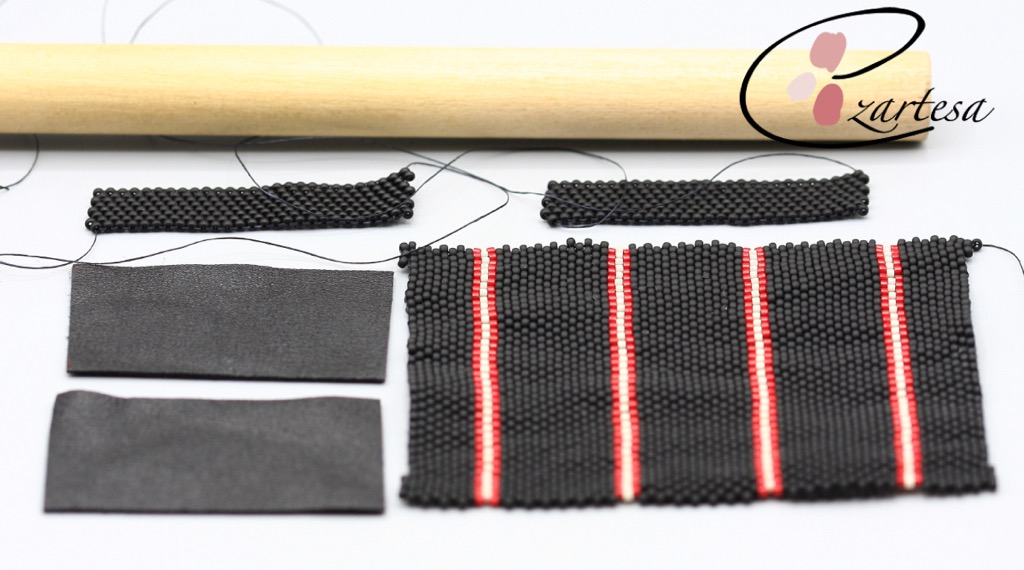
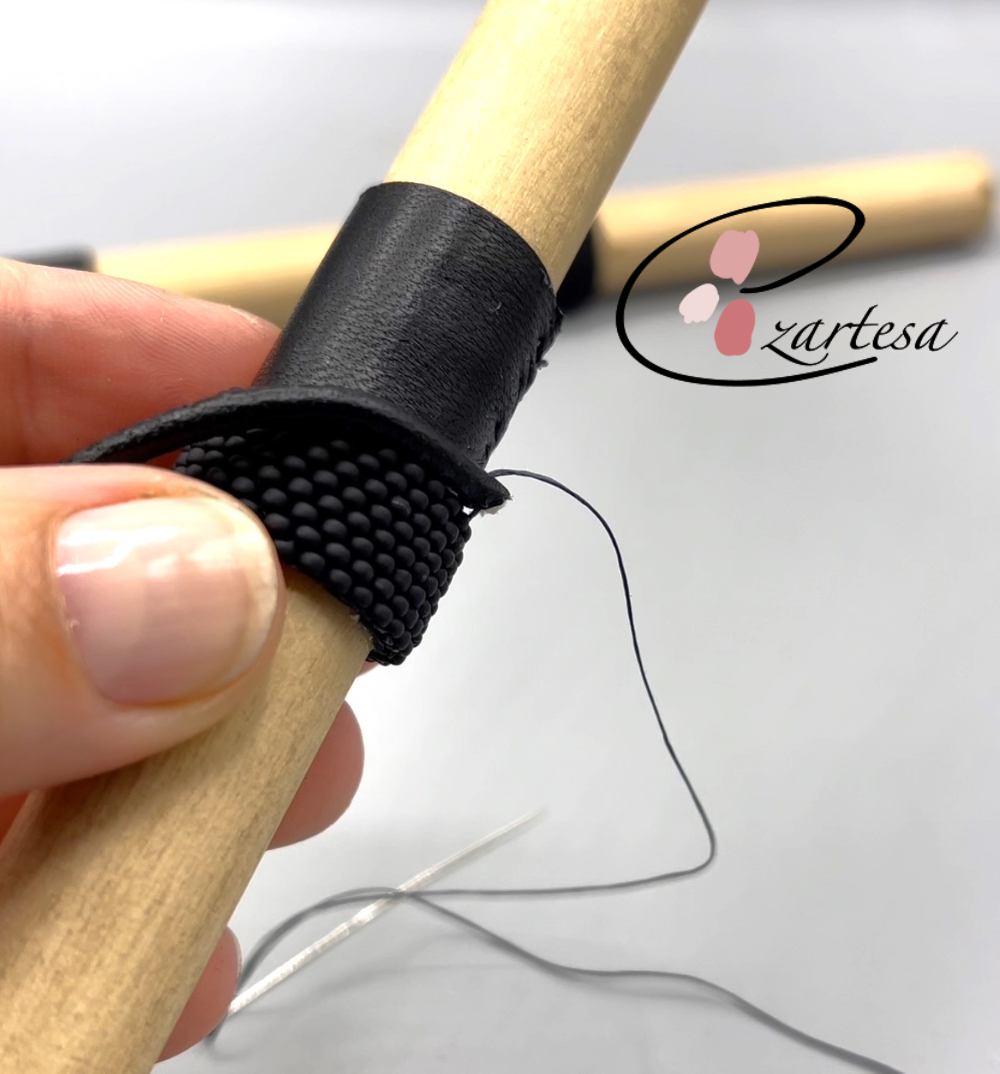
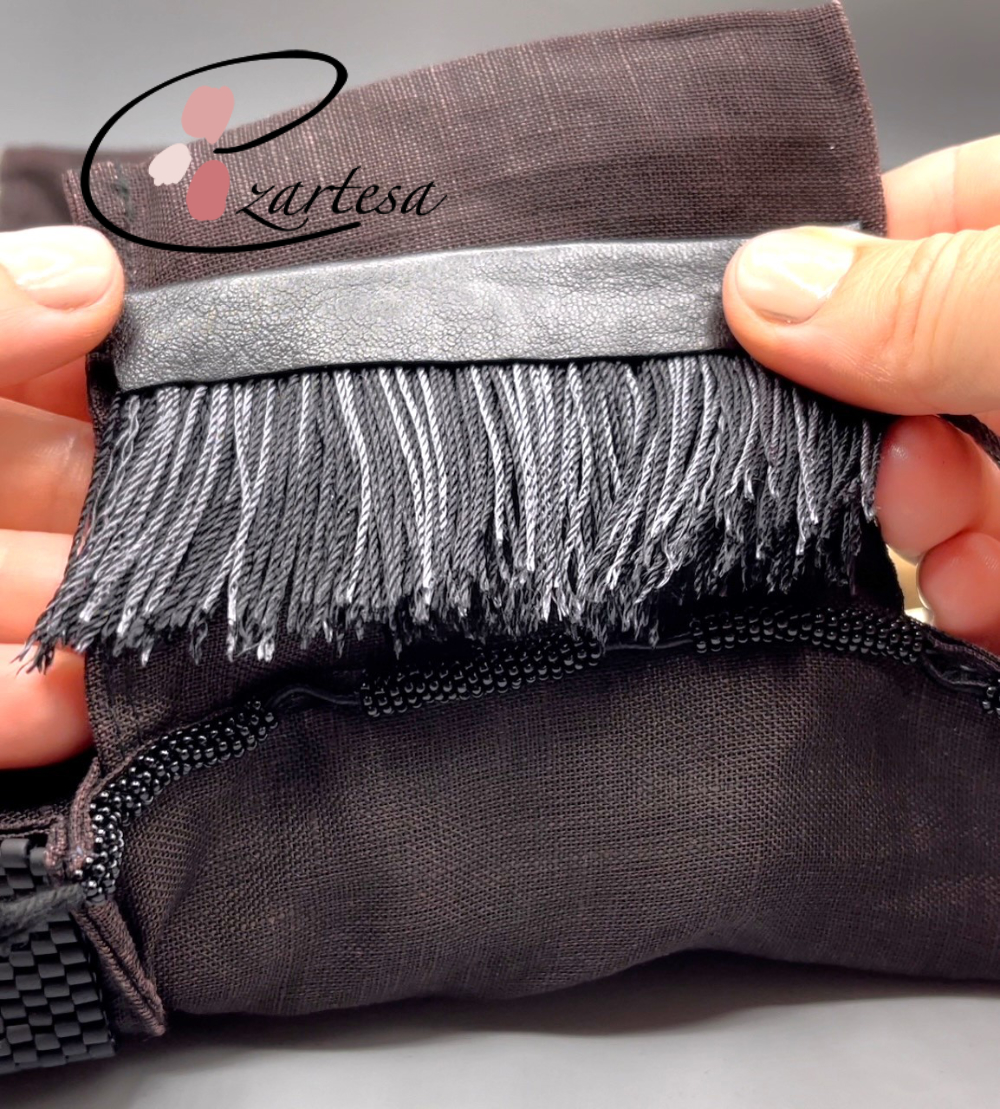
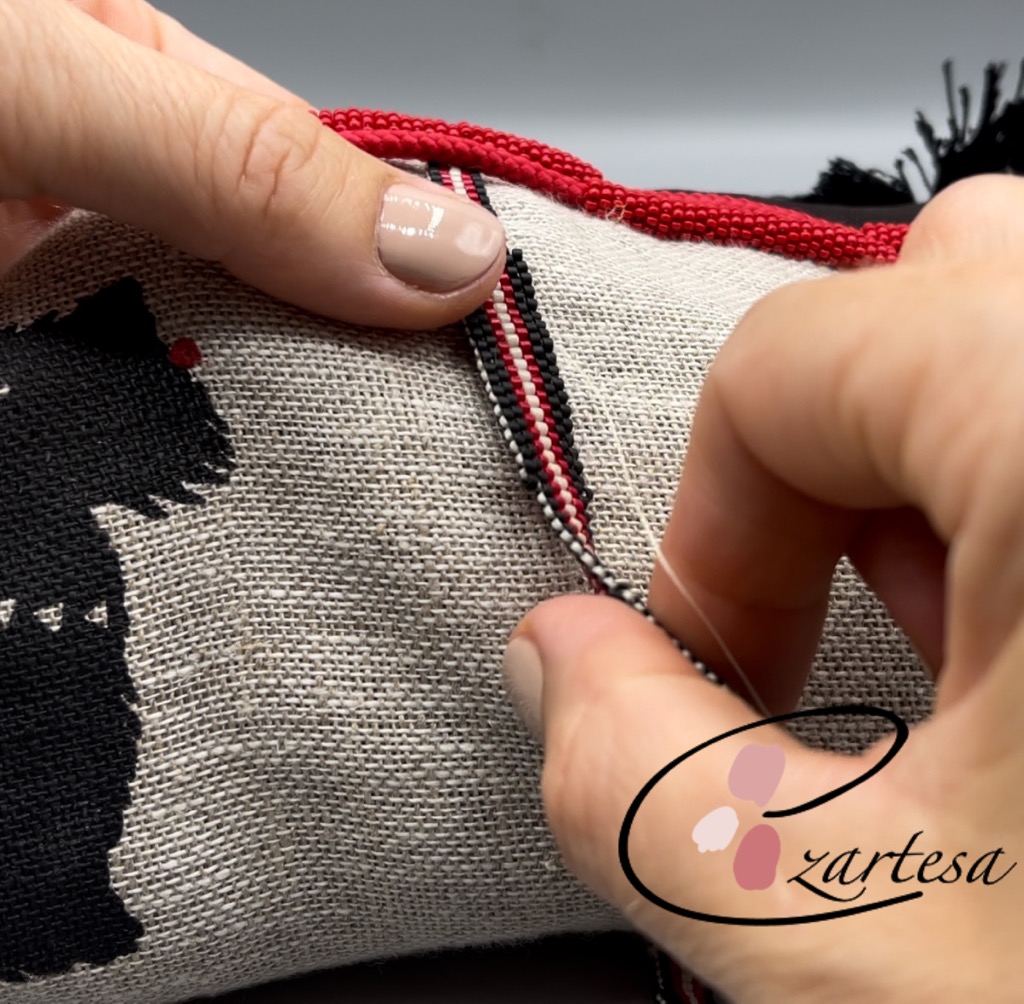
Incorporating leather and cotton cord, I introduced tactile elements that enhanced the bag's texture and durability. The black leather accents provided a striking contrast to the glass seed beads, while the cotton cord added a rustic charm, harmonizing with the overall design.
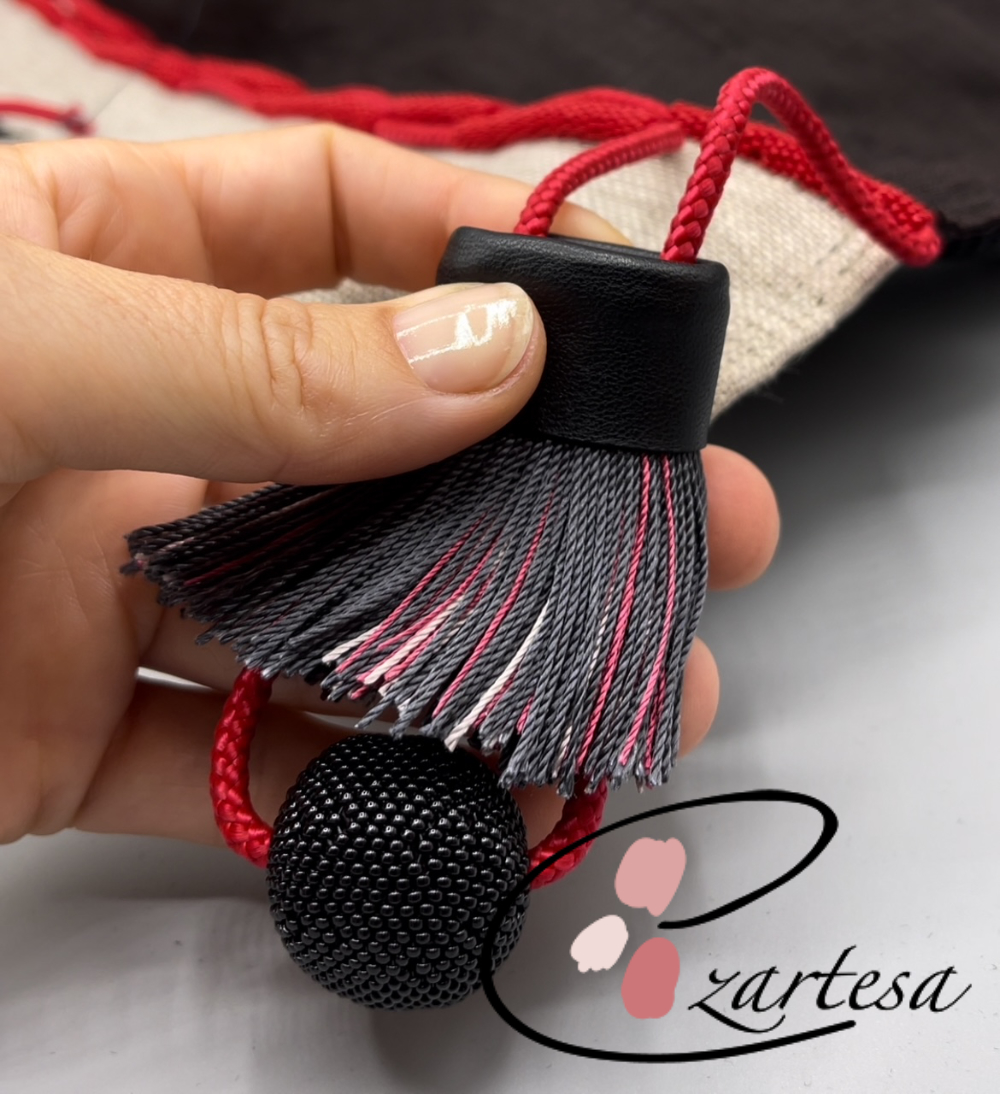
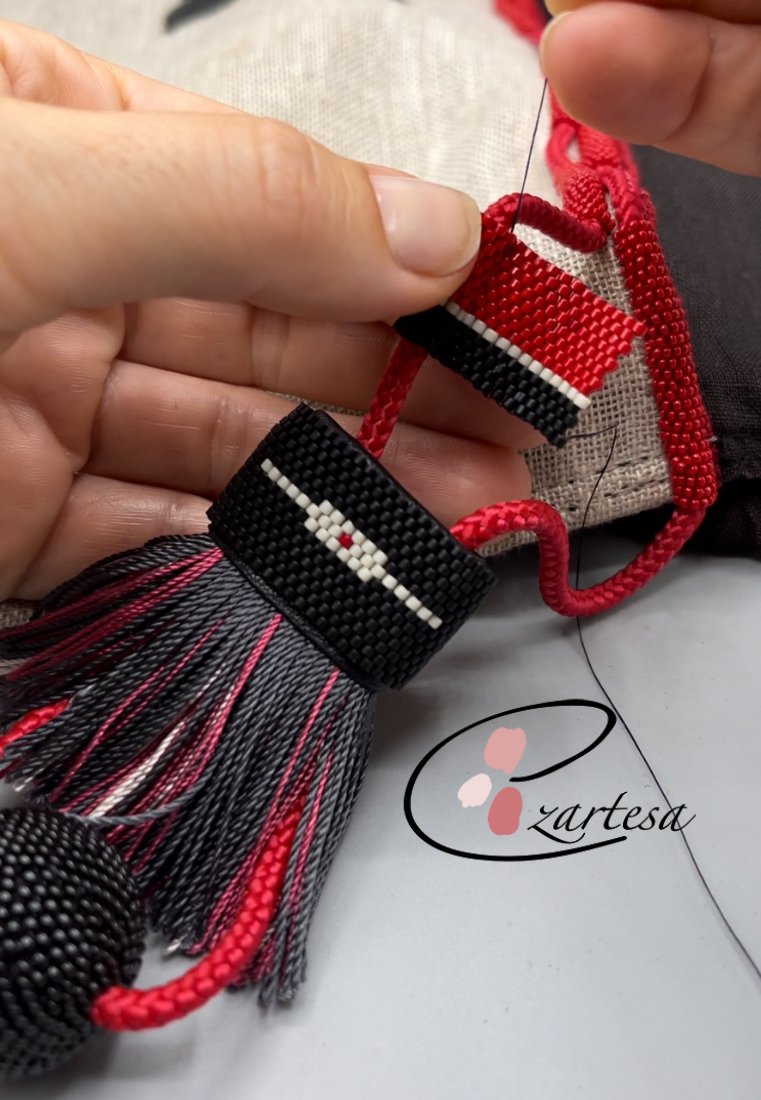
I created a handmade natural silk tassel, wrapped it with natural leather and embellished it with tiny glass seed beads. The beaded round dangle bead adds to a bag a fun feel.
Add additional large, beaded charms to your bag and make it more unique and interesting.
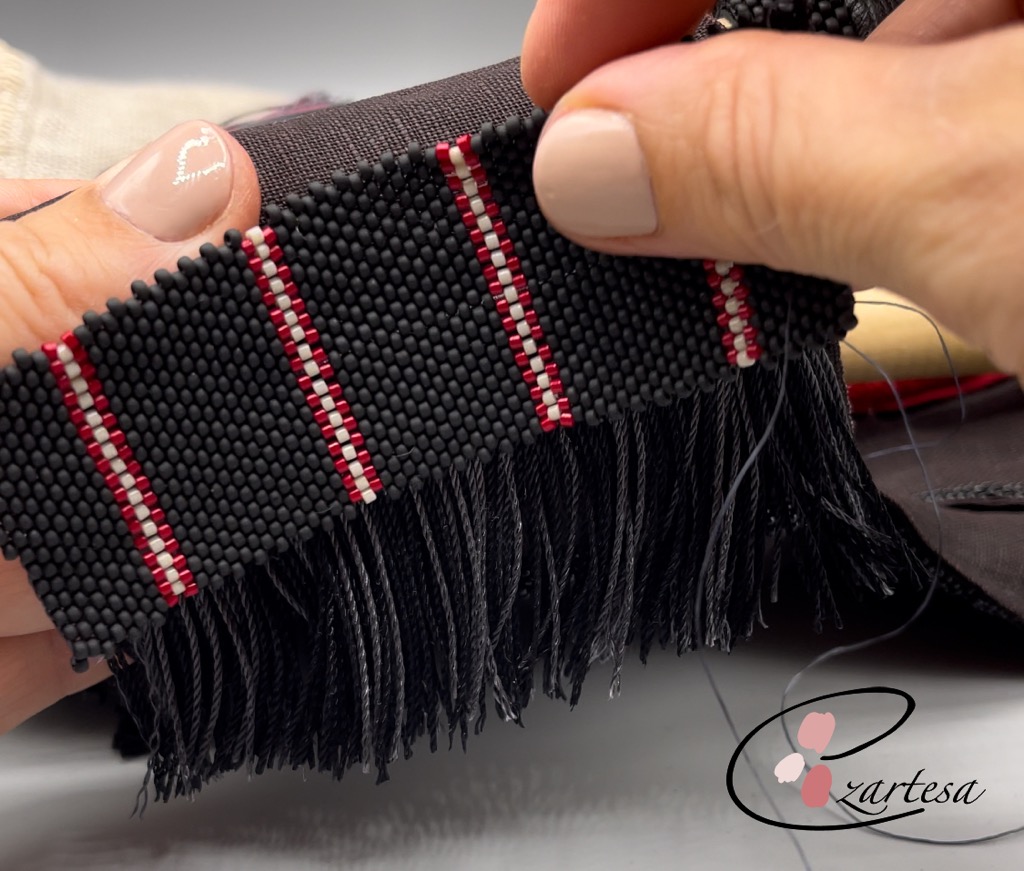
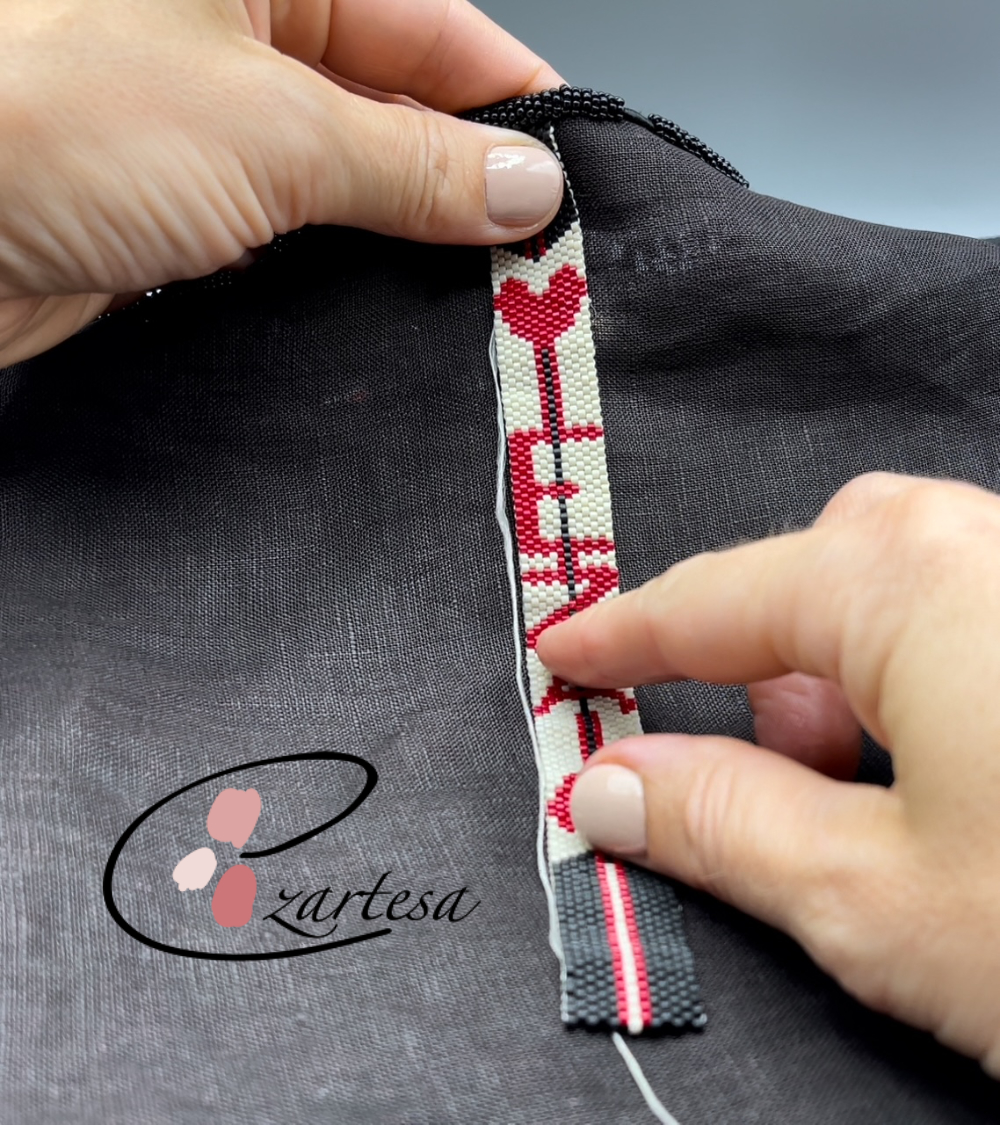
Hand beaded strip with letters or other motives from glass seed beads make your bag super personalized and cool.

As the final touches were added, the old bag underwent a remarkable metamorphosis. The once-faded accessory was now adorned with a symphony of glass seed beads, exuding a timeless allure that captured the essence of traditional craftsmanship and contemporary elegance.
In conclusion, the process of remaking the old bag with glass seed beads, leather, cotton cord, and silk thread was a testament to the transformative power of creativity. By infusing new life into forgotten pieces through meticulous craftsmanship, we not only honor their history but also celebrate their potential for reinvention. This project exemplifies the beauty of sustainable fashion and the artistry of beadwork, inspiring us to look at everyday items with fresh eyes and embrace the magic of reinvention.
May this journey serve as a reminder that within every worn-out treasure lies the opportunity for a dazzling revival, waiting to be unveiled through the artful mastery of glass seed beads and creative ingenuity.
Free Beading Tutorials with Instructions for Beginners | Ezartesa
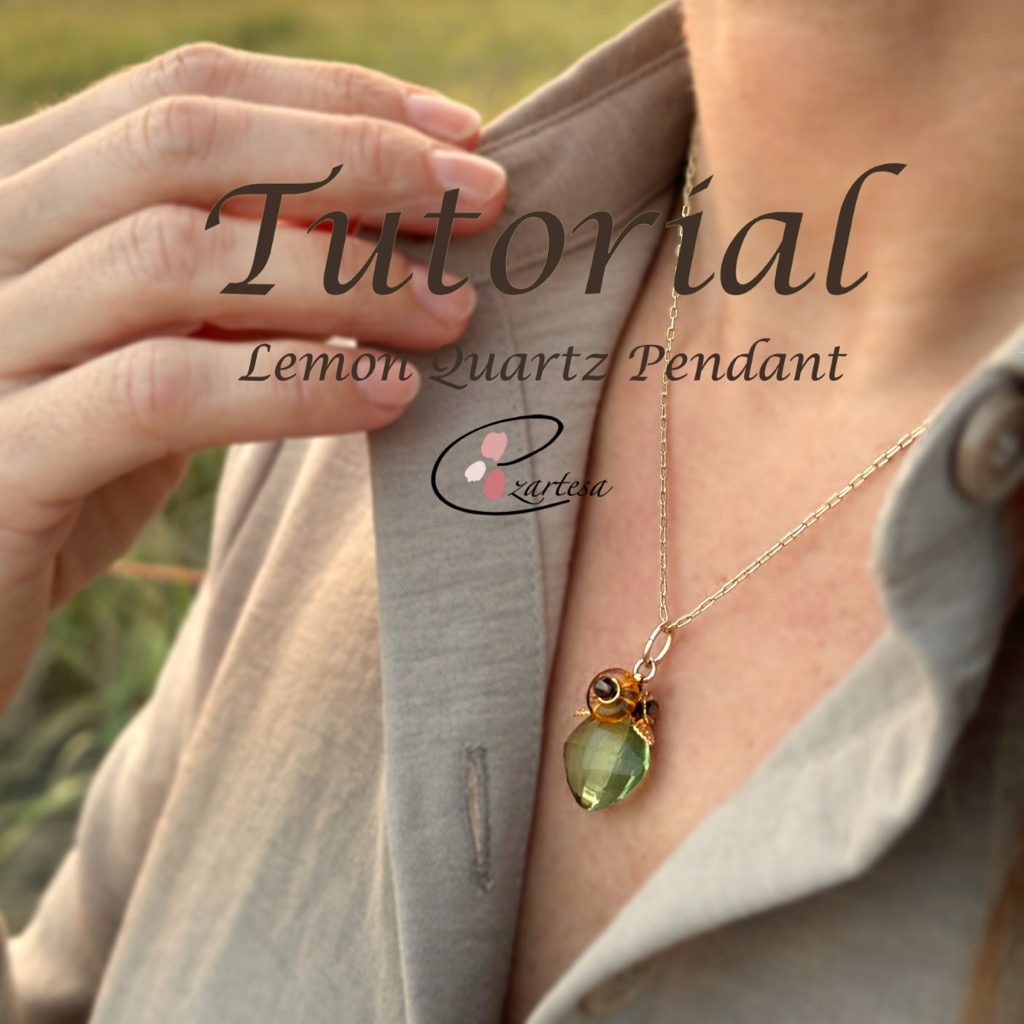
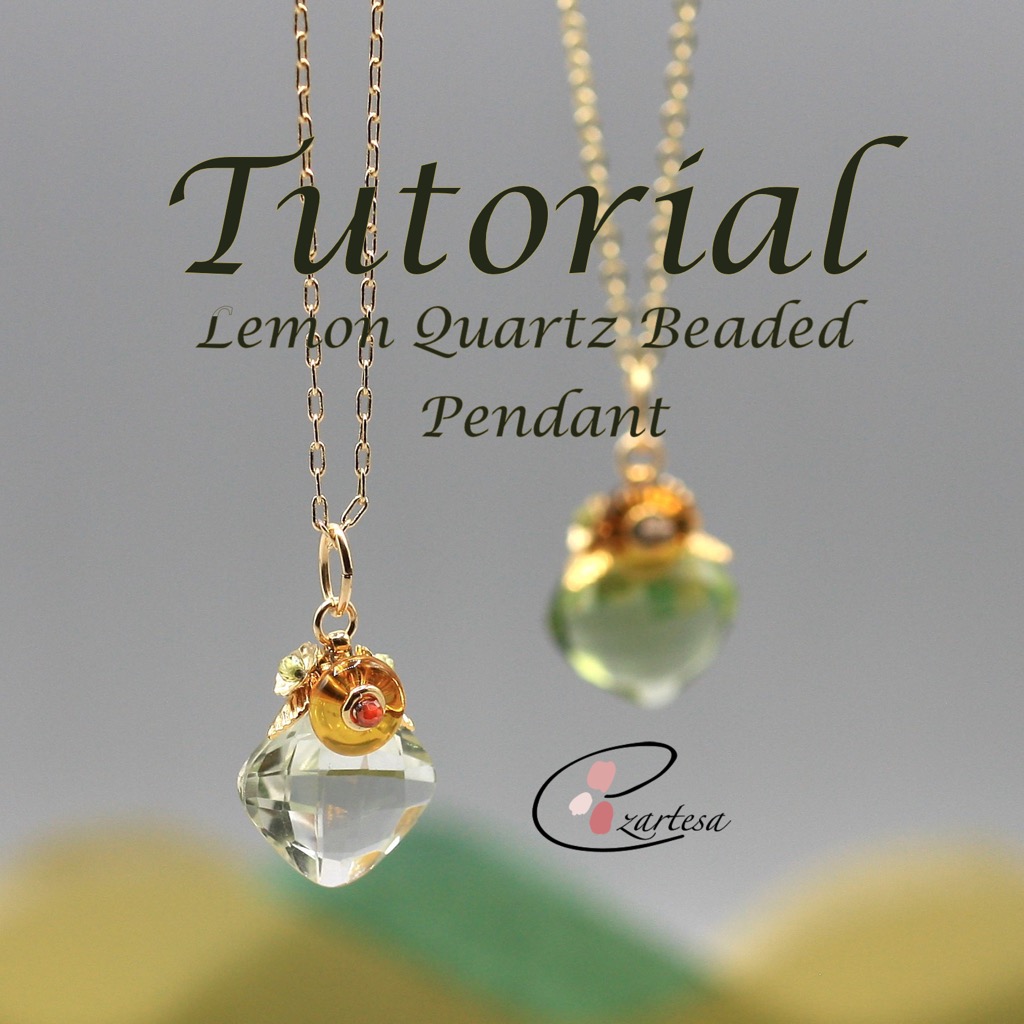
Lemon Quartz Beaded Pendant
Materials for a pendant.
- Nylon beading thread, green color (conditioned with beeswax) or Fireline 6lb.test
- Beading needles #12.
- Scissors.
- Pliers.
- Jump-ring tool.
- Bead, lemon quartz (heated), 17x17mm hand-cut top-drilled faceted puffed diamond, B grade, 1 bead.
- Bead, smoky quartz (heated / irradiated), light to medium, 3mm round, B grade, 1 bead.
- Bead, Czech pressed glass, honey, 8x2.5mm ring, 1bead.
- Bead, Zircon, avocado, 2mm faceted round, 3 beads.
- Bead cap, 14Kt gold-filled, 5x1mm flower, 2 beads
- Charm gold-plated brass, 6.5x4mm leaf, 2 beads.
- Jump ring, gold-plated brass, 4mm soldered round, 2.4mm inside diameter, 20 gauge, 1 bead.
- Jump ring, 14Kt gold-filled, 4mm round, 2.4mm inside diameter, 20 gauge, 1 bead.
- Jumpring – 14Kt golf-filled, open, 7.5x5mm oval, 6x3.3mm inside diameter, 18 gauge, 1 ring.
- Chain, gold-finished brass, 2mm cable.
- Bead, gold-plated brass, 2x1.5mm micro round, 2 beads.
- Rocailles Seed Beads
This is a step-by-step beading and jewelry making tutorial for beginners that will teach you how to make a very simple but super cute pendant.
Beaded Lemon Quartz Bead
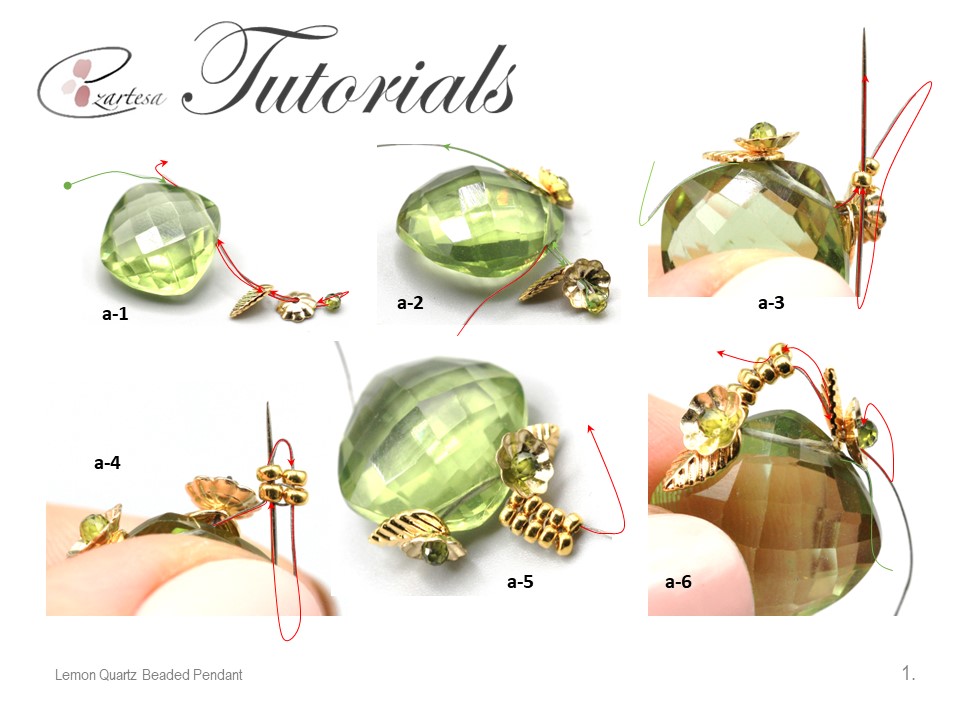
Step 1: On 1.5yd. of fireline and leaving a 12” tale, string 17x17mm puffed diamond lemon quartz bead, one 6.5x4mm leaf bead, one 5x1mm flower bead cap, one 2mm avocado Zircon bead (photo a-1) and sew the needle back through the 5x1mm flower bead, leaf bead and exit through the other end of the quartz bead (photo a-1).
Step 2: Then secure the other end (tale) of the thread and string one 6.5x4mm leaf bead, one 5x1mm flower bead cap, one 2mm avocado Zircon bead and sew the needle back through the 5x1mm flower bead, 6.5x4mm leaf bead and exit through the other end of the quartz bead (photo a-2).
Step 3: Next secure the other end of the thread, string two 15o As and sew the needle up through the first bead added to this step (photo a-3). Position the beads the closest you can near the quartz bead on the right side. Then use the square stitch:
- Be sure the working thread is emerging from the top of the first bead and pick up two 15o A beads.
- Pass down through the next bead to the right on the row below and up through the following two beads (photo a-4). Add a total of five rows of 15o A beads (photo a-5).
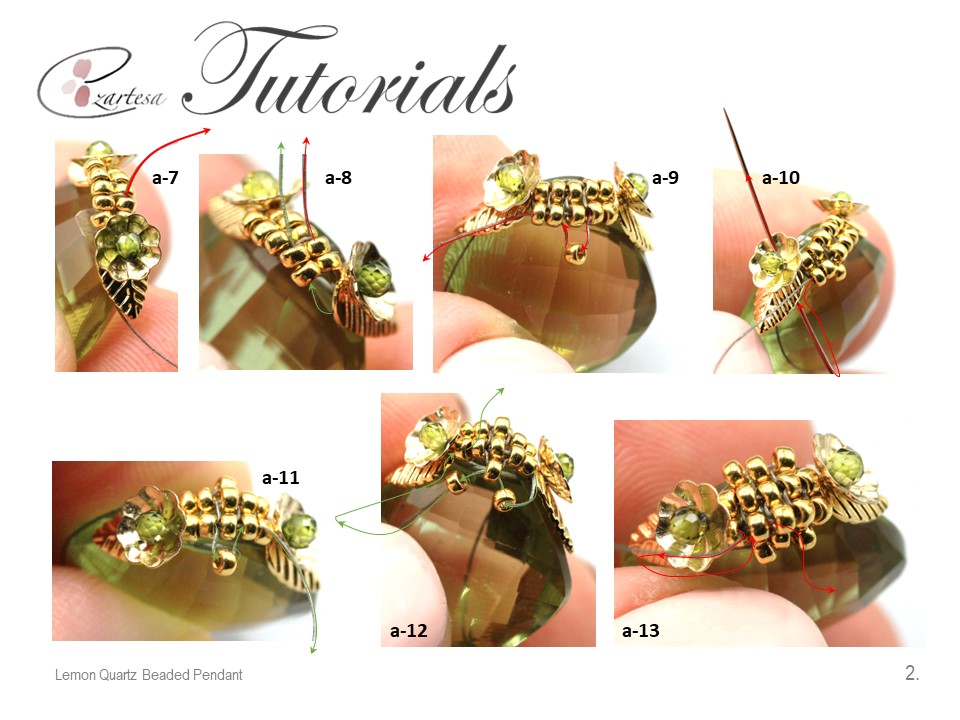
Step 5: Then pick up the other end of the thread and sew the needle up through the two 15oAs (at the left) of the beaded strip (photo a-8).
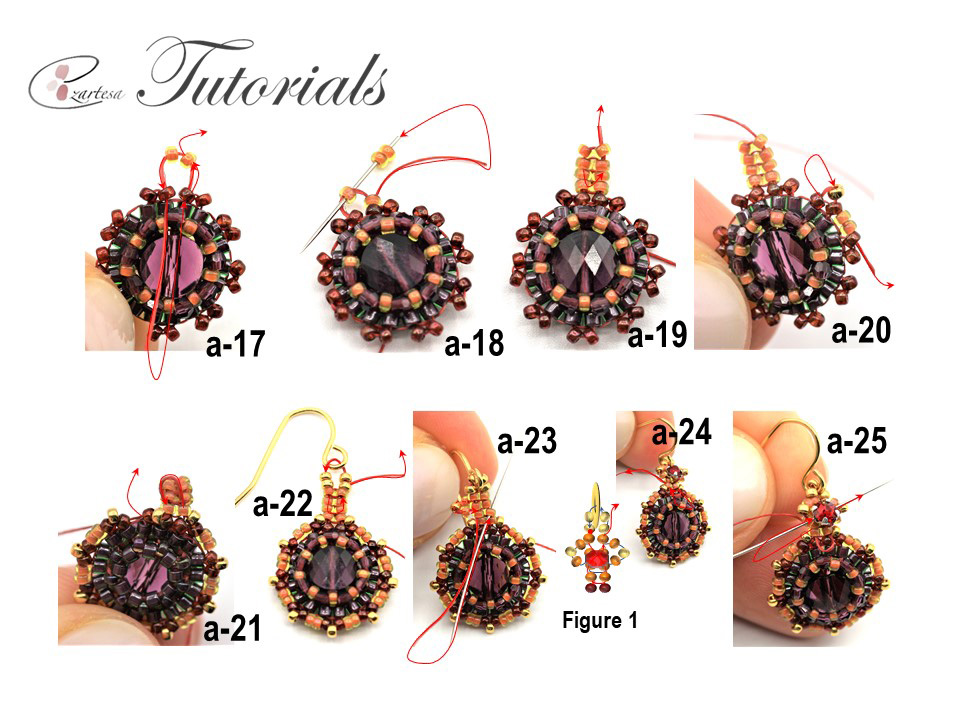
Step 6: Secure the other end of the thread, string one 15o A, skip one bead and sew the needle through the next two 15oAs (photo a-9). Then sew the needle up through the leaf bead, flower bead, 2mm zircon (photo a-10), then sew back through the leaf bead, flower and exit through the opposite 15o A bead. Then secure the other end of the thread, string one 15o A, skip one bead and sew the needle through the next two 15oAs (photo a-11).
Step 7: Next exiting 15o A bead string one 15o A bead and sew the needle to the left through the 15o A bead you added at the step 6, then string 15o A bead and sew the needle to the right through the last 15o A (photo a-12).
Step 8: Secure the other end of the thread and repeat step 7 at the opposite side (photo a-13).
Step 9: Next exiting 15o A bead sew the needle up through the next 15o A bead (photo a-13) then string one 2x1.5mm micro round bead, skip the middle bead and sew the needle diagonally through the other rows 15o A bead (photo a-14). Then sew the needle to the left through the opposite 15o A bead, go diagonally through the 2x1.5mm micro bead (photo a-15) and exit through the 15o A bead (opposite 15o A bead you started) (photo a-15).
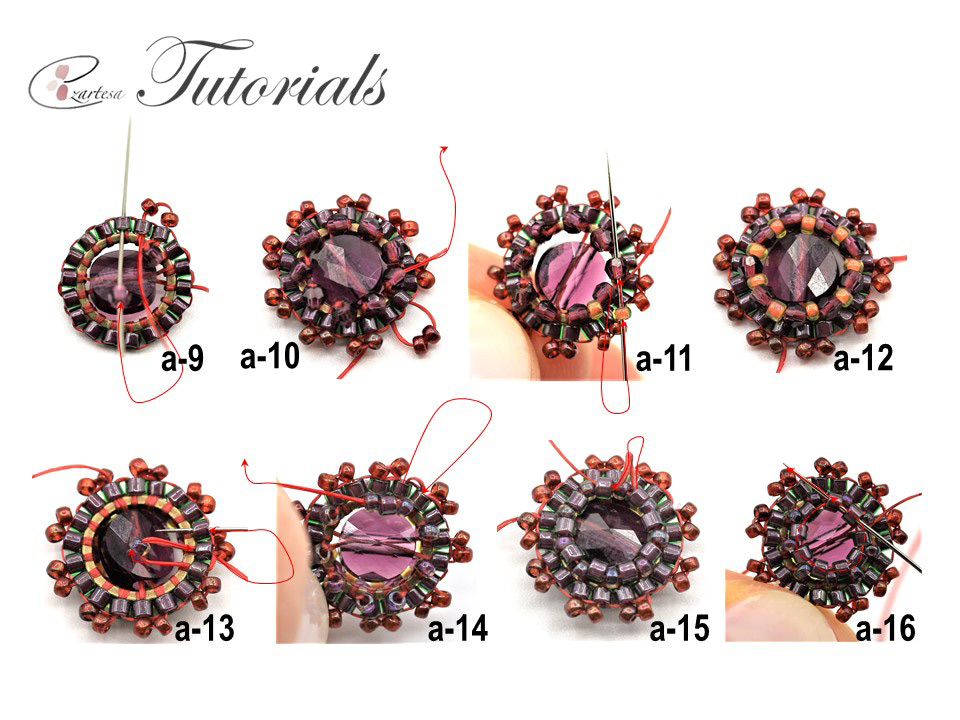
Step 10: Next sew the needle down to the left through the opposite 15o A, then string one 8x2.5mm glass honey ring, one soldered 4mm jump-ring, one 3mm smoky quartz bead and sew the needle back through the jump-ring, glass ring and exit through the opposite 15o A bead (photo a-16). Secure the thread tale in the beadwork and trim.
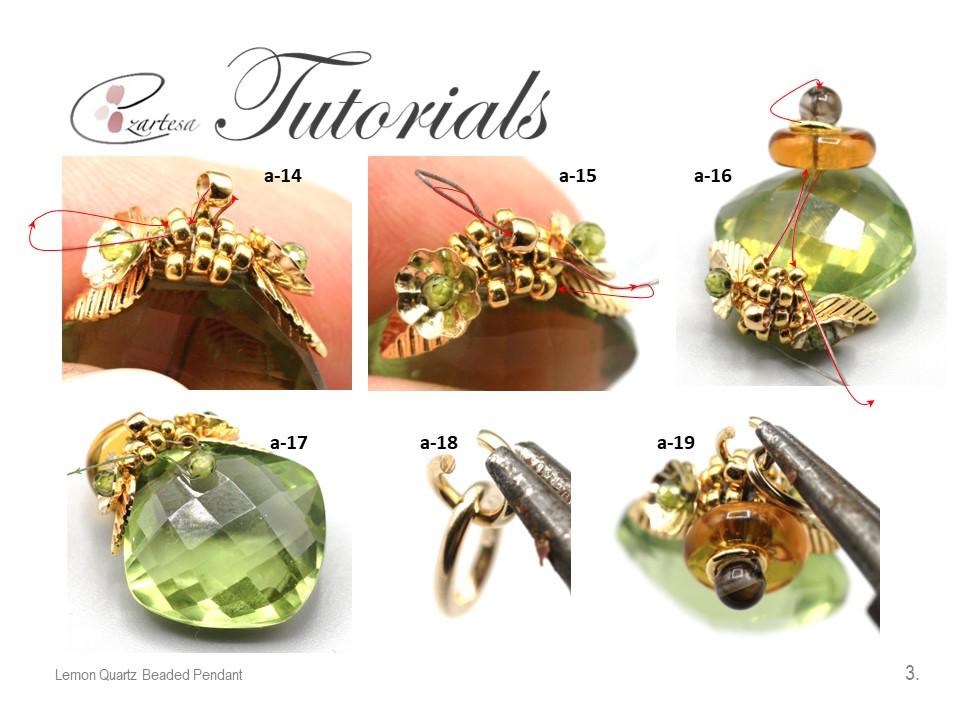
Step 11: Next secure the other end of the thread, exit one lower 15o A bead, string one 2mm avocado Zircon bead and exit through the next 15o A bead (photo a-17). Secure the thread tale in the beadwork with a few half-hitch knots and trim.
Step 12: Next pick up the 4mm jump-ring, open it, slide on it the 7.5x5mm oval jump-ring (photo a-18). Then slide the 4mm jump-ring through the micro bead and close the 4mm jump-ring (photo a-19,20).
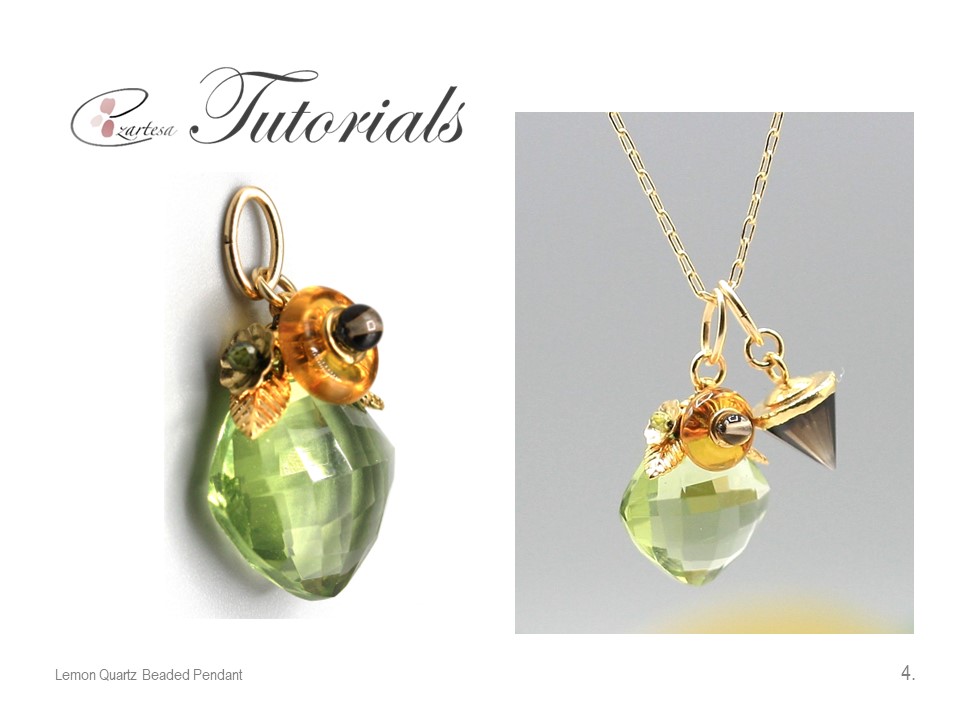
Suggestion: Instead of the 3mm Smoky Quartz bead you can add any other gemstone bead like amethyst or cranberry color 3mm zircon bead. Play with the pendant and add to the golden chain other pendants like the smoky quartz, gold-finished sterling silver, 9x8mm-11x8mm hand-cut faceted cone drop.
You can purchase and download this tutorial at my Etsy shop https://ezartesajewelry.etsy.com
Don’t forget to search in my shop for more advanced beading patterns.
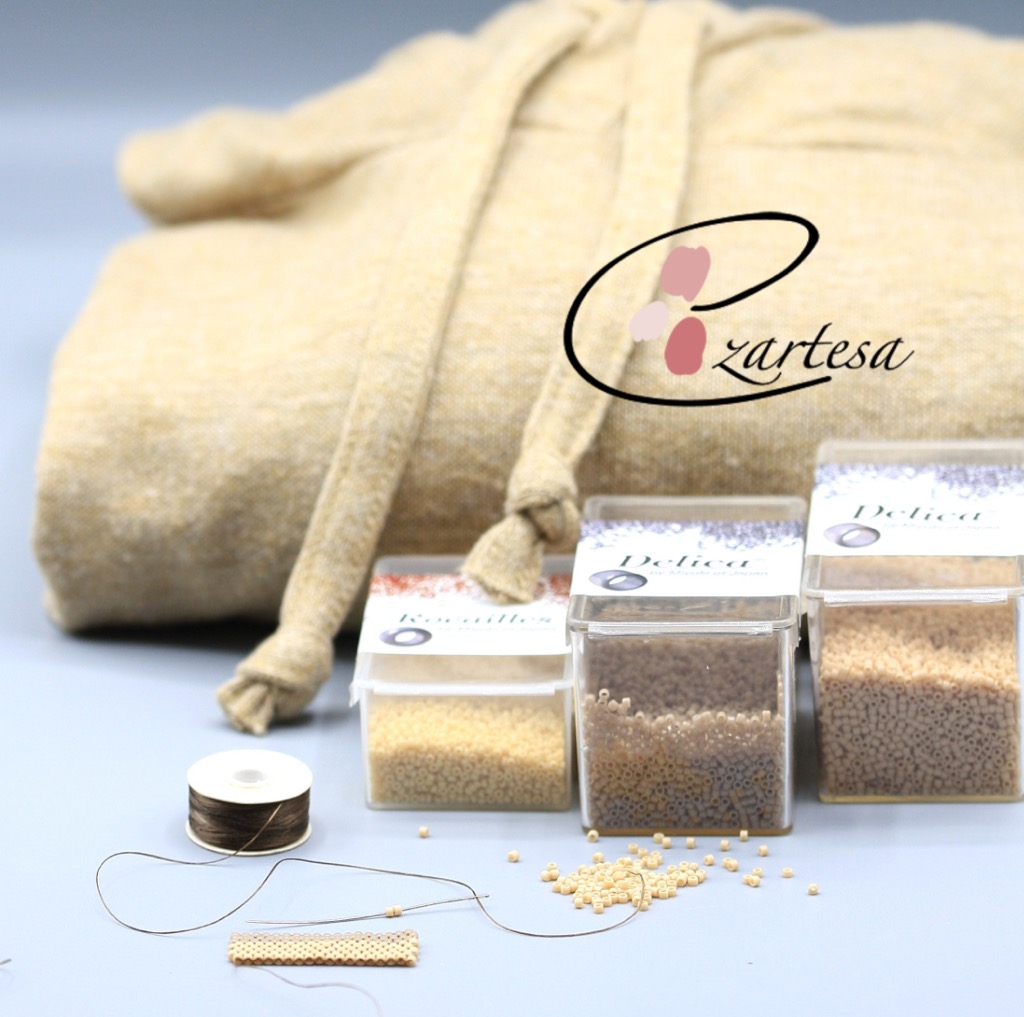
What Can You Do With Glass Seed Beads Other Than Jewelry?
Today I’m embellishing my old hoodie drawstrings with sand, beige and linen glazed opaque and matte glass seed beads. I’m using neutral color palette just because I wanted to add to my hoodie a little bit of texture.
The Materials:
- Nylon beading thread color brown (conditioned with beeswax).
- Beading needles #12.
- Scissors.
- Japanese Cylinder, Delica Seed Beads
approx. 1g size 11o B – Opaque beige (DB2105).
approx. 1g size 11o C – Linen glazed (DB0261).
- Rocailles Seed Beads
approx. 0,5g size 15o E – Mate pear (RR4512).
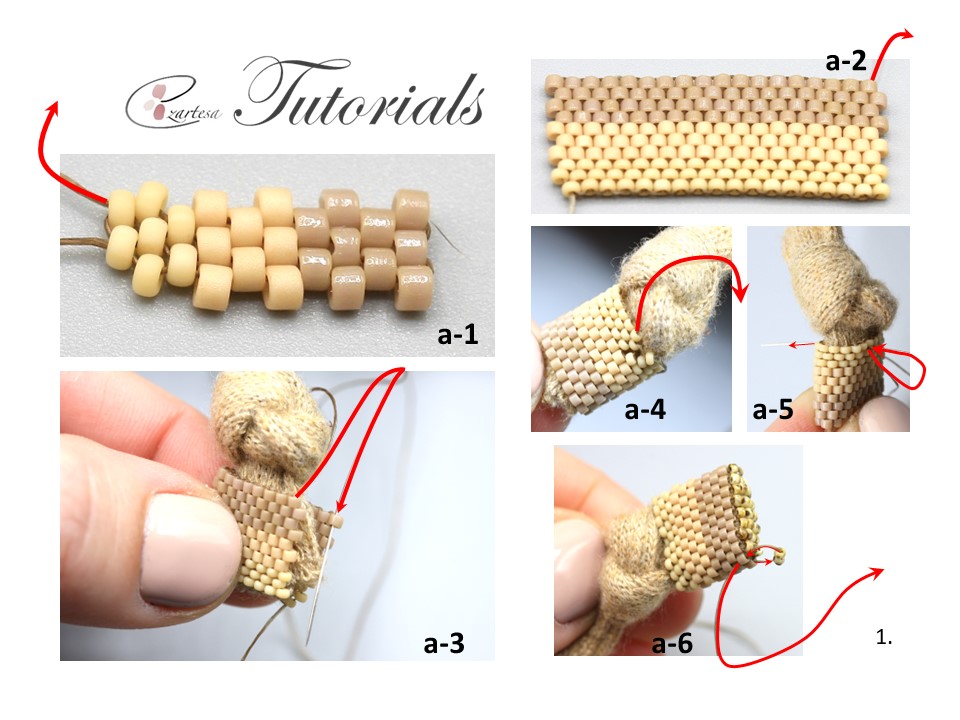
Step 1. Make a peyote strip (flat peyote stitch) that is the 10 beads wide and 36 rows long (photo a-1,2). Start by stringing three 15o Es, three 11o As, four 11o Bs.
Step 2. After you finished the strip, wrap it around the one end of the drawstring. Next Zipp-up the jagged edges of the strip (photo a-3,4). Then sew with the needle through the beadwork and the drawstring (repeat couple times) (photo a-5).
Step 3. Next weave the working thread through the beadwork and exit one edge 11oB bead, pick up the two 15o Ds, and sew down through the opposite 11oB bead of the front side beadwork. Come back through the next 11oB bead and repeat using four 15o Ds per stitch, work till the end and finish with two 15o Ds (photo a-6). Secure the thread tales in the beadwork with a few half hitch knots and trim.
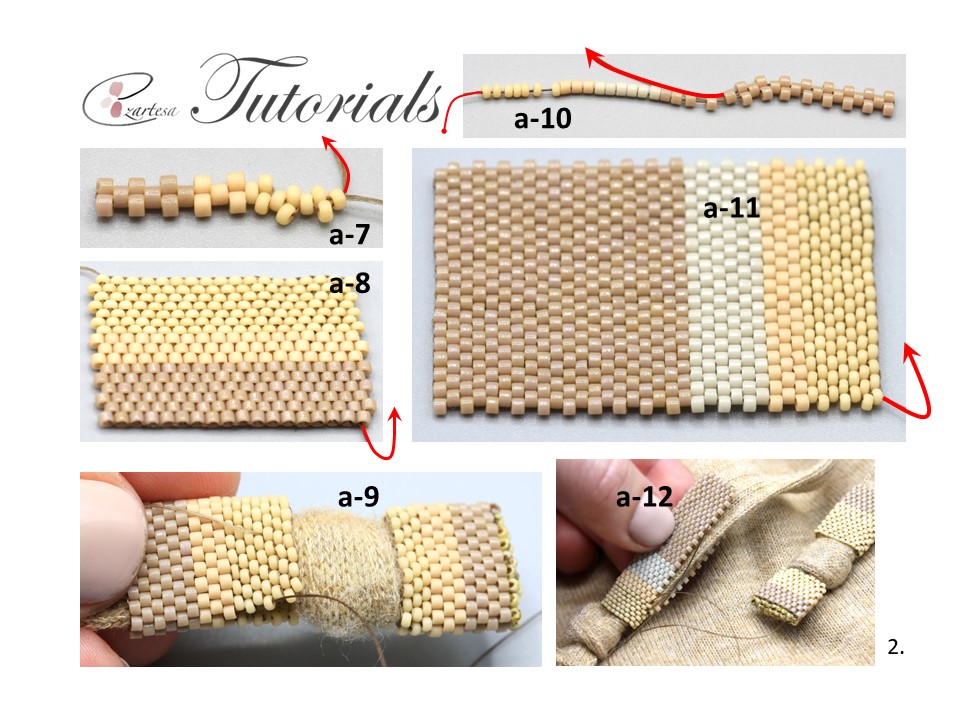
Step 4. Make a peyote strip (flat peyote stitch) that is the 16 beads wide and 36 rows long (photo a-7,8). Start by stringing seven 15o Es, three 11o As, six 11o Bs.
Step 5. After you finished the strip, wrap it around the drawstring you are already working on. Zipp-up the jagged edges of the strip (photo a-9). Then sew with the needle through the beadwork and the drawstring (repeat couple times).
Step 6. Make a peyote strip (flat peyote stitch) that is the 36 beads wide and 36 rows long (photo a-10,11). Start by stringing seven 15o Es, three 11o As, six 11o Cs, twenty 11o Bs.
Step 5. After you finished the strip, wrap it around the second drawstring. Zipp-up the jagged edges of the strip (photo a-12). Then sew with the needle through the beadwork and the drawstring (repeat couple times). Secure the thread tales in the beadwork with a few half-hitch knots and trim.
This is a supper simple idea what you can do with glass seed beads other than jewelry.
Discover the art of beading with my beading tutorials!Learn the basics and create beautiful peaces.
Wonderful DIY ways to transform your old jeans.
For some time, l had this awesome idea to make fun and artsy shorts from my old jeans. Finally, I did it! I had these oversized and slouchy jeans which were perfect for this project.
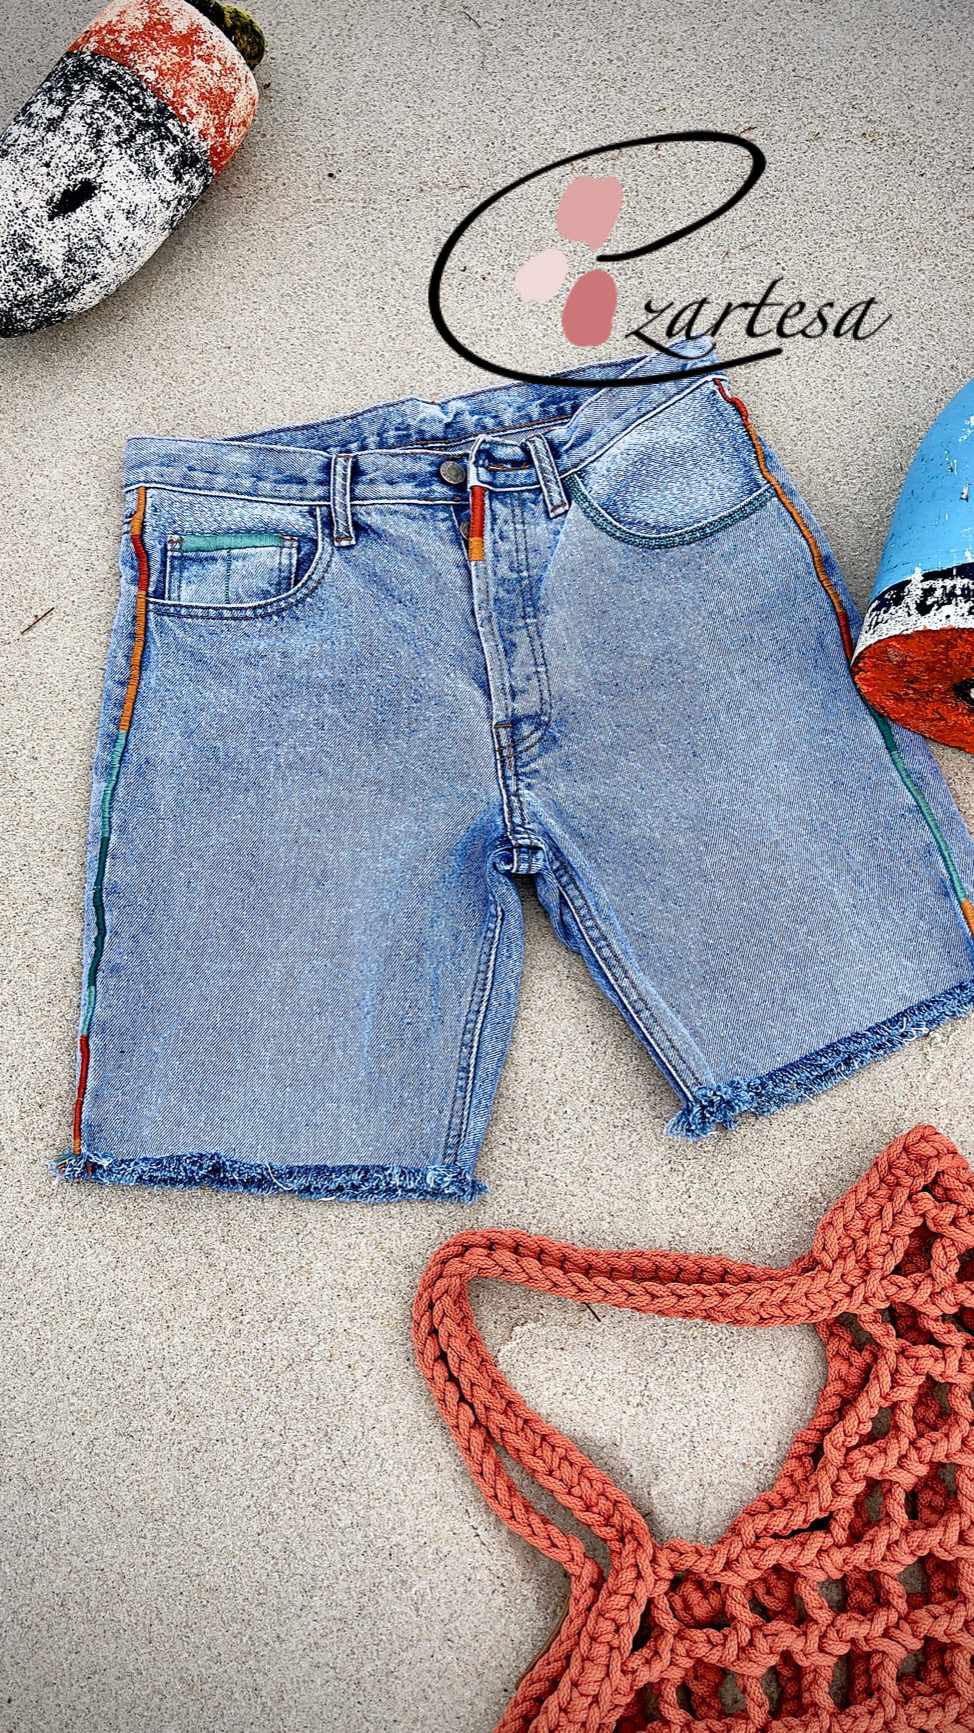
First, measure, mark, and cut one leg. Then folding in half and matching out seams from waistband down, mark and cut the second leg.
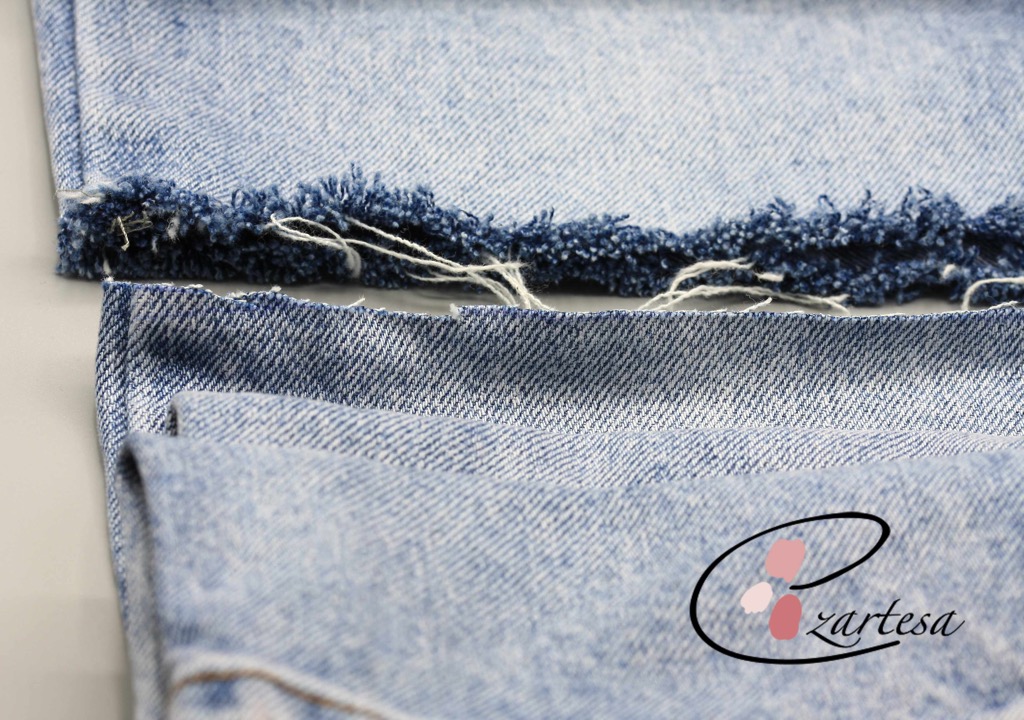
Second, distress your shorts and wash.
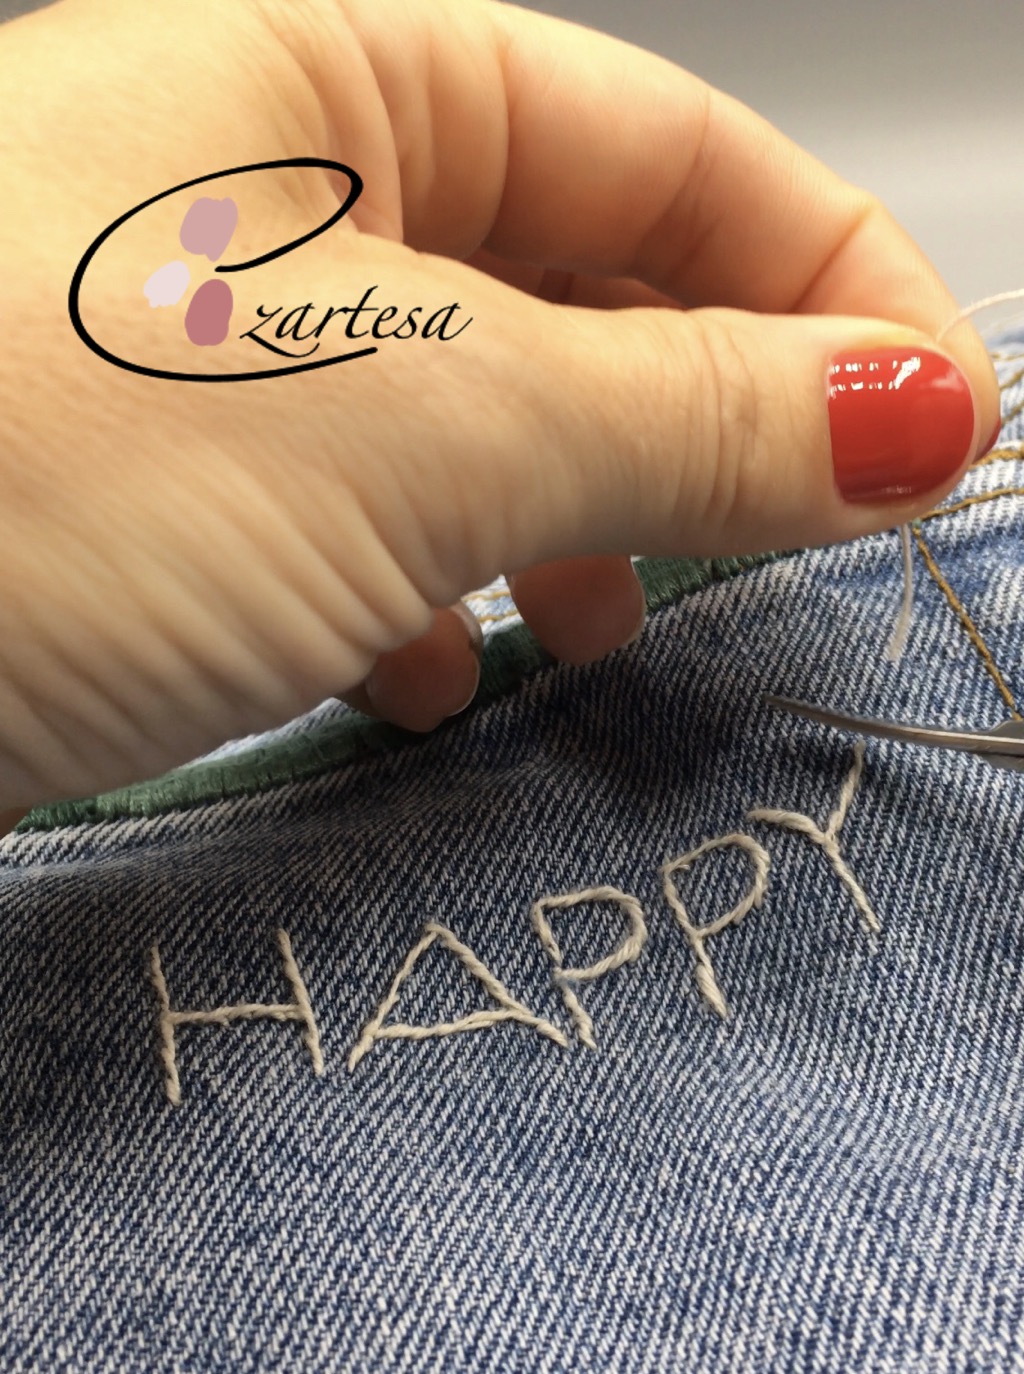
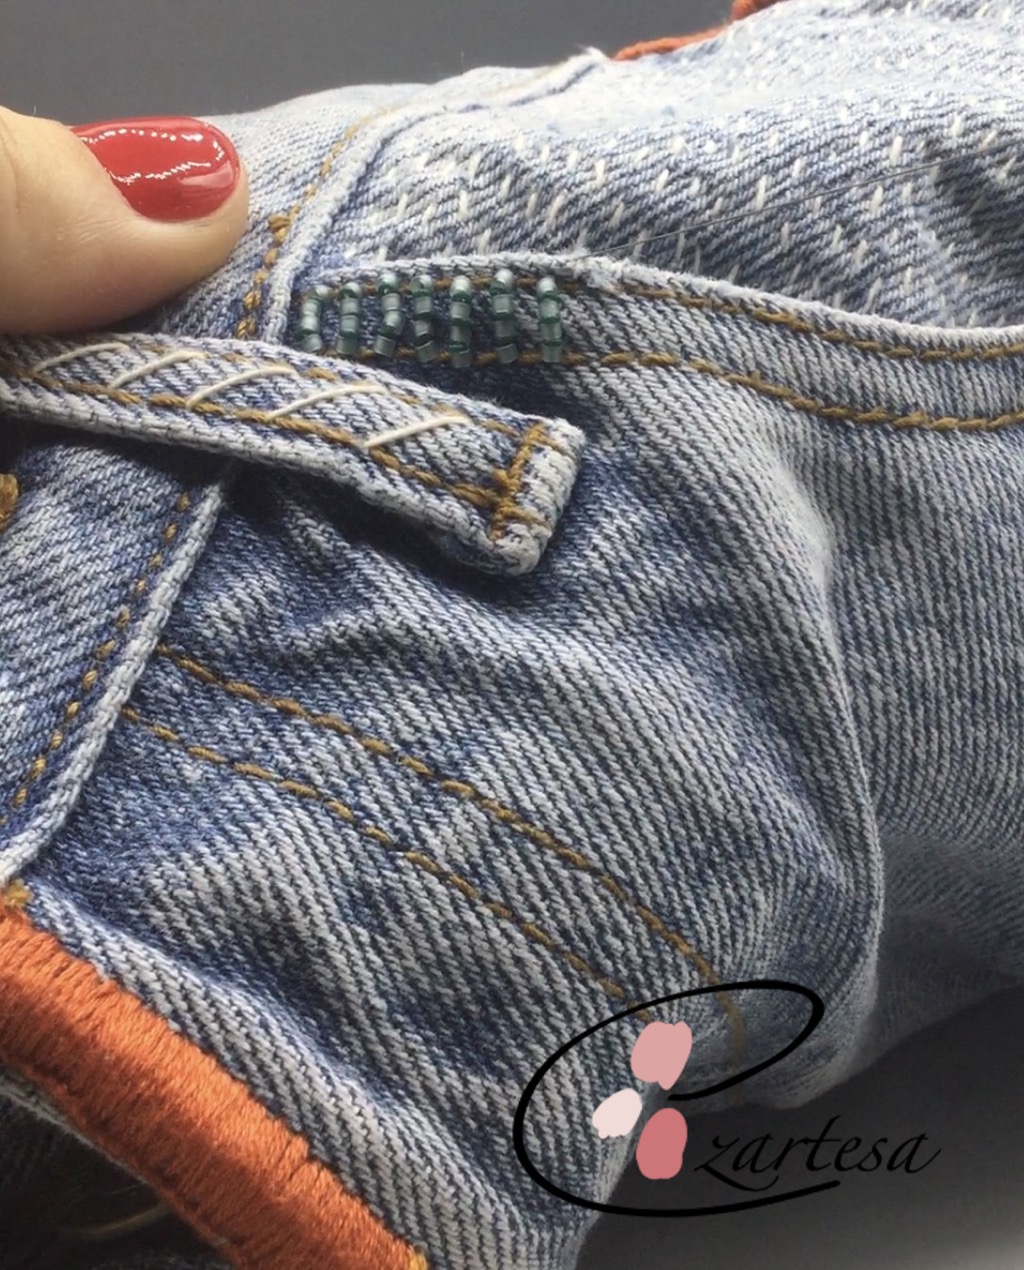
Third, have fun embroidering, patching & mending if you wish…
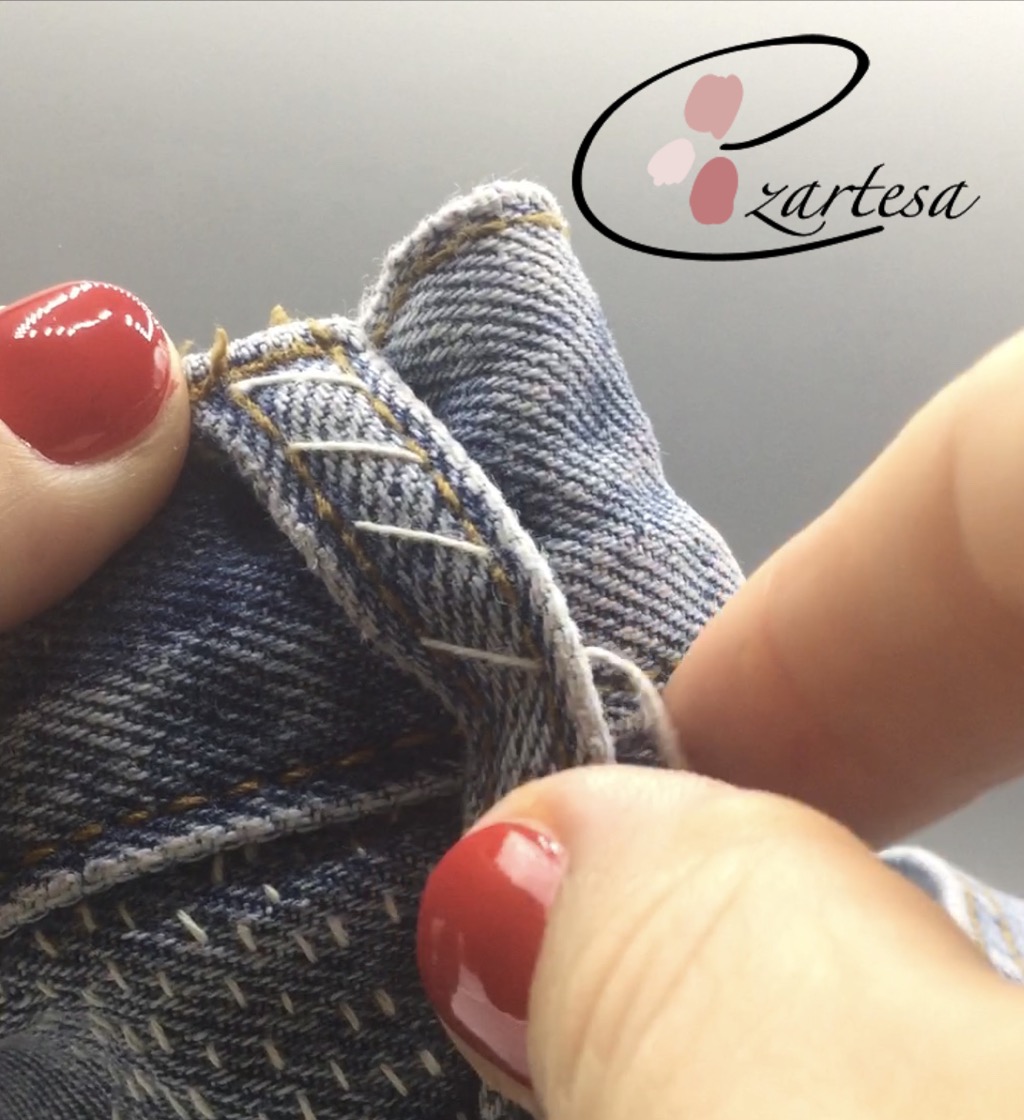
I used the matte finish glass seed beads, tiny rubber rings and embroidery cotton thread to embellish my shorts.
The basic Sachiko stitch was perfect for adding some texture to the jeans.

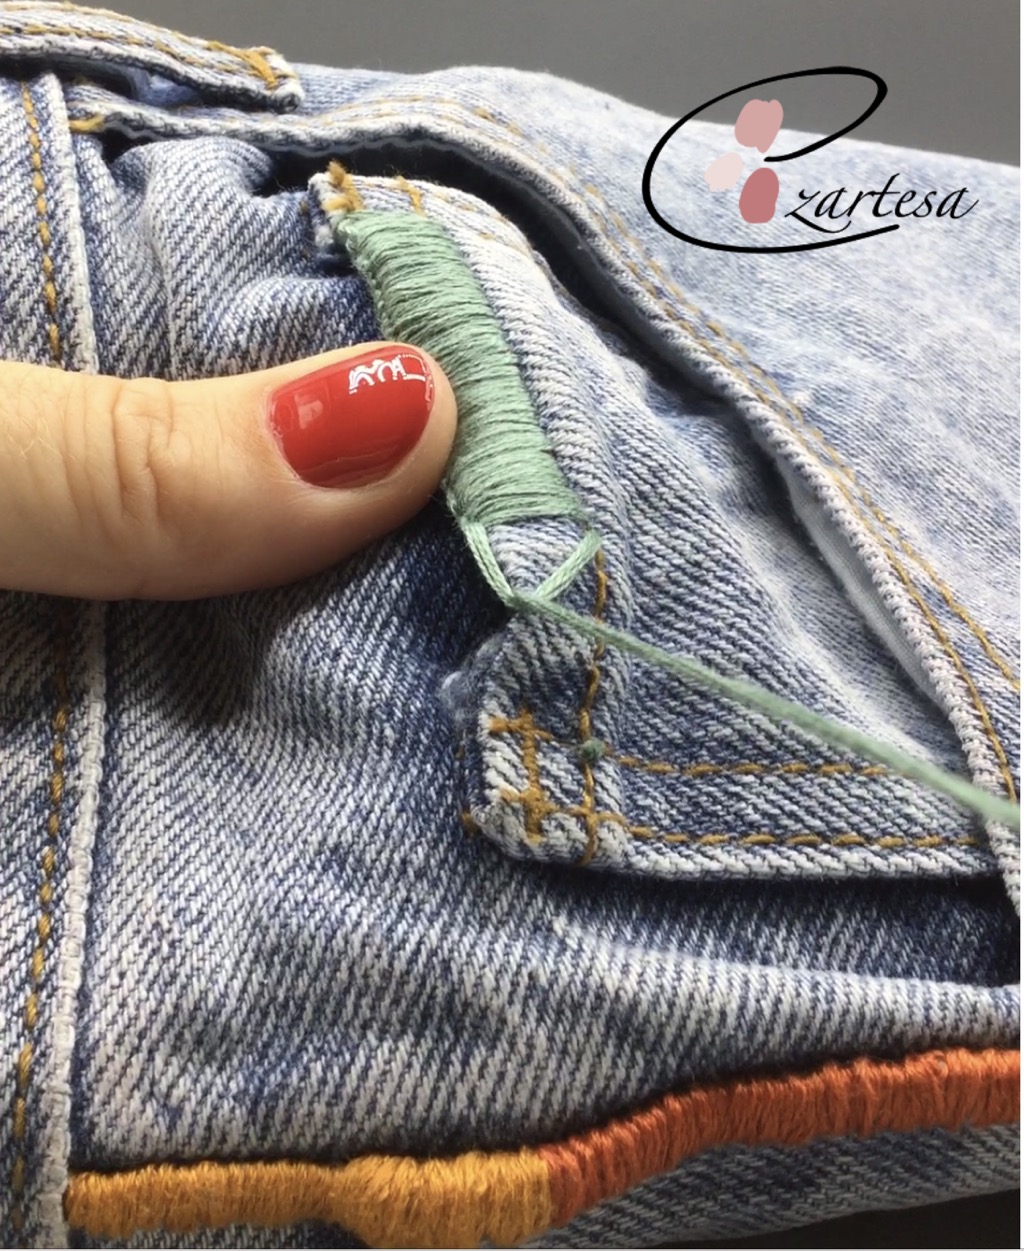
For the edging I used the blanket and satin stitches.
The gorgeous and tiny mate glass seed beads added the fun and artsy feeling to the jean shorts.
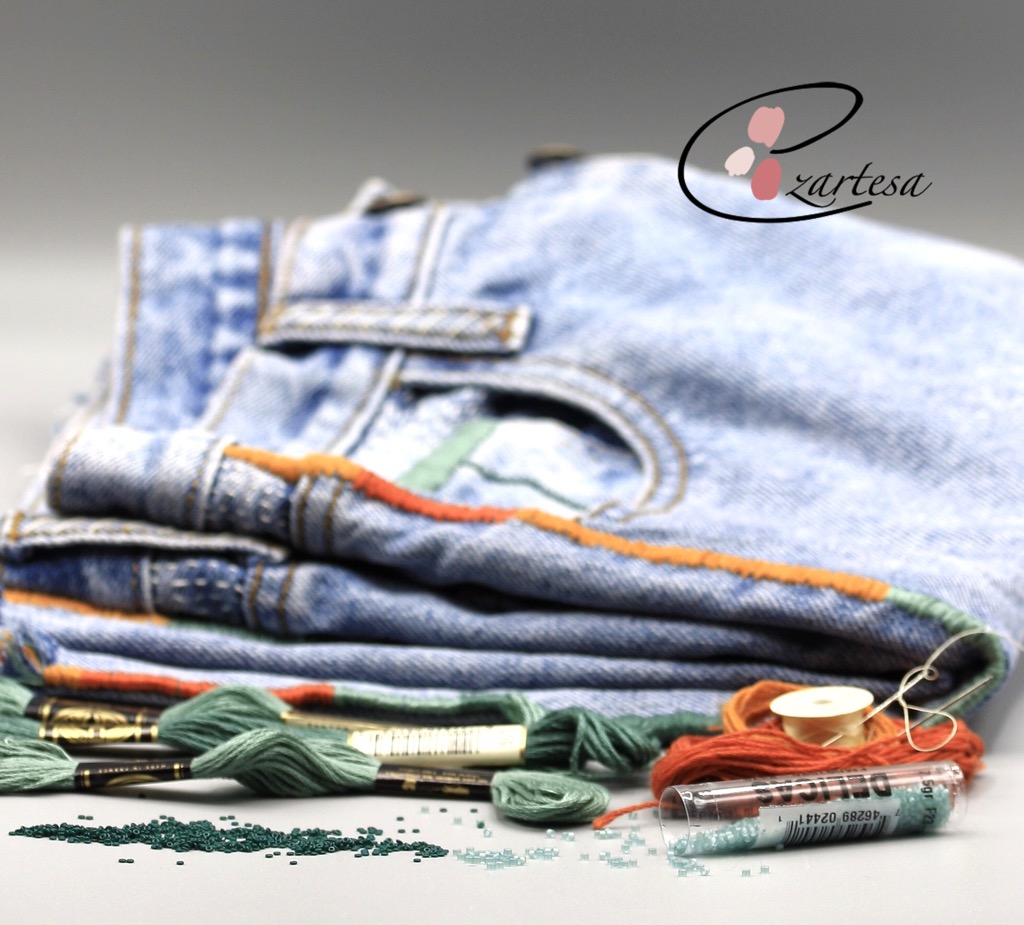
Materials:
Old jeans Delica glass seed beads #11 matte sea glass green DB0385
Oh! Rubber rings, dark green, 1.5mm round with 0.5mm hole.
DMC cotton embroidery floss:
Sea green 502
Dark sea green 501
Burnt sienna 921
Ochre 817
White 3033
FireLine 6lb smoke
I’m so happy to have these well-loved jeans back in rotation!
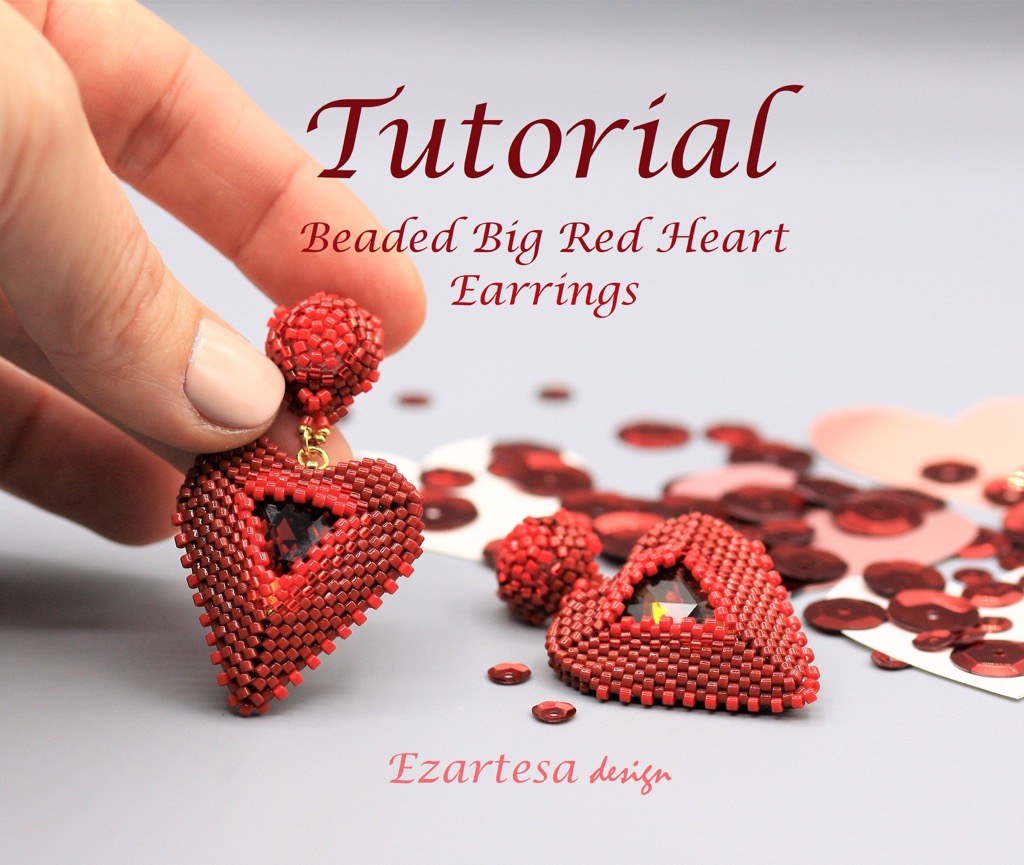
Beaded Heart Pendant Free Beading Tutorial by Ezartesa
Free Beading Tutorial. Beaded Heart Pendant by Ezartesa
I am very happy to share with you this free beading tutorial of “Purple Heart Pendant”. It’s easy project with simple peyote and square stitches and is suitable for beginners.
Hello everybody, just finished making the Beaded
💜 Pendant Tutorial. The material list and directions are available at my blog #HandmadeHour @HandmadeHour #InternationalWomensDay https://t.co/PkRwWXugL8 pic.twitter.com/jQsW8HvAse
Materials
- Nylon beading thread in red color, size D (conditioned with beeswax).
- Beading needles #12.
- Scissors.
- Roundnose pliers.
- Jump-rings - open 4mm 20ga, 2.4mm, 13 beads.
- Jump-rings - open 7.5x5mm, oval, 1 bead.
- Gold plated brass rounds, 2mm micro round bead, 1.3mm hole, 1 bead.
- Drop in green and pink (red or burgundy color), 22x13mm faceted pear pendant.
- Chain, gold-finished brass, 2mm flat cable, 36 inches with 1-1/4-inch extender chain and lobster claw clasp.
- 2mm faceted Rhodolite Garnet round beads, 20 beads.
- 3-3.5mm round Garnet beads, 2 beads.
- Japanese Cylinder, Delica Seed Beads
approx. 3g size 11o B – Silver lined wine (DB0611).
approx. 3g size 11o C – Silver lined dk rose (DB1342).
approx. 1g size 11o D – 24Kt light gold plated (DB00340).
- Rocailles Seed Beads
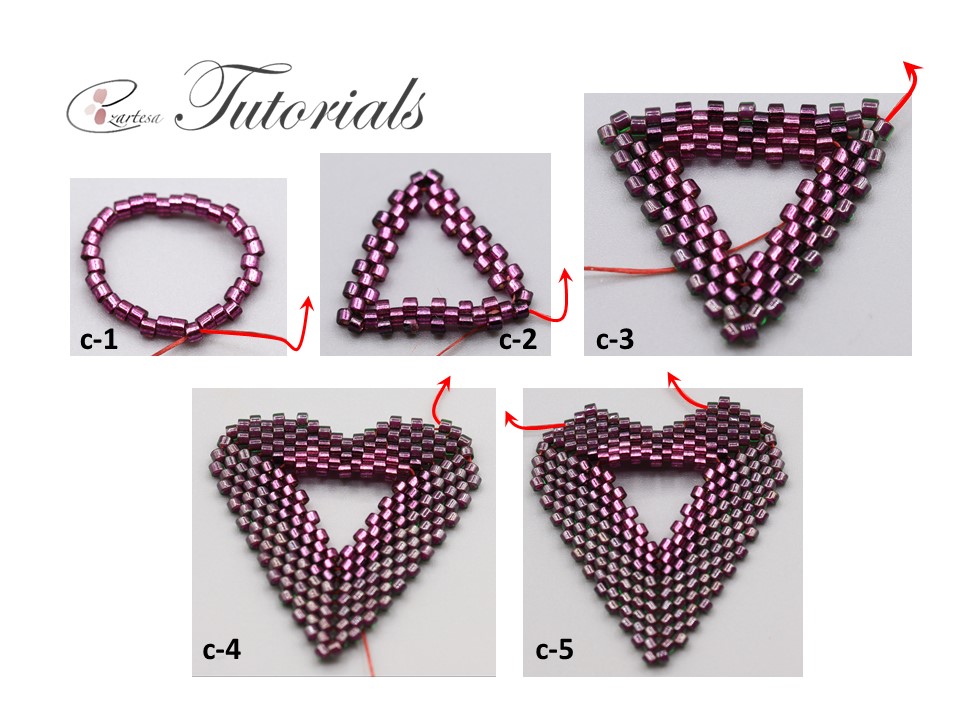
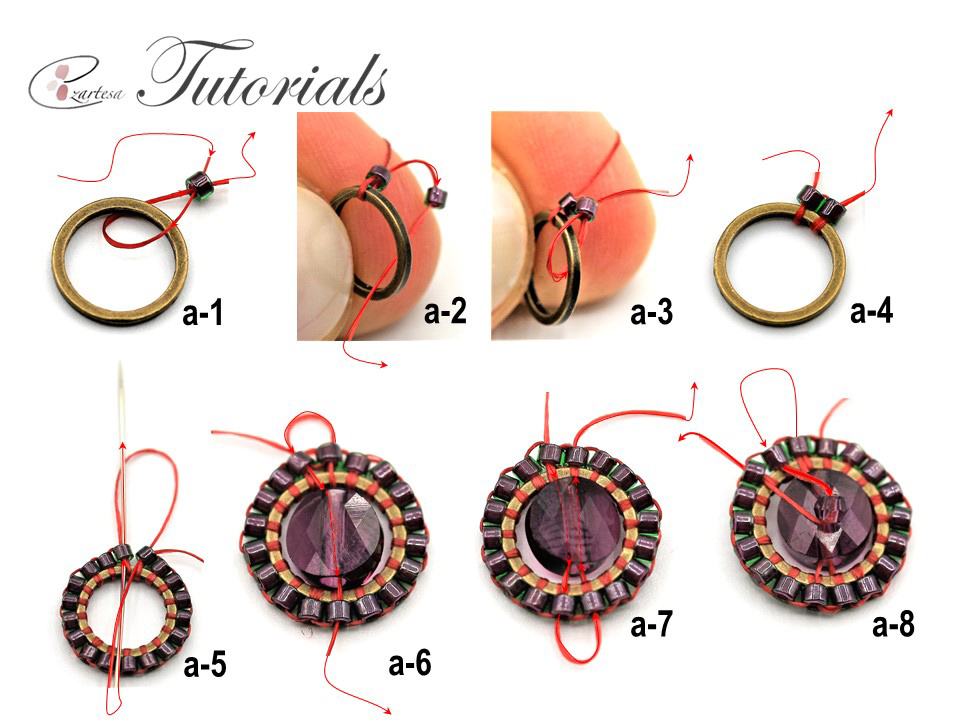
(1) On 1.5 yd. of thread, and leaving an 8-in. tail, pick up thirty-three 11o Cs and form a ring (photo c-1).
(2) Exiting one 11o C bead string two 11o Bs and sew the needle through the next 11oC bead (start forming the triangle shape). Next work two stitches with 11o Cs, one stich with 11o B, two stitches with 11o Cs, at the corner work two 11o Bs per stitch. Then work five stitches with 11o Bs, then string two 11o Bs and sew the needle through the next 11oC bead and finish with five stitches of 11o Bs (photo c-2). Step up through the first one (of the pair) bead added to this round.
(3) At the corner add two 11oAs per stitch, next work one 11o B, one 11o C, two stiches with 11o Bs, one 11o C bead, one 11o B bead and at the corner work two 11oAs per stitch. Next work with 11o Bs and at the corner adding two 11oA beads (photo c-3). Step up.
(4) Exiting one 11o A bead add two 11oAs per stitch, next work one 11o A, two 11o Bs, one 11o A, two 11o Bs, one 11o A and at the corner work two 11oAs per stitch. Next work with 11o As and at the corner adding two beads per stitch (photo c-3). Step up.
(5) At the corner add two 11oAs per stitch, next work two 11o As, one 11o B, two stiches with 11o As, one 11o B bead, two stitches with 11o As and at the corner work two 11oAs per stitch. Next work with 11o As and at the corner adding two 11o A beads per stitch (photo c-4). Step up.
(6) At the corner add two 11oAs per stitch, next work four stiches with 11o As, then weave the thread down through two beads and go up through the one bead, work four 11o As and at the corner work two 11oAs per stitch. Next work with 11o As and at the corner adding two 11oA beads per stitch (photo c-4). Step up.
(7) Next sew the needle through the two beads of the corner, then work four stitches with 11oAs. Weave the thread down and up through the 11o As, work four 11o As, sew the needle through the two corner beads and exiting 11oAs work down ten stitches with 11o As. Next add at the corner two 11o As and finish this step with ten 11oAs (photo c-4). Step up through the first bead added to this round.
(8) Then work three stitches with 11o As. Weave the thread down through the one 11o A and 11o Bs (photo c-4) weave the thread up through the beads and exit 11o A bead from previous step (I suggest not to weave the thread through the upper 11o As, because you won't be able to pass the thread through these beads in future) and work three 11o As, sew down through the two corner and one more 11o A bead. Next work with 11o As and at the lower corner adding two 11oA beads per stitch (photo c-4). Step up through the first bead added at this round.
(9) Exiting 11oA bead work two stitches with 11o As. Weave the thread down through the couple 11o As and then follow the path from step (8) and exit one 11o A bead from previous step. Next work two stitches with 11o As, sew the needle down through the four beads, work ten stiches with 11o As, work two 11oAs at the corner and finish with ten stitches of 11oAs (photo c-5). Step up.
(10) At top of beaded heart beadwork exiting 11oA bead work one stitch with one 11o A bead and repeat at the opposite side (photo c-5).
Check my Pinterest @artshopping for Beaded Heart pendant tutorial videos and learn how to make beaded chain links with 2mm and 3mm Garnet gemstone beads.
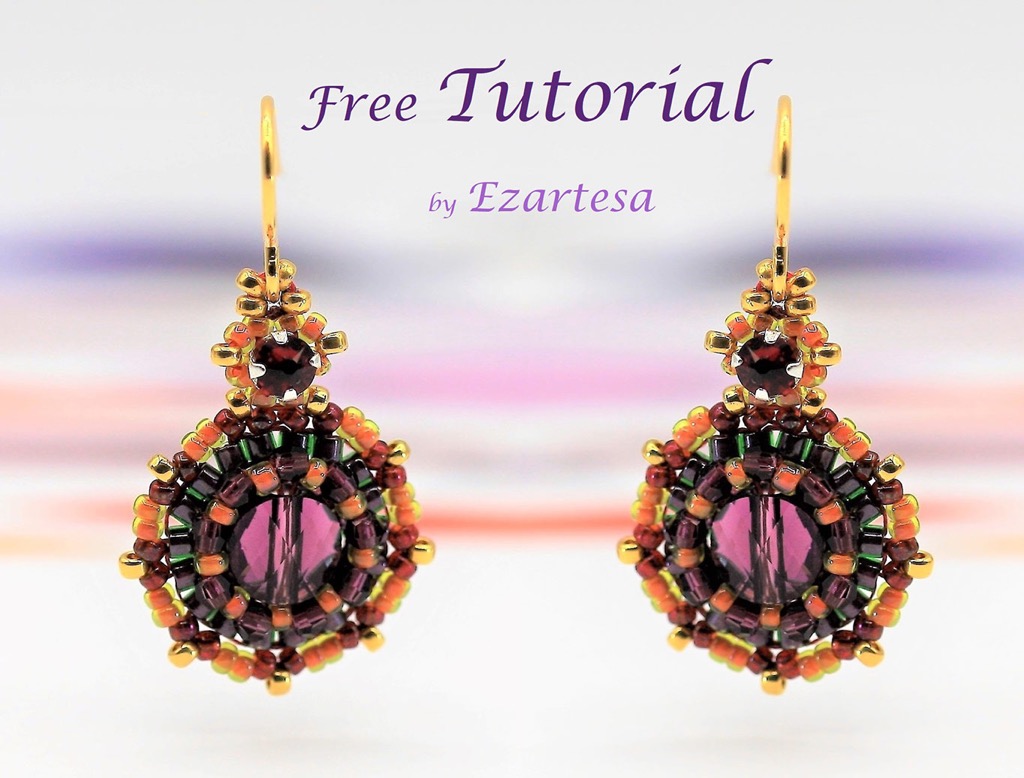
Detailed instructions for the Beaded Heart earrings
Please check my all beading tutorials.
Happy beading!
Ezartesa.
TUTORIAL: Ouroboros Beaded Hoop Earrings Beading Pattern
This is the ancient Egyptian symbol of which it is said: It slays, weds, and impregnates himself. It is man and woman, begetting and conceiving, devouring and giving birth, active and passive, above and below, at once.
As symbol of the origin and of the opposites in it the ouroboros the “Great Round” in which positive and negative, male and female, elements of consciousness, elements hostile to consciousness and unconscious elements are intermingled…
Hello, l made new beading tutorial Ouroboros Beaded Hoop Earrings!
Living the cycle of it’s own life, it is the circular snake, the primal dragon of the beginning, that bites it’s own tale, the self-begetting #HandmadeHour @HandmadeHour https://t.co/4Y6VsbLMUI #handmade #DIY pic.twitter.com/WZsrFYyc4N
This beading pattern is fun to make…learn how to make beaded circle from the herringbone rope and how to make the tiny serpent’s head. The seed beads I use: Delica #11, Toho #11 and Rocaille #15 size glass seed beads. And I’m using the simple tubular peyote and herringbone rope stitches.
Free Beading Patterns with Instructions for Beginners | Ezartesa
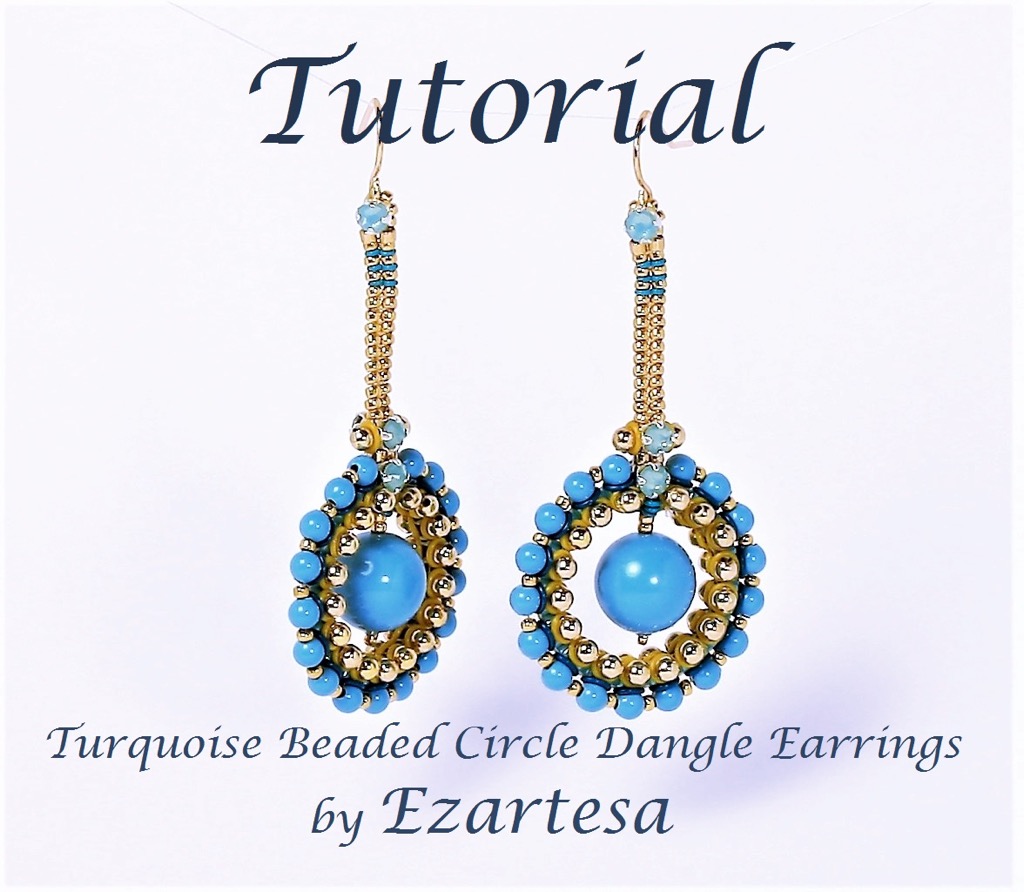
Free Beading Patterns with Instructions for Beginners by Ezartesa
Bead weaving is my passion, and I am incredibly happy to share with you this free beading pattern of “Turquoise Beaded Circle drop dangle earrings”. It is easy project with basic stitches and is suitable for beginners.
Materials for a pair of earrings.
- Nylon beading thread (conditioned with beeswax).
- Beading needles #12.
- Scissors.
- 10mm Turquoise Swarovski Crystal Pearls, 2 pearls.
- 3mm Turquoise Swarovski Crystal Pearls, 34 beads.
- 3x3.2mm Pacific Opal Swarovski Crystals Rose Montees, silver-plated pewter, 10 beads.
- 2.5mm round gold plated bead, 72 beads.
- Component, Oh! Ring, rubber, light green, 1.5mm round with 0.5mm hole, 24 beads.
- Component, Oh! Ring, rubber, light blue, 3mm round with 2mm hole, 34 beads.
- Component, Oh! Ring, rubber, yellow, 3mm round with 2mm hole, 72 beads.
- Component, antique brass-plated brass, 18mm open round with 16mm hole, 2 rings.
- Japanese Cylinder, Delica Seed Beads
approx. 0,5g size 11o B – light gold-plated beads
Rocailles Seed Beads
approx. 1g size 15o C – 24Kt gold plated.
- Ear wire, gold plated stainless steel, 11mm fishhook with open loop.
This is a step-by-step beading and jewelry making tutorial for beginners that will teach you how to make these beautiful, beaded circles drop dangle earrings. Learn how to use tiny glass seed beads to form the base around the metal rings and how embellish it with crystal pearls, metal beads and rubber rings.
Step-by-step instruction
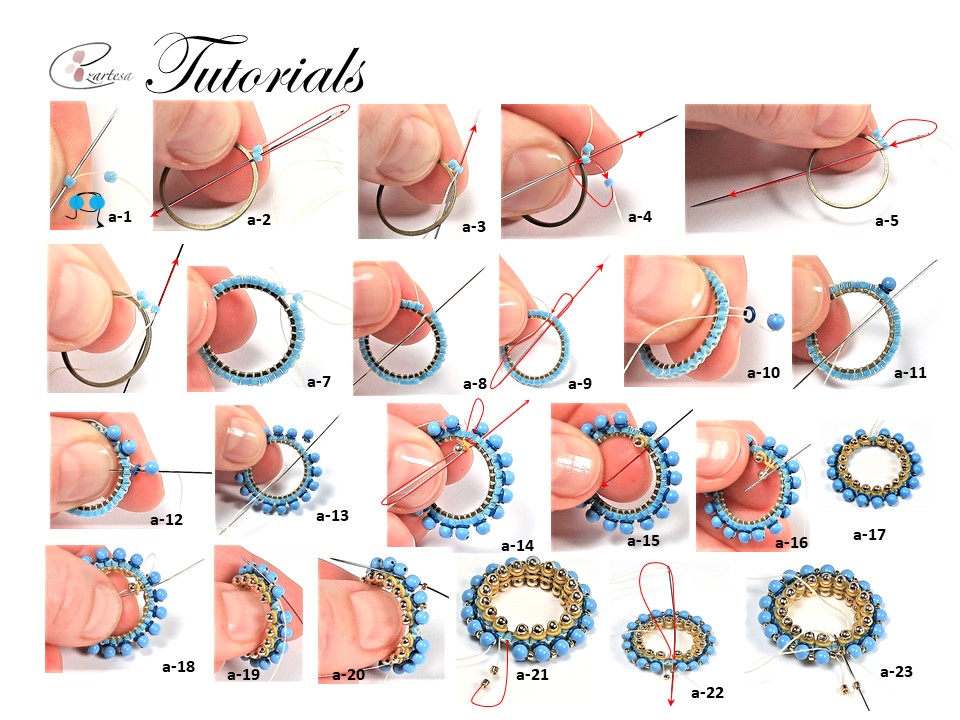
(1) On about 1yd. (.9m) of (ivory) thread, and leaving an 32in.(84cm) tail, make a two-bead ladder with 11o A color seed beads (photo a-1).
- Then pick up 18mm open round, and those two 15o A beads, hold them outside the ring (photo a-2), go with the needle through the ring and exit up through the second bead (photo a-3).
- Then pick up one 11o A and sew up through the second 11o A (photo a-4), then sew through the ring, and sew up through the last bead (photo a-5).
- Repeat around the ring for a total of 35 11o A beads.
(3) Then pick up one 3mm light blue Component, Oh! Rubber Ring, one 3mm Swarovski turquoise crystal pearl, and sew back through the rubber ring and down through the next bead (photo a-10), come up through the next bead to the right (photo a-11). Repeat around the ring for a total of seventeen turquoise Swarovski pearls and rubber rings (photo a-12, a-13).
(4) Then secure the other end of the thread and sew down through the next bead to the right. Pick up one 3mm yellow Component, Oh! Rubber Ring, one 2,5mm round gold platted bead, and sew back through the rubber ring and up through the next bead (photo a-14) and sew down through the next bead to the right (photo a-15). Repeat around the ring for a total of seventeen 2,5mm round gold platted beads, and rubber rings (photo a-16, a-17).
(5) Then secure the thread tail and sew down through the next bead to the right (work at other side of ring). Pick up one 3mm yellow Component, Oh! Rubber Ring, one 2,5mm round gold platted bead, and sew back through the rubber ring and up through the next bead (photo a-18) and sew down through the next bead to the right. Repeat around the ring for a total of seventeen beads and rings.
(6) Then sew up through the blue rubber ring and 3mm turquoise Swarovski crystal pearl (photo a-19), pick up one 15o C, and sew through the next 3mm turquoise pearl. Repeat around the ring for a total of sixteen 15o C s (photo a-20). and sew down through the next bead to the right. Repeat around the ring for a total of seventeen beads and rings.
(7) Secure the other end (that exiting 11o A bead) of the thread and pick up two 11o B s (photo a-21), skip one 11o A, and sew down through the next 11o A. Then skip one 11o A and sew up through the next 11o A and 11o B that you just added (photo a-22).
(8) Then pick up two 11o B s (photo a-23), and sew down through the one 11o B bead, come back up through the next (opposite) 11o B bead, and one 11o B that you just added. Then work thirteen pairs with 15o C s (photo a-24).
(9) After you added thirteen pairs of 15o C s (photo a-25), pick up one light green 1,5mm rubber ring, two 15o C s, one light green 1,5mm rubber ring and sew down through the one 15o C bead, come back sewing up through the next (opposite) 15o C bead, rubber ring, and 15o C that you just added (photo a-26). Repeat step (9) two more times (photo a-27, a-28).
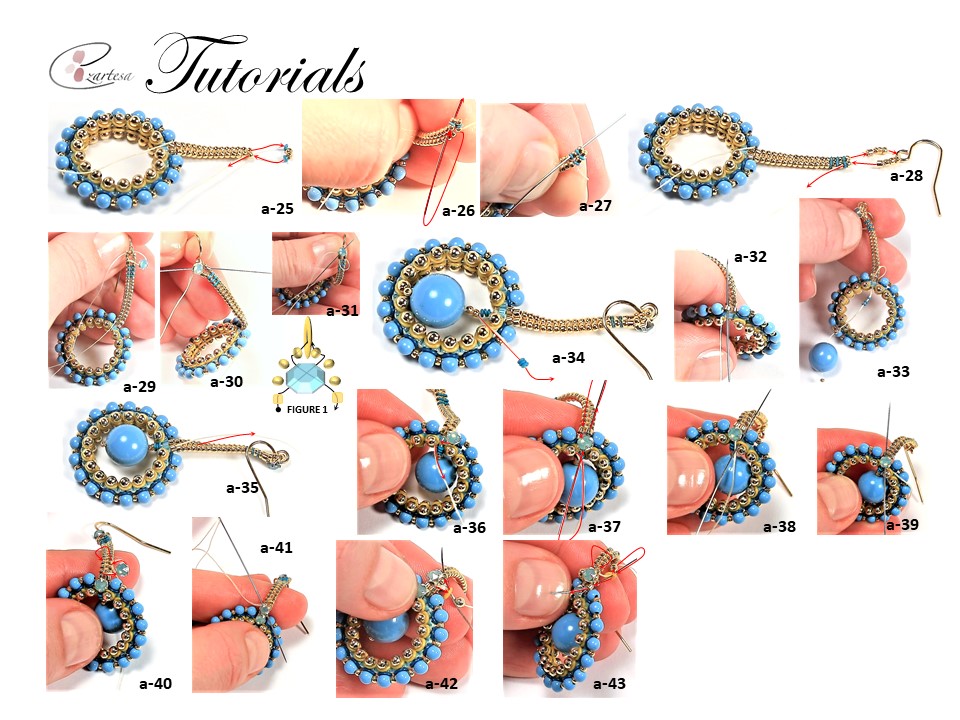
(10) Then pick up 11o B, tree 15o C s, ear-wire, three 15o C s, one 11o B, and sew through the opposite 15o C, and rubber ring (photo a-28).
(11) Sew up through the opposite rubber ring, 15o C and one 11o B bead, pick up one Swarovski 3x3.2mm Pacific Opal montee, and sew diagonally through the one 15o C, ear-wire, 15o C (photo a-29). Then sew diagonally through the other end of Pacific Opal montee and exit through 11o B (photo a-30) (FIGURE 1).
(12) Reinforce the Swarovski 3x3.2mm Pacific Opal montee by sewing through the opposite 11o B (photo a-31), sew diagonally through the montee, one 15o C, ear-wire, 15o C, then diagonally through the other end of Pacific Opal montee, and 11o B. Secure the thread in the beadwork and trim.
(13) Then secure the threat (tail) and sew up through the 11o B (photo a-32), then sew down through the opposite 11o B, down 11o A, and pick-up tree light green rubber rings, two 15o C s, 10mm Swarovski pearl and one 15o C (photo a-33).
(14) Sew back through the 10mm pearl two 15o Cs, pick up three light green rubber rings (photo a- 34) and turn the beadwork upside down, and sew through the 11o A bead, and go up through the 11o B (photo a-35).
(15) Pick up one Swarovski 3x3.2mm Pacific Opal montee and sew diagonally through the yellow rubber ring (photo a-36), then sew back through the same hole of montee and up through 11o B (photo a-37). Sew through the opposite 11o B, other end of montee, and go diagonally through the other yellow rubber ring (photo a-38). Then sew back through the Swarovski 3x3.2mm Pacific Opal montee (photo a-39) and exit up through 11o B (photo a-39).
(16) Exiting the 11o B, pick up one Swarovski 3x3.2mm Pacific Opal montee, and sew up diagonally through the third 15o C (photo a-40). Then sew through the opposite 15o C, the other end of Pacific Opal montee, and diagonally (skipping two15o Cs), through the 11o B (photo a-41).
Repeat steps (15), (16) to the other side of earring.
(17) Exiting the second 11o B, pick up one yellow rubber ring, one 2,5mm gold plated round, and sew back through the rubber ring, and exit up through the third 15o C (photo a-42). Then turn the beadwork upside down and sew down to the right through the opposite 15o C, pick up one yellow rubber ring, one 2,5mm gold plated round, and sew back through the rubber ring, and exit down through the 11o B (photo a-43).
Secure the thread tail in the beadwork with half-hitch knots, and trim.
Repeat to make a second earring.
I created these earrings in turquoise blue color palette, but you can mix and match different colors and materials to create the different look and feel of these earrings.
Do not forget to search in my shop for more advanced beading patterns.
© Ezartesa.
Taurus Zodiac Sign Birthstones, Jewelry and Beading Tutorials
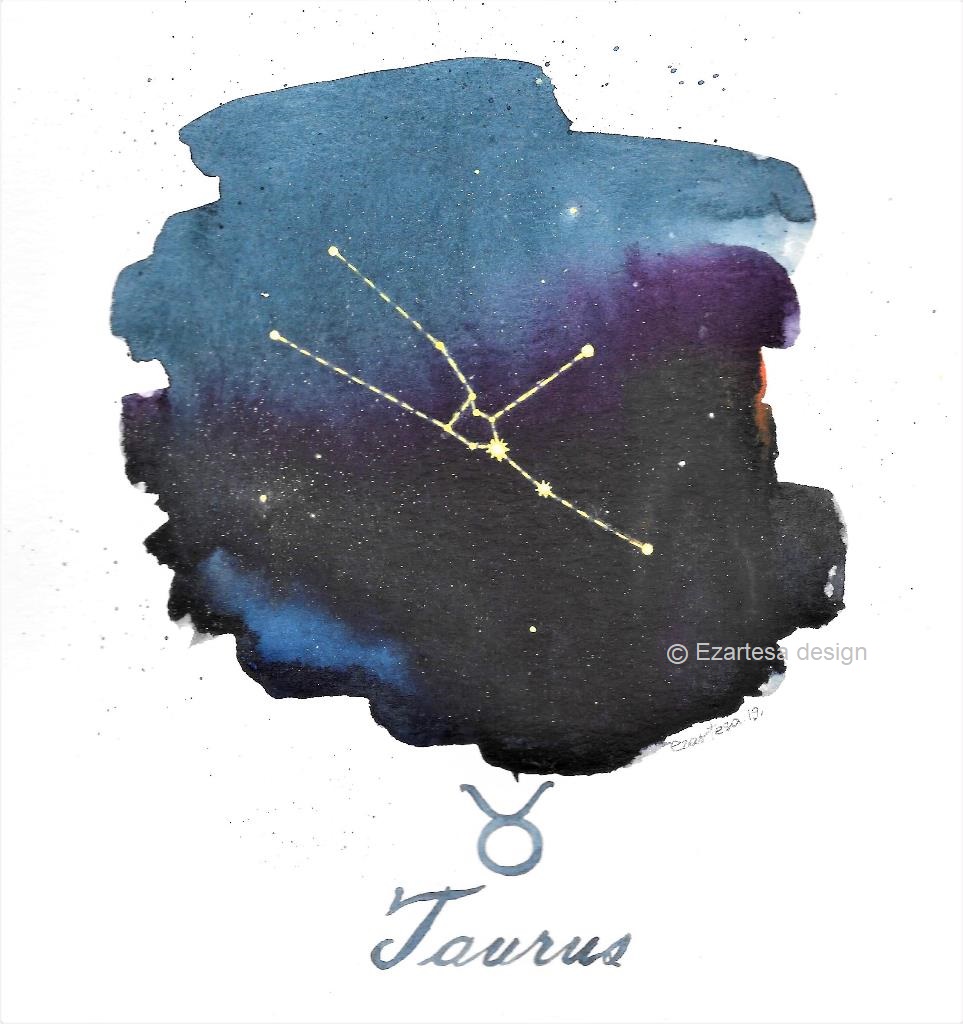
April 20-May 20
Incredibly creative and multitalented people, possibly the most gifted sign of them all in terms of ability in both music and the visual arts. Taurus lives a life of art-it literary is their life.
Taurus is too honest to play with your emotions. Never question the loyalty of these people. They will take it personally. If a Taurus feels like they are being taken for granted they will fade out of your life, just as quickly as they appeared.
Taurus likes to help others sort through they problems but doesn’t want anyone to help them when they have something going on. Taurus work in silence and make it look easy.
A Taurus is extremely generous sign. If there is something that you need and you let them know, they will make it happen. Taurus is a sign who hardly ever will lose hope and has fate that everything they do is either for the better or for a reason or meant to be.
This is the list of some crystals that are recommended for everyone who was born under this star sign.
Emerald, Rose Quartz, Diamond, Topaz, Lapis Lazuli, Green Aventurine, Tiger Eye, Turquoise
Emerald is the birthstone for May-born people. Emerald is believed to keep wearer calm and healthy. It stands for true love.
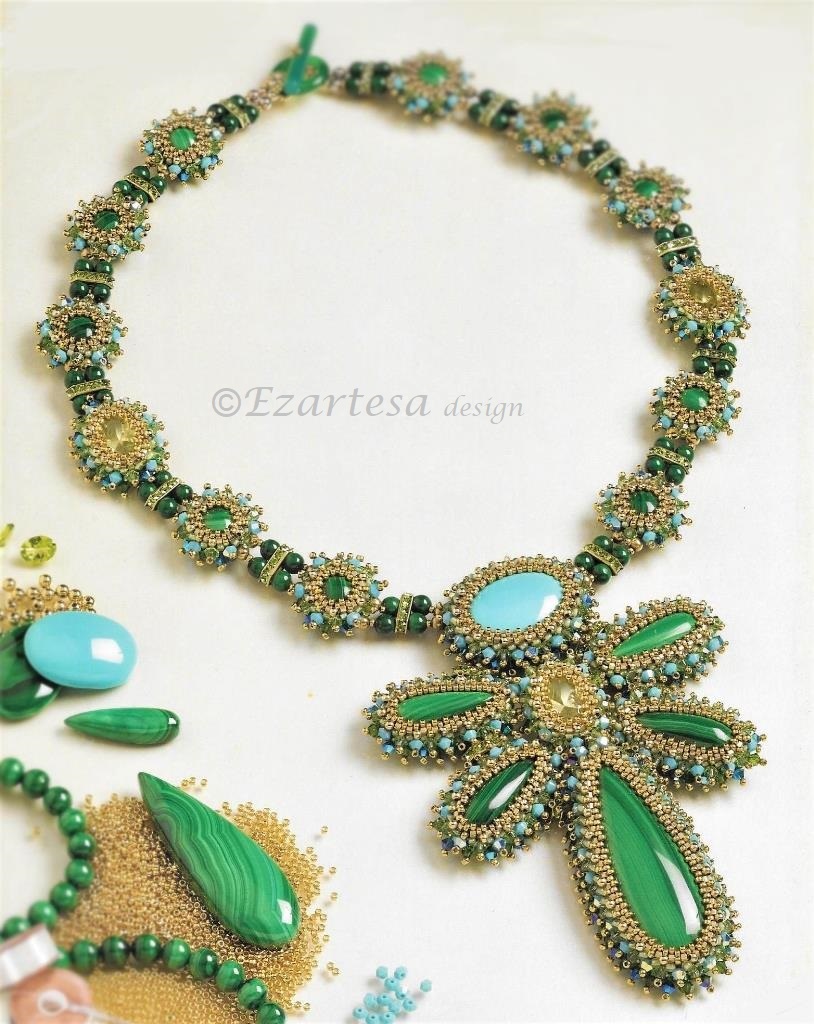
Beaded Necklace Emerald Isle is created from Malachite cabochons, Peridot gemstones beads, Sleeping Beauty Turquoise Cabochons, Swarovski crystals and tiny glass seed beads.
Rose Quartz - the love stone and is believed to enhance creativity, heal emotional wounds and mend broken hearts. It is also often used to increase self-esteem and self-worth by increasing the love and forgiveness towards oneself.
Flowering Cherry hand beaded necklace is created from tiny glass seed beads, Swarovski crystals and Rose Quartz cabochon.
Green Aventurine is calming and comforting for all matters of the heart. It is very positive stone for prosperity. Believed to amplified creativity and openness to relationships. Aventurine balances male-female energy.
This necklace is available at my etsy shop
Green Eye hand beaded bracelet and necklace are created from tiny glass seed beads, Green Aventurine cabochons and German glass beads.
Tiger Eye is a solar gemstone of courage. It strengthens your will and gives clarity to intention. Helps one to see clearly without subjectivity. Brings good luck and prosperity.
This necklace is hand beaded from tiny glass seed beads, Tiger Eye cabochons, Black Onyx cabochons, Czech glass beads, Turquoise beads and Citrine gemstone beads.
Diamond is the hardest and most durable gemstone, symbolizing everlasting love and invincibility. Its wearers are thought to carry great courage, making it possible to conquer hardships.
The representative color for Taurus is Green. All shades of green nurtures Taurus’ spirit and reinforces its connection to nature and growth.
The other colors which are also associated with Taurus are pink and blue.
Secret Garden glass seed bead and Swarovski Crystal hand beaded necklace.
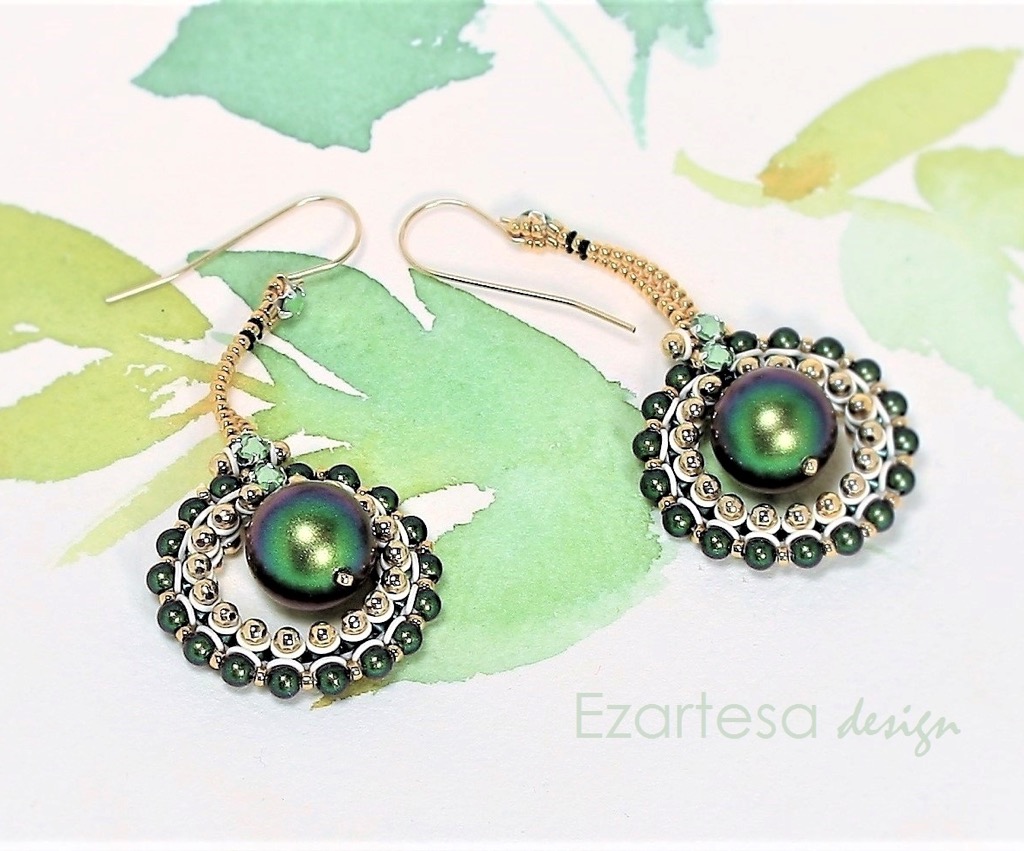
I designed gorgeous teardrop earrings beading tutorial with Taurus zodiac sign colors.
Create your own beaded teardrop dangle earrings inspired by Taurus zodiac sign colors and birthstones. Beading pattern is available there.
How to make adjustable sliding clasp for necklace
How to make adjustable sliding clasp for necklace
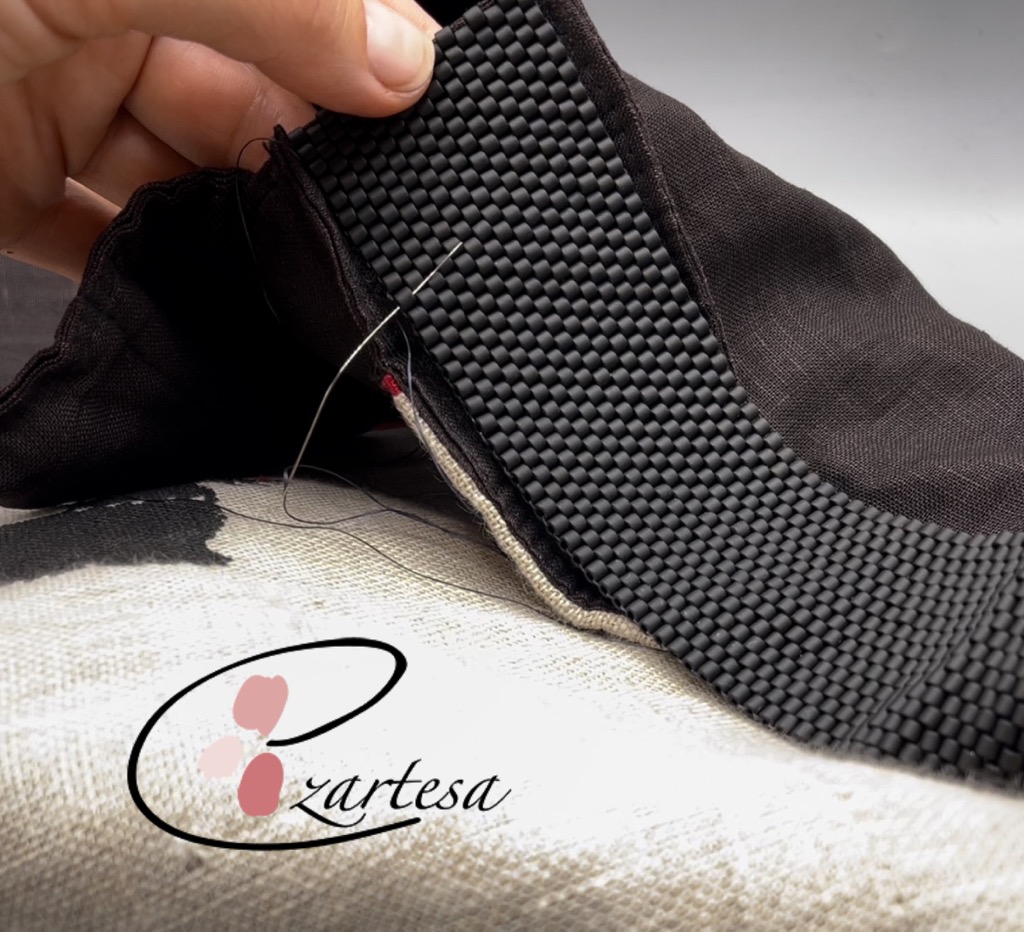
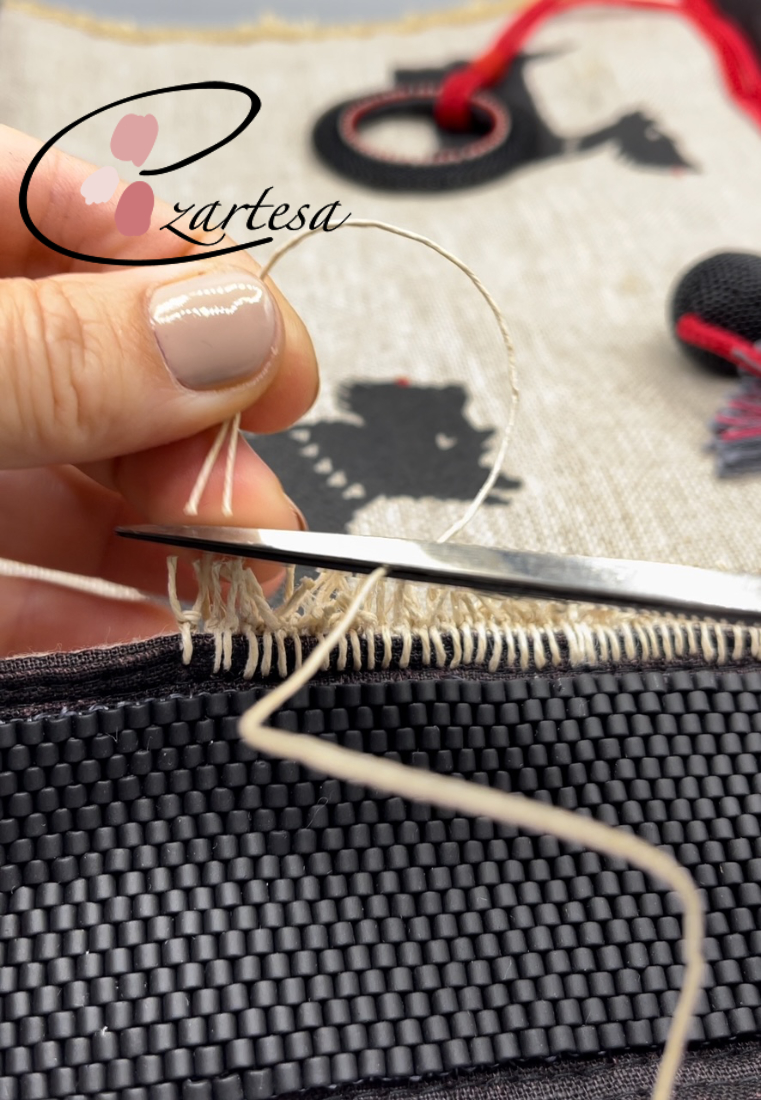
I am showing to you how to make adjustable sliding clasp for beaded necklace with cotton cord strap. For this tutorial you will need to know simple even-count peyote stitch technique.
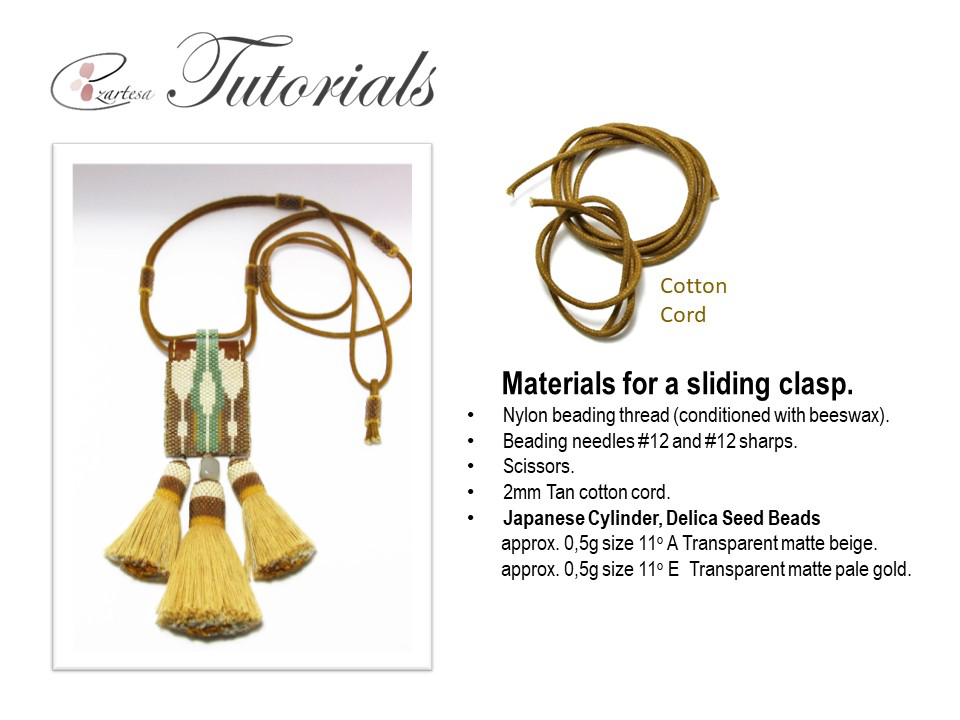
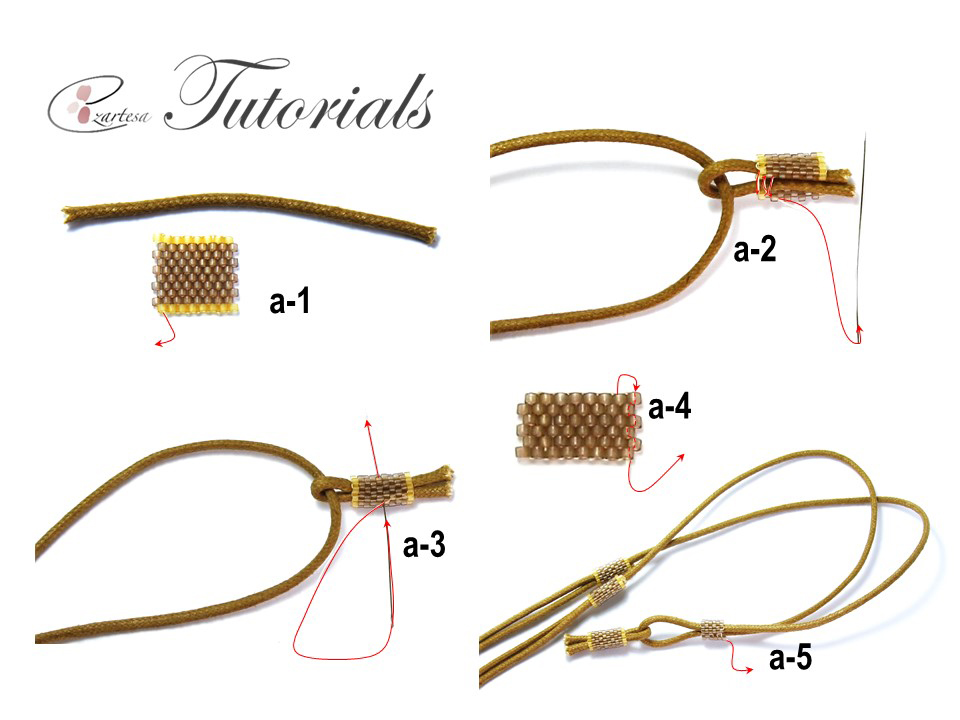
Step 1: On 28” of thread, and leaving 6” tail work in flat, even-count peyote stitch to make one strip of 10 beads wide ant 16 rows tall (one 11oE, eight 11oA, one 11o E) (photo a-1). Secure the 6” tail thread in beadwork with a few half-hitch knots between beads, and trim.
Step 2: Cut a 2” long peace of cotton cord (photo a-1). Wrap it around the necklace strap. Then pick up a finished strip and wrap it around 2” folded cord (photo a-2). Zip up the first and last rows together, retrace the thread path a few times, and with the sharp needle sew through the middle of beaded strip and two cotton cords (photo a-3), weave through the couple beads and repeat one more time. Secure the working thread in the beadwork and trim.
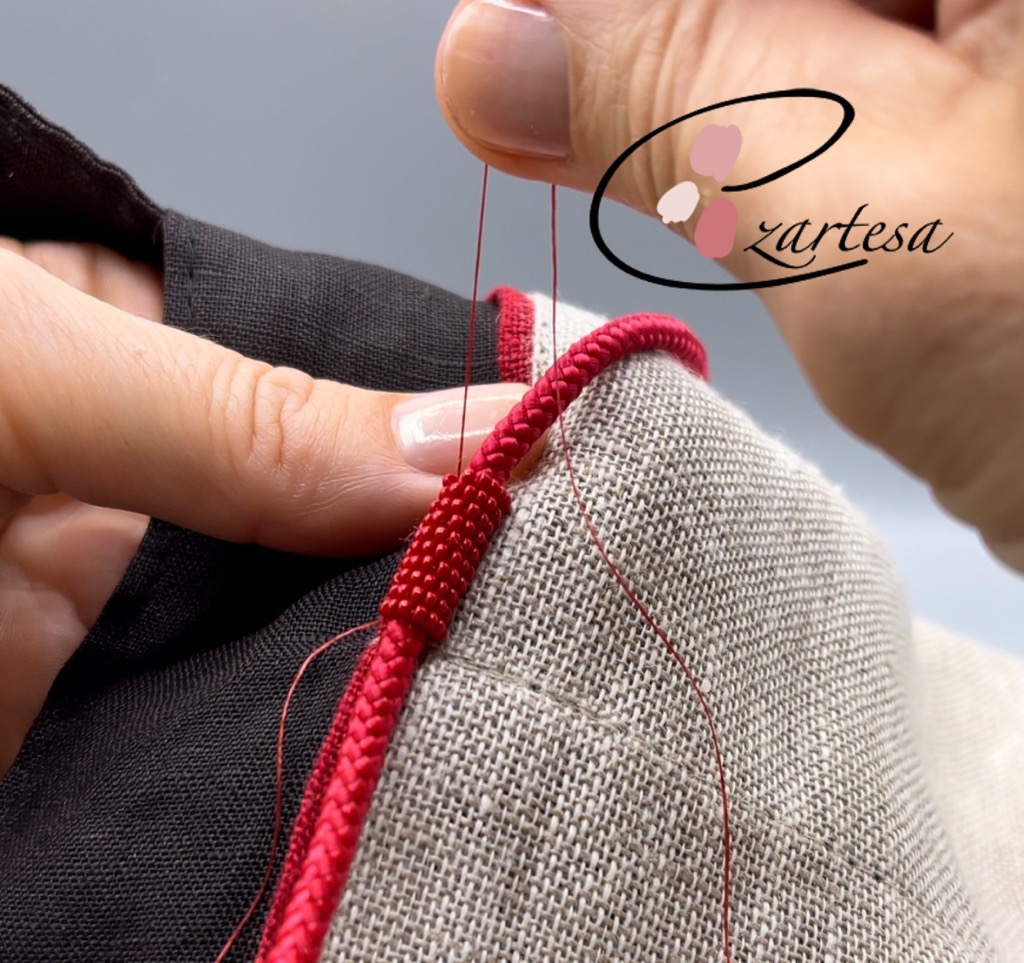
Step 3: On 14” of thread and leaving 5” tail work in flat, even-count peyote stitch with 11oAs to make a strip of 6 beads wide ant 16 rows tall (photo a-4). Secure the 5” tail thread in beadwork with a few half-hitch knots between beads, and trim.
Step 4: Wrap finished strip around the necklace strap (photo a-5), zip up the first and last rows together (photo a-5). Retrace the thread path a few times, secure the tail in beadwork with a few half-hitch knots between beads, and trim. This last strip should slide, be careful not to sew through the cotton cord.
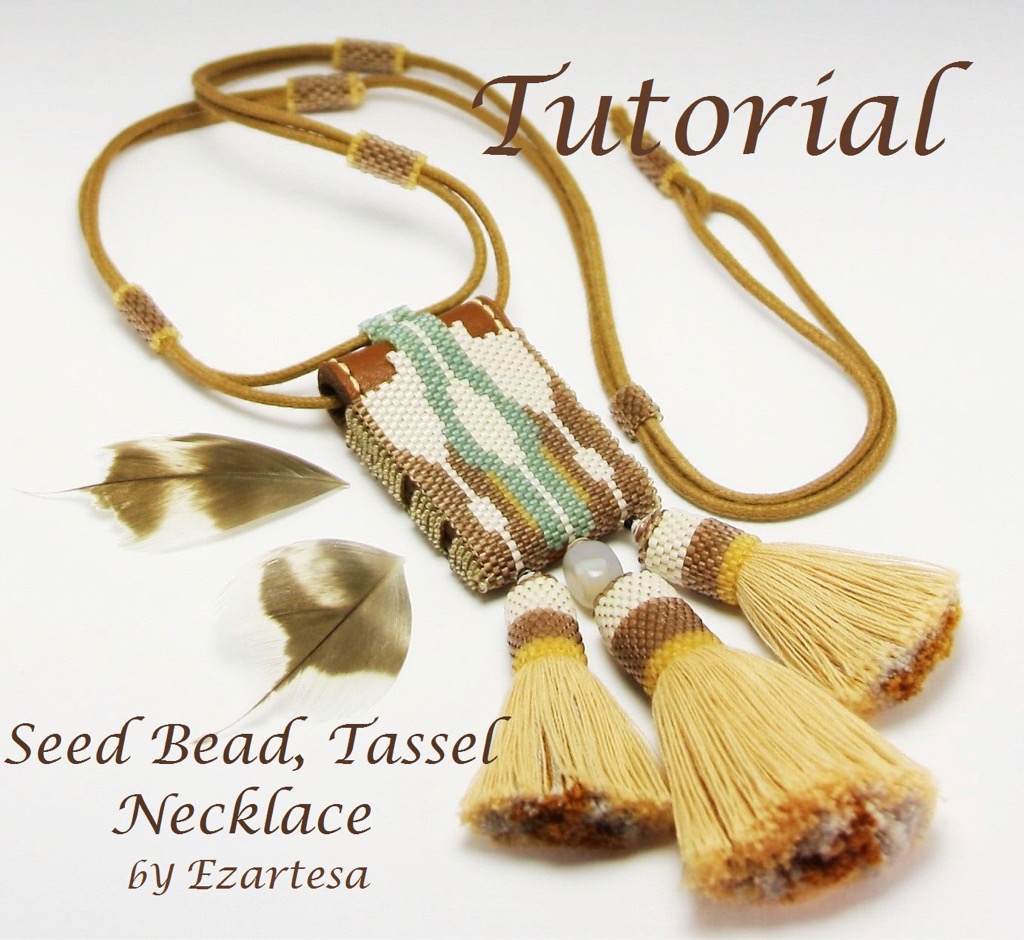
If you would like to learn how to make this bohemian, ethnic inspired beaded seed bead necklace press here.
© Ezartesa design.
FREE Beading Tutorials
I created a fun and easy beading tutorial for advanced weavers and determined beginners. Learn how to incorporate in your beadwork Swarovski crystal rose montees, mini rounds and open round rings.
Materials for a pair of earrings.
- In this beading tutorial I’m using size D Nylon thread in reed color (conditioned with beeswax).
- Beading needles #12.
- Scissors.
- Bead, Swarovski® crystals, Crystal Passions® amethyst, 6mm faceted mini round (5052), 2 beads.
- Bead, Swarovski® crystals, Crystals, amethyst, 2mm faceted round with 0.6mm hole, 18 beads.
- Component, antique brass-plated brass, 9mm open round with 7mm hole, 2beads.
- Swarovski crystals and silver-plated pewter, scarlet, 3-3.2mm rose montees with 0.4-0.6mm hole, 2 beads.
- Japanese Cylinder, Delica Seed Beads
Rocailles Seed Beads
approx. 0,5g size 15o B – transparent color-lined fancy rose gold.
approx. 0.5g size 15o C – Transparent color-lined rainbow purple.
approx. 0.5g size 15o D – Translucent gold luster cranberry.
approx. 0.5g size 15o E – 24Kt gold plated.
- Ear wire 13.5mm fishhook with open loop.
- On about 1yd of (red) thread, and leaving an 18in tail string one 11o A color seed bead,
- Connect two last beads by sewing the needle down through the next 11o A bead (photo a-5) and come up through the bead where you started.
- Sew the needle down through the next 11o A and string 6mm mini round (photo a-6) sew down through the opposite 11o A bead (at the other end of the ring), turn the beadwork up side down, sew the needle to the left through the next 11o A bead, go through the 6mm mini round bead and exit through the opposite 11o A bead (at the other end of the ring) (photo a-7).
- Sew the needle down to the left through the one 11o A bead, pick up one 2mm amethyst Swarovski round bead and sew up through the next 11o A bead (photo a-8), then string two 15o D beads and sew down through the next 11o A bead (photo a-9). Work around the ring till you have a total of nine 2mm beads and nine 15o D pairs (photo a-10).
- Then exiting one 2mm amethyst bead string one 15o B bead and sew through the next 2mm bead (photo a-11). Work around the ring till you have a total of nine 15oB beads (photo a-12).
- Secure the thread at the other end of the beadwork, sew the needle down through the 11o A bead, string one 15o C bead and come up through the next 11o A (photo a-13). Repeat around the ring.
- Then exiting last 15o C string one 11o A bead, sew through the next 15o C and work around the ring till you have a total of nine beads (photo a-14,15) and sew the needle through the all nine beads two times (photo a-16).
- Secure the thread at the other end of beadwork and exit 11o A and 15o D at the top of earring (photo a-17), string two 15o Bs and sew down through the next 15o D, come up to the right through the 15o D and 15o B beads. Work three more 15o B pairs (photo a-18, 19).
- Secure the thread at the other end of beadwork and exiting 15o D bead (photo a-20,21) work one 15o E bead between the pairs, and then two 15o B s…repeat around the ring. Then secure the thread in the beadwork and trim.
- Secure the thread that exits 15o B bead and string two 15o Es, ear-wire, two 15o Es sew down through the 15o B and come up through the next 15o B and 15o D beads (photo a-22).
- Then sew the needle up through the 15o E, ear-wire, down through the two 15o Es and 15o B bead, string 15o B, 15o E, 15o B skip one bead and sew the needle through the 15o B (photo a-23), come up through the next 15o B, and repeat to the other side (FIGURE 1).
- Weave the thread up through the two 15o Es, ear-wire, two 15o Es, one 15o B and string the Swarovski rose montee, skip two beads, and sew diagonally through the one 15o B, come up through the next 15oB, sew diagonally through the Swarovski montee and exit through the opposite 15o E bead (photo a-24, 25) (FIGURE 1). Secure the thread in the beadwork and trim. Repeat to make a second earring.
To sea more beading tutorials and patterns go to my beading tutorials page.
All text and photos copyright by jewelry designer Ezartesa.
Beading Tutorials with Turquoise and Gold Seed Beads by Ezartesa
My most popular, bestselling necklace tutorial is Turquoise Drop Statement Necklace.
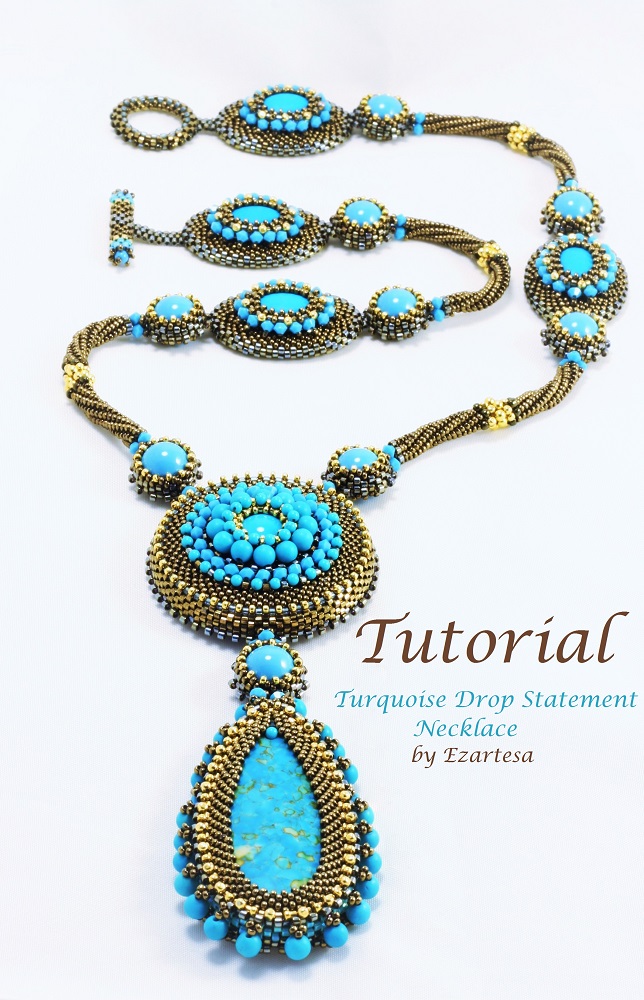
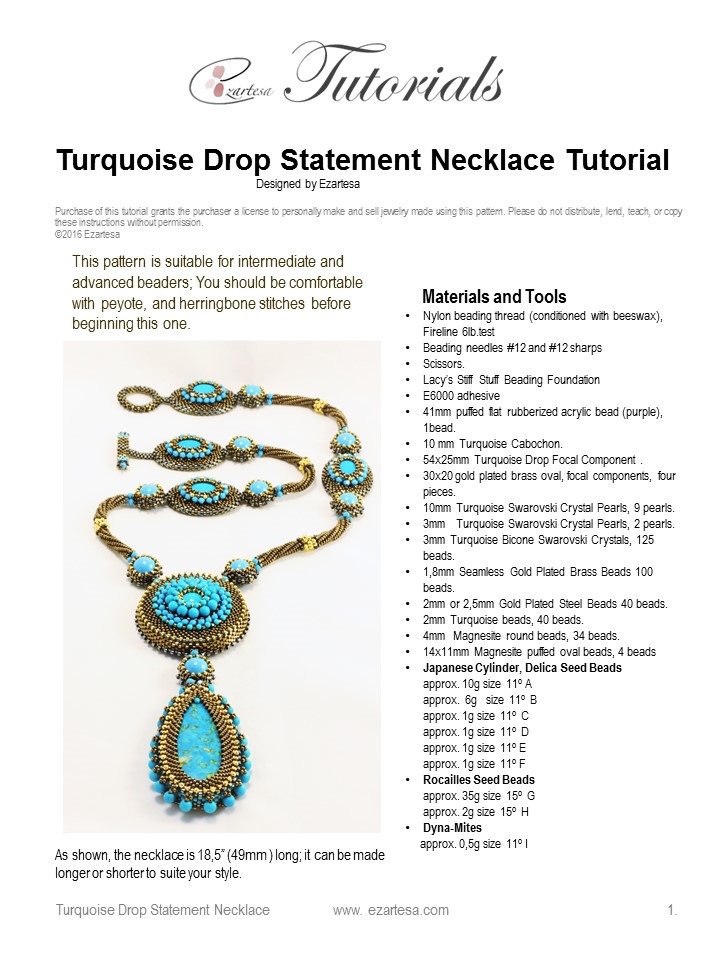
Through this tutorial, I am showing you how to create this gorgeous piece of art with its basic techniques and tips used in this project. This material includes 14 color pages. Step-by-step instructions with 80 color pictures, 11 diagrams. Inspirational photos of other pieces of mine created with the same technique.
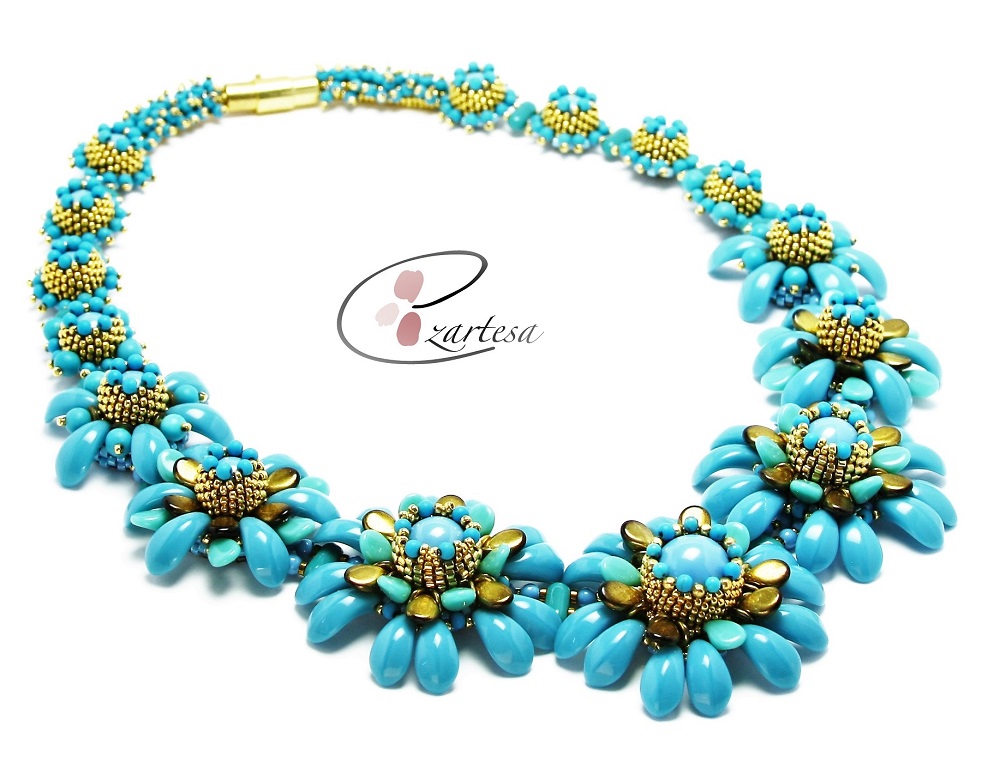 My beaded necklace tutorial Turquoise Flower Necklace is very fun to make.
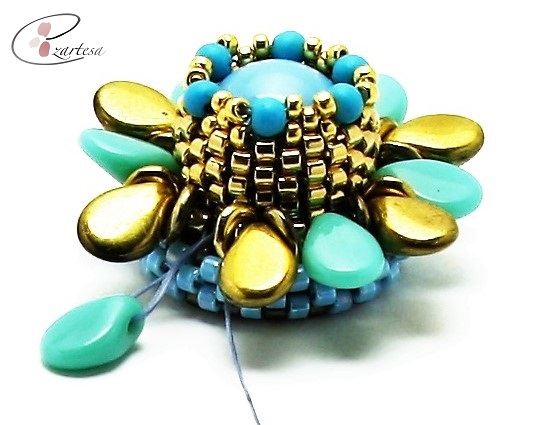
Learn how to make large, medium and small size flowers with 12mm, 10mm, 8mm Pearls, seed beads and Preciosa Czech glass petals!
This material includes 11 color pages.
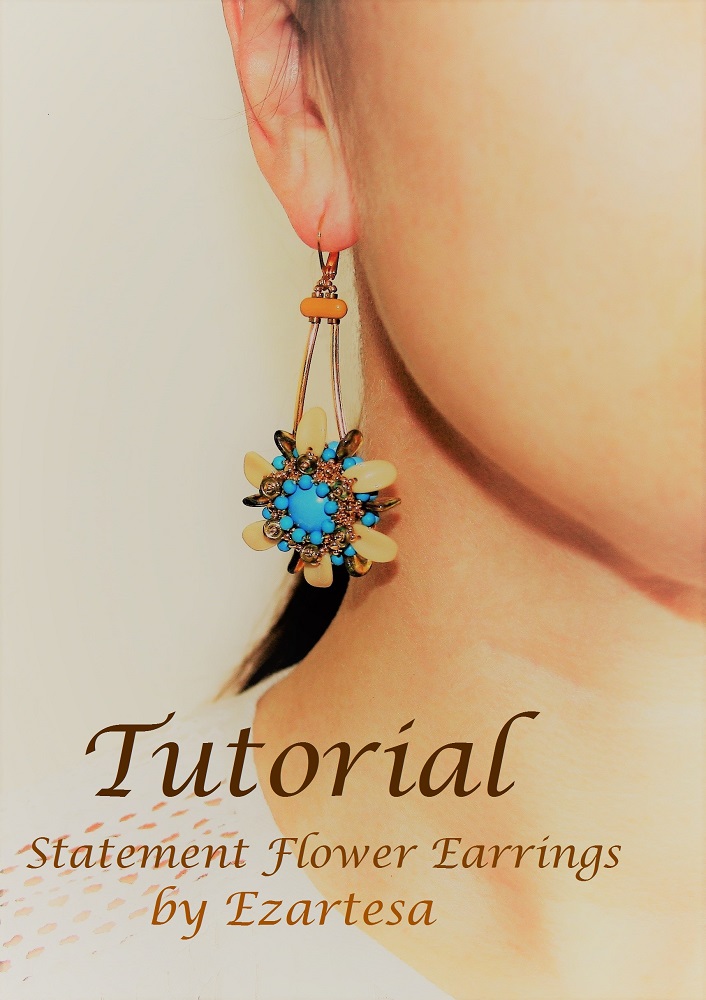
Through this Statement Flower earrings tutorial learn how to work with interesting materials: gorgeous turquoise pearls, luxurious gold beads, Czech glass, and touch of vintage German beads! This material includes 5 color pages.
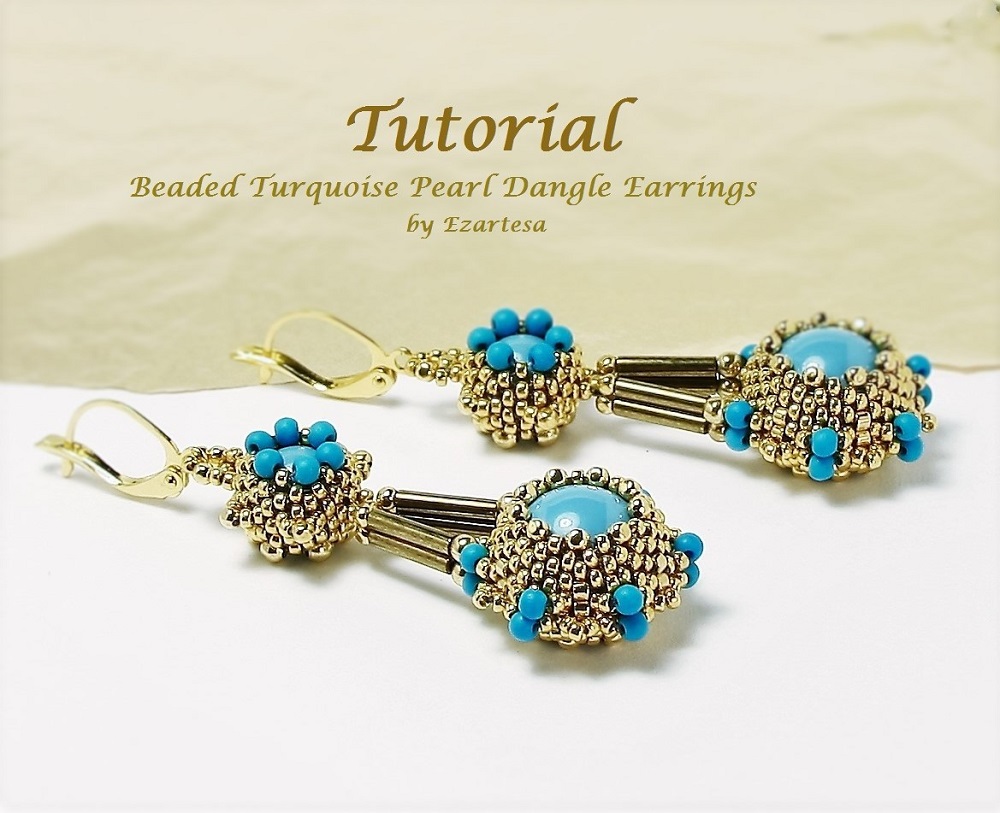
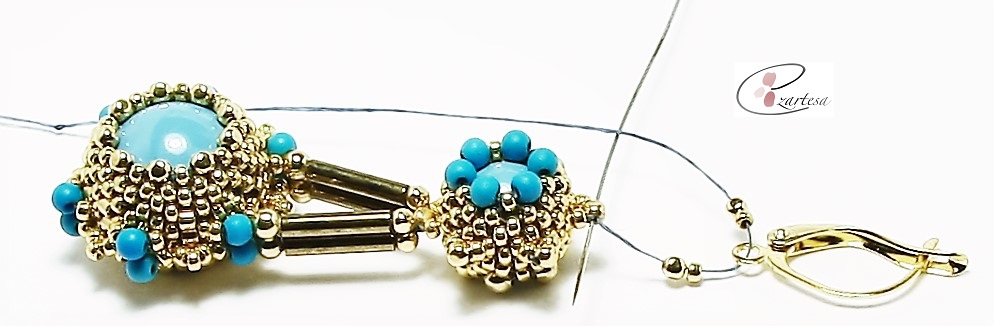
Through this Beaded Turquoise Pearl Dangle Earrings Tutorial I am showing to you how to create these gorgeous earrings with its basic techniques (peyote stitch) and tips used in this project. This material includes 5 color pages. Skill Level: intermediate, and for determined beginners.
This is a Tutorial, Pattern of these gorgeous Beaded Circle Earrings with Swarovski turquoise crystal pearls, shell heishi beads, and tiny gold and turquoise seed beads. Lear how to make these stunners!

My beading tutorials are very easy to understand and follow. Make a statement when you craft and wear these very stylish and unique Turquoise and Gold Seed Bead Jewelry Designs!
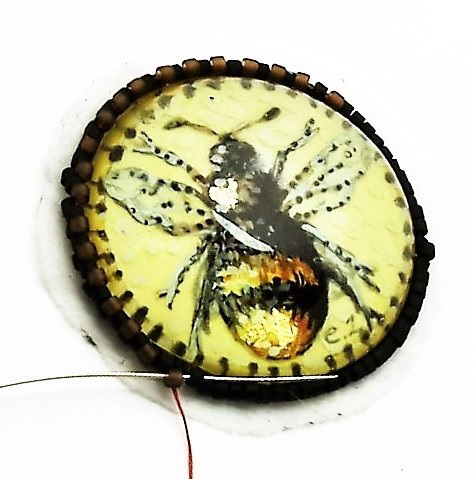
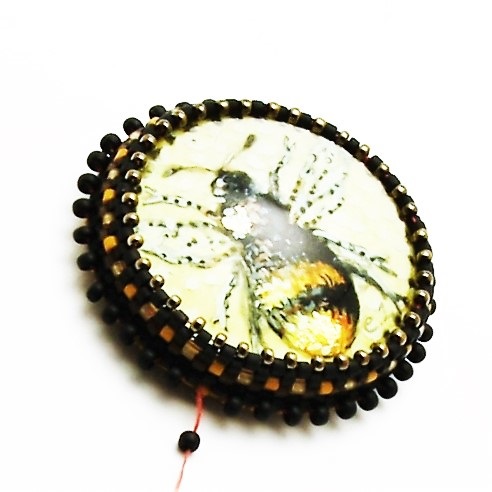
Beaded Bezel Pendant Tutorial with Hand Painted Honey Bee Glass Cabochon, Leather and Glass Seed Beads
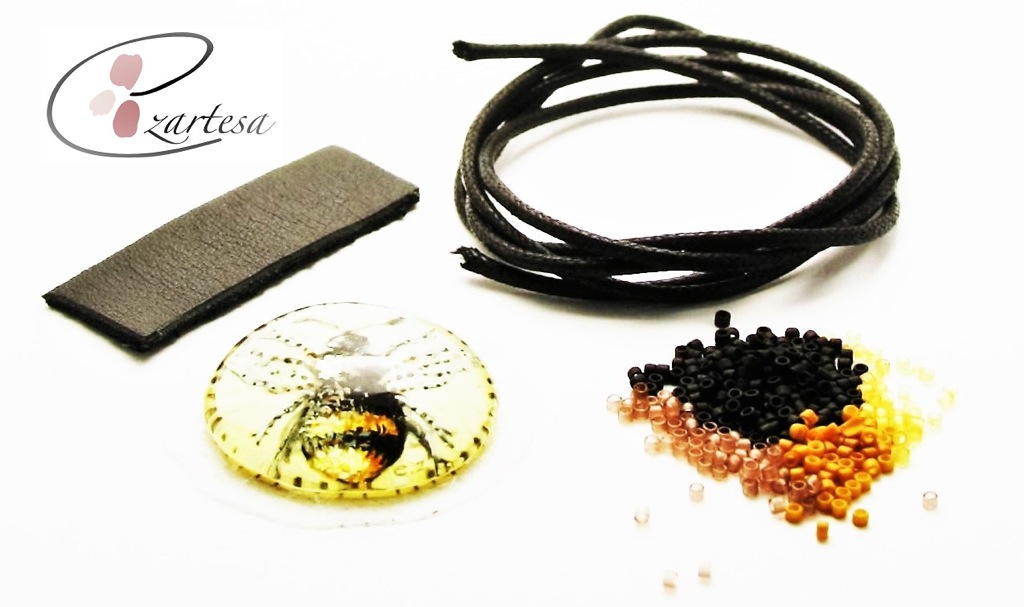
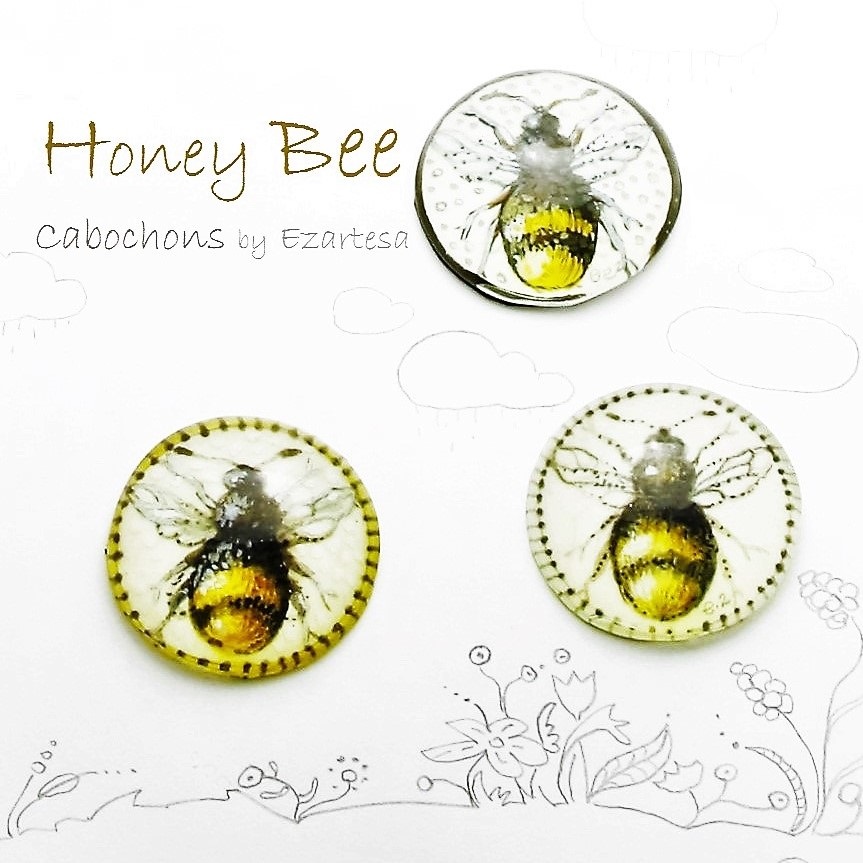
Honey Bee Hand Painted Cabochons for sale!
(1) First separate the Lacy’s Stiff Stuff Beading Foundation fabric in to a very thin layers, cut a piece of fabric that is approximately (3mm) larger than the cabochon. Glue it to cabochon. If you are using E6000, allow time for the glue to dry.
(2) Tie an overhand knot at the end of 2yd. (1.8m) of conditioned thread. Using a # 12 needle, sew through the beading foundation fabric from back to front, next to the cab’s edge.
(3) Pick up six 11o black color Japanese seed beads, and position them along the cab’s edge. Sew through the last three beads. Continue working in beaded backstitch around the edge of the cab, adding an even number of beads.
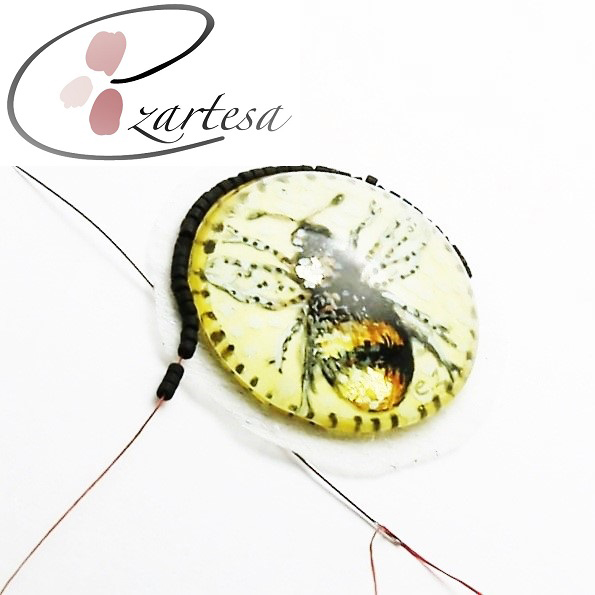
(4) Using a regular beading needle and 11o beads, work in tubular, even-count peyote stitch around the ring. Changing seed bead colors, continue adding rounds of peyote until the top edge of the cab is covered.
(5) Then work a round of peyote using 15o (rocailles) dark gold color seed beads, black, and gold plated rocailles to curve the beadwork inward so it’s snug around the dome of the cab.
(6) Weave through the bezel to the backstitched round, sew through the sheet between two beads, and tie a knot. Don’t trim the thread.
(7) Glue the Ultrasuede to the back of the cabochon. Trim two layers of fabrics near to the edge of cabochon, be careful don’t cut the thread. Sew through to the new back of the pendant near the edge, and whip stitch (using sharps seedle) the edges together. Don’t trim the thread.

(8) Using sharps needle, sew back through the fabrics and the backstitched round one of the lower beads. Using the pumpkin color delica 11o Japanese seed beads continue adding rounds of peyote.
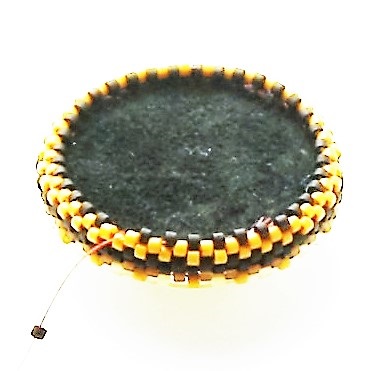
(9) Work a two - three rounds of peyote using black color 15o rocailles, to curve the beadwork outward so it’s snug around the back of the cab. Secure the thread in the beadwork with a few half-hitch knots between beads, and trim.
(10) Add the thread to the beadwork, and exit from the beaded backstitch one of the lower beads. Pick up one black color 11o rocaille and work one round in tubular, even-count peyote stitch around the beaded cab.
Embellished Leather Bail
Step 1: Cut the leather into 2”x 0,5” strip.
Step 2: Work in flat, even-count peyote stitch to make a strip that is eight beads wide and forty-three or more rows tall.
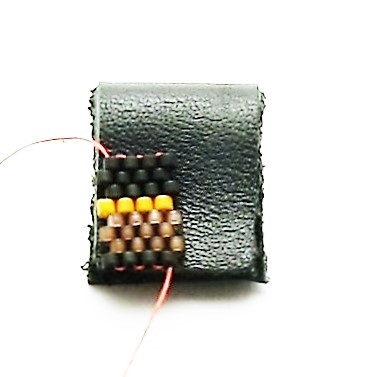
Step 3: Wrap finished strip around the leather, zip up the first and last rows together.
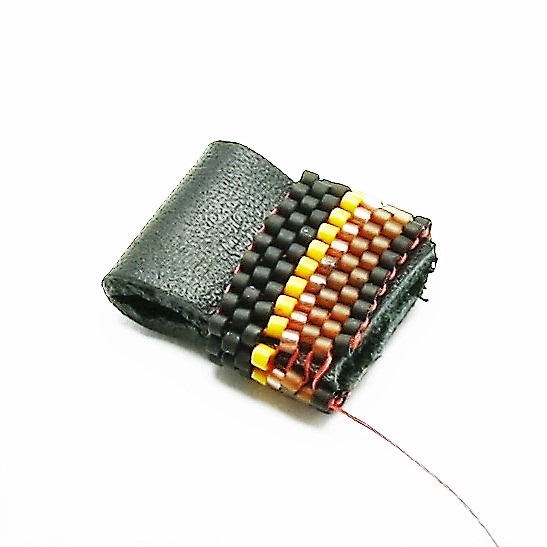
Step 4: Pick up the working thread and weave through the beadwork to the middle of the bail. Then sew through the beadwork, and leather (with #12 sharp beading needle) to the other side, exit through two beads, weave through the beadwork, secure the thread with half-hitch-knot do not cut the thread.
Step 5: Attach the bail to beaded bezel: exit the one edge bead of bail, pick up one 15o dark gold bead, and sew through one beaded bezel black color 11o rocaille, then pick up one dark gold bead and sew through next edge black bead of bail. Repeat around the bail. Secure the thread with half-hitch-knot and cut the thread.

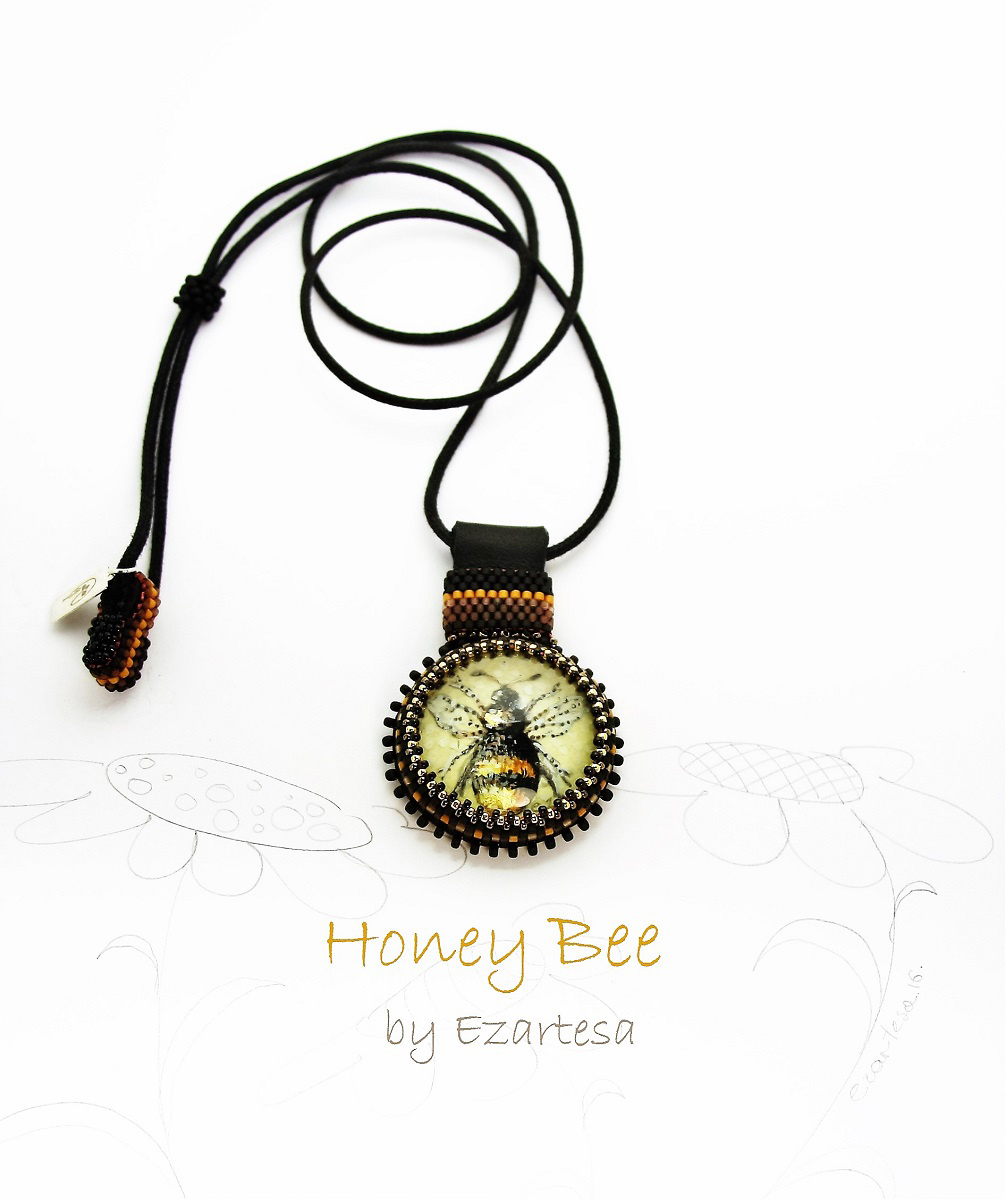
You can put this pendant on gold chain, beaded herringbone rope, or cotton cord.
More step-by-step Ezartesa tutorials.
This adorable necklace is available for sale! Perfect gift for a bee lover!
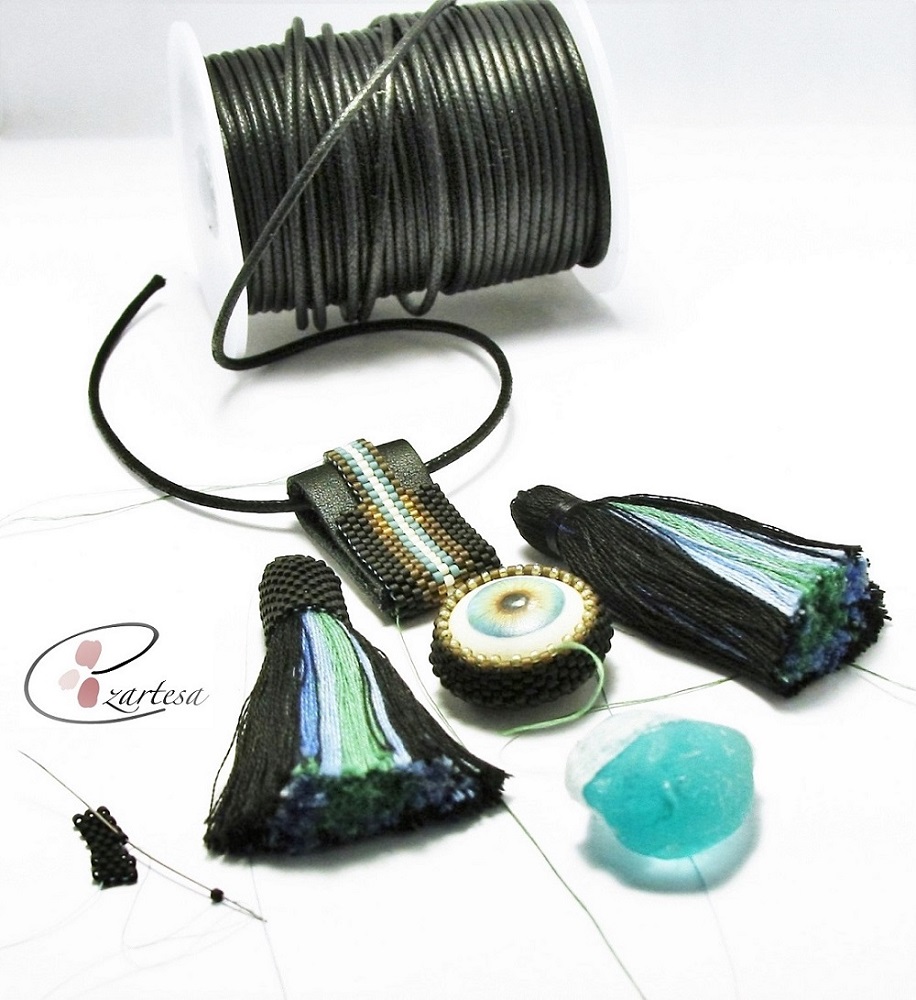
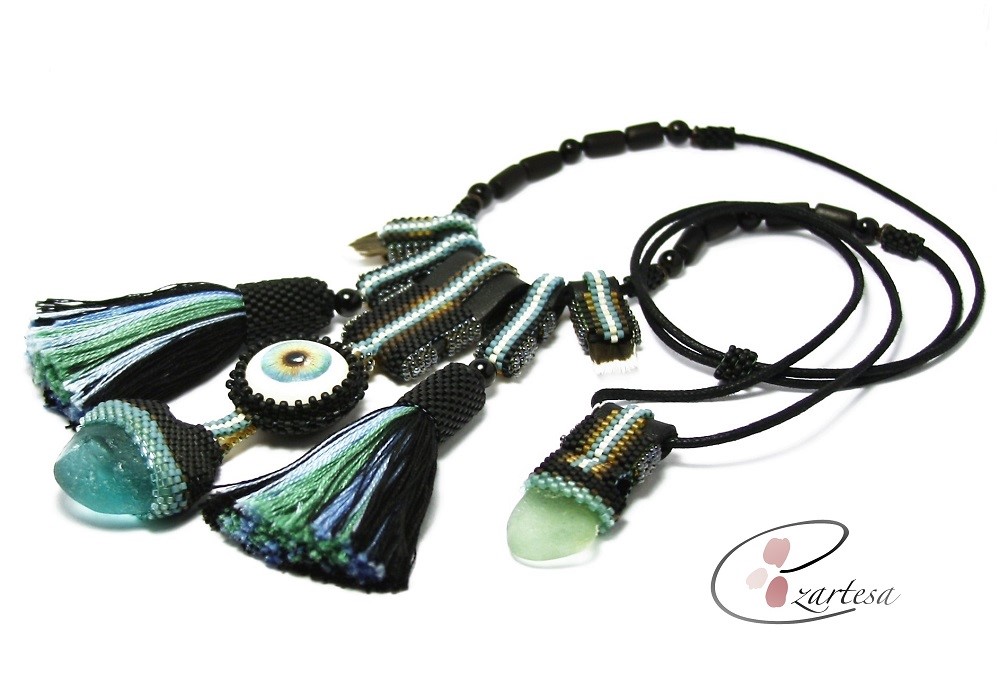
Making Jewelry from Sea Glass with Interesting Materials: Seed Beads, Leather, Cotton Tassels, Driftwood, Feathers and Cotton Cord
Many sea glass collectors simply choose to keep their treasures in jars, while others enjoy giving pieces to friends or relatives. I collect these frosted gems for my jewelry making projects and crafts. I love combining sea glass with tiny glass seed beads, leather, driftwood, shells, and feathers to form a beachy style Jewelry.
Making Jewelry From Sea Glass, Tutorial by Ezartesa.
What I love about the sea glass? There is no two identical pieces of sea glass. Every shape is unique and exiting! When I look for the quality pieces of sea glass for me is very important smoothness, absence of chips, shape and size. If I find a piece that’s still has a sharp edges or is not opaque, I just let it stay on the beach for more rolling.
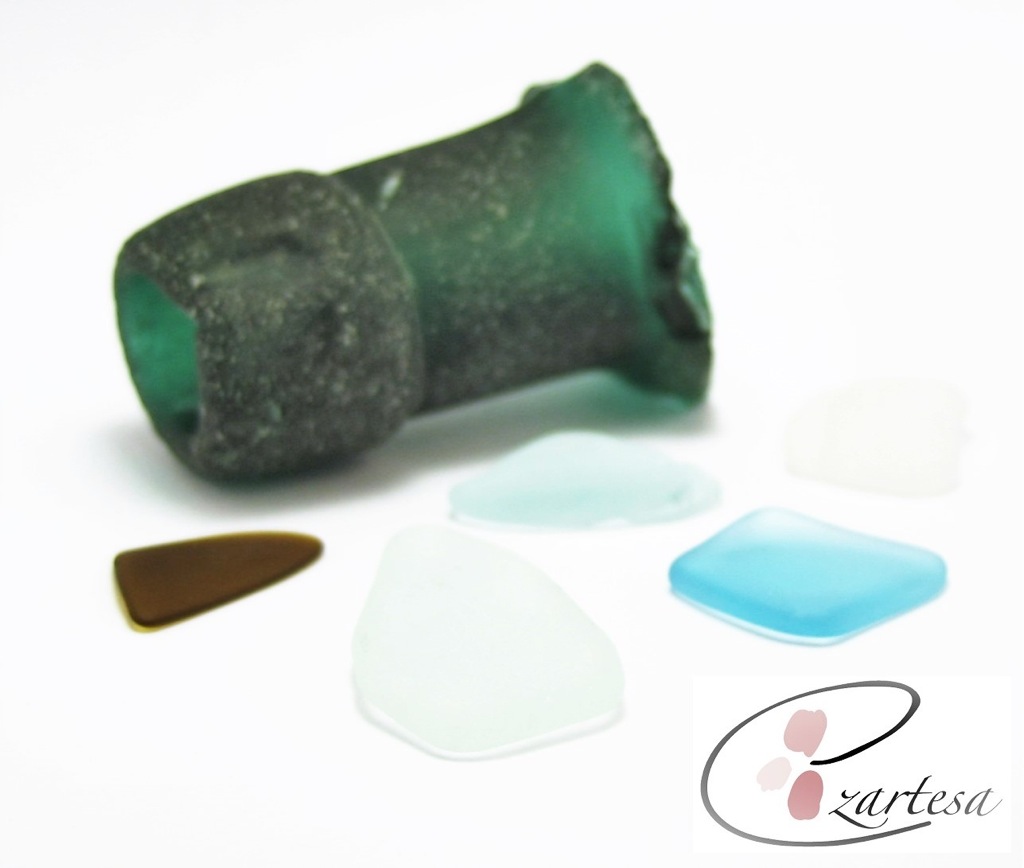
When I designing a piece of jewelry, I always start with the color combinations, shape and size of the sea glass. Then I decide what seed bead color palette will be, or what patter I need to create to enhance the beauty of sea glass.
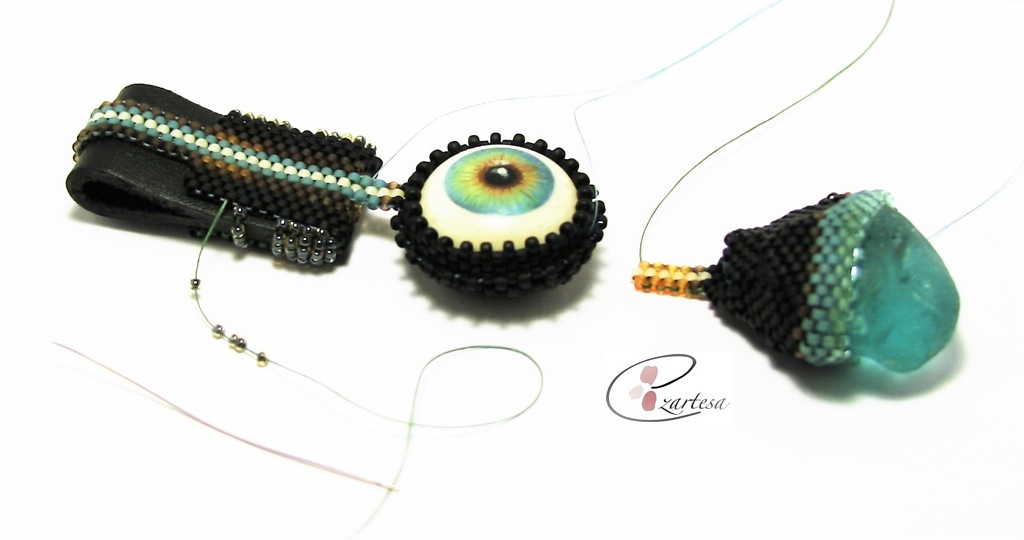
I like using a natural leather for my jewelry base. Usually wider and longer leather strip is cut for the centerpiece, and two or four smaller pieces arranged around it.
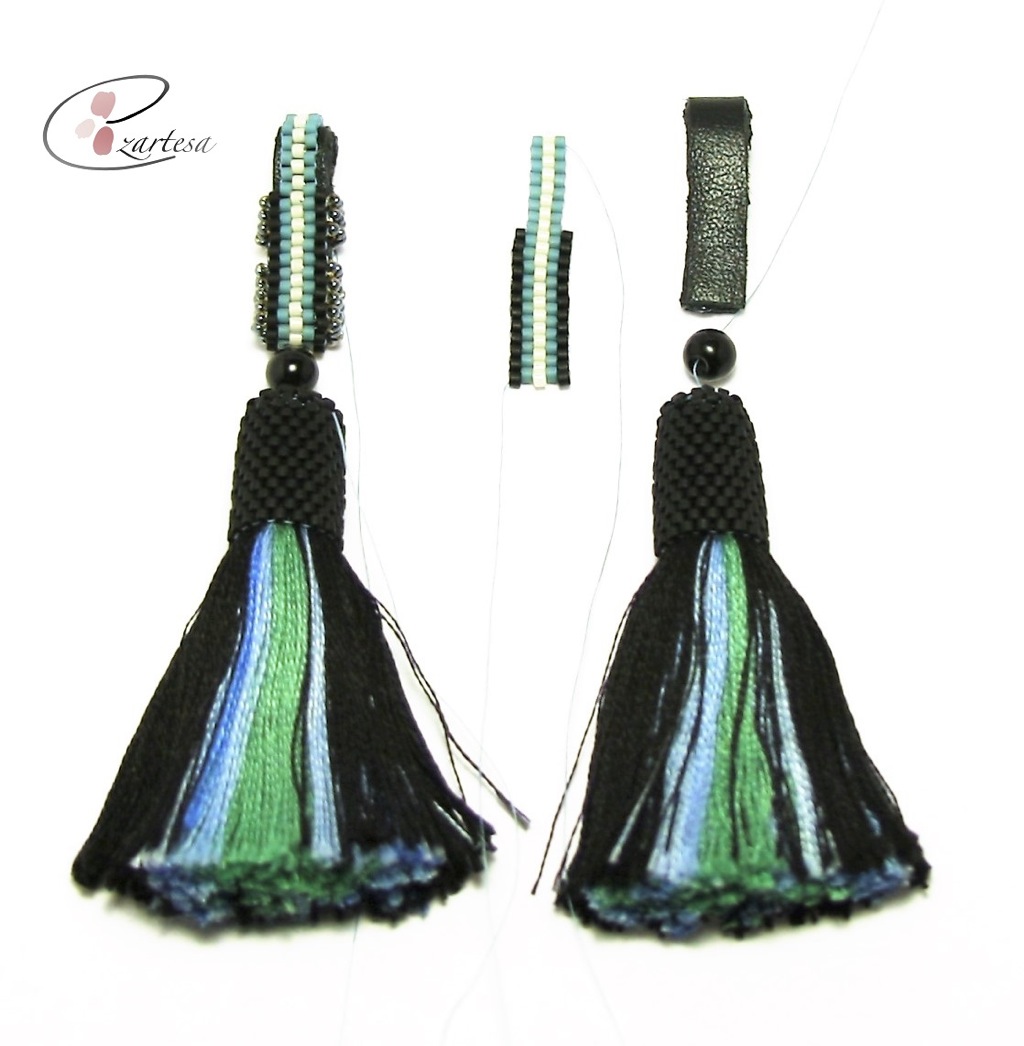
Beaded Cotton Tassel Necklace Tutorial by Ezartesa
Seed bead TUTORIAL: My favorite sea glass jewelry designs have incorporated handmade tassels, which are not difficult to make.
Step 1: Cut a winding board from heavy card stock, or cardboard; for the big tassel 6cm cardboard, for two small 4,5cm.
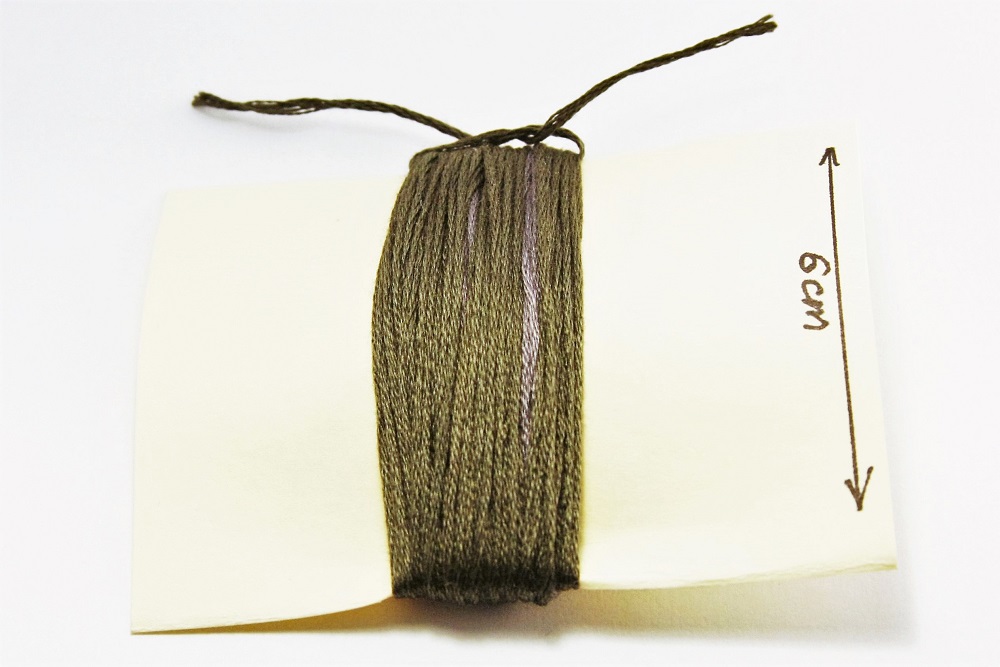
Step 2: Wind thread around board in loops until you reach desired fullness (as you work, you can change thread colors)
Step 3: Tie 5-inch thread into a tight knot around top of looped thread.
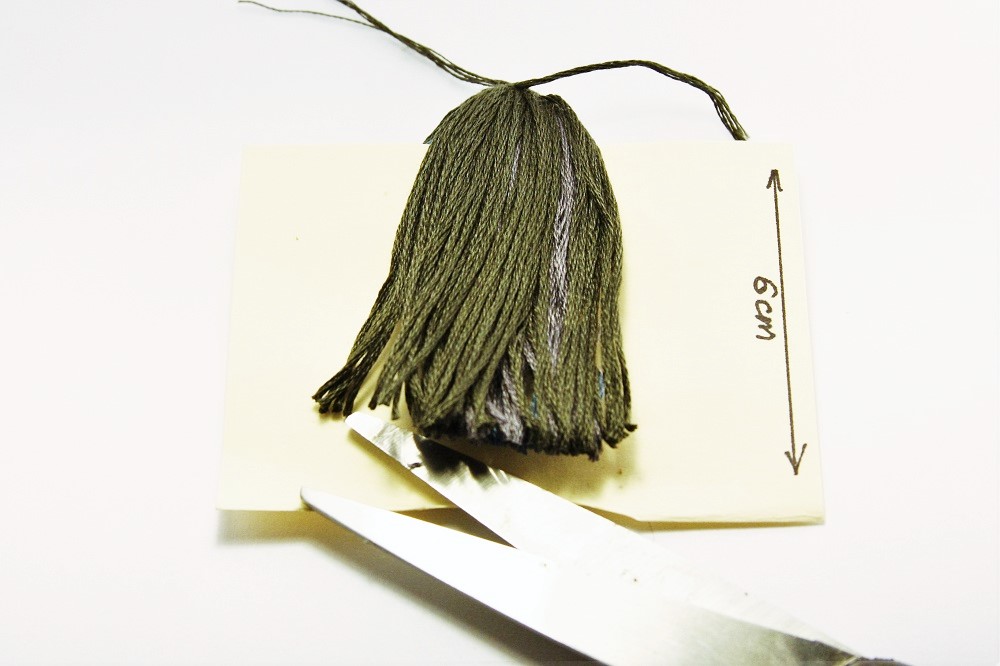
Step 4: Cut through looped ends (take it off board), and adjust it into tassel shape
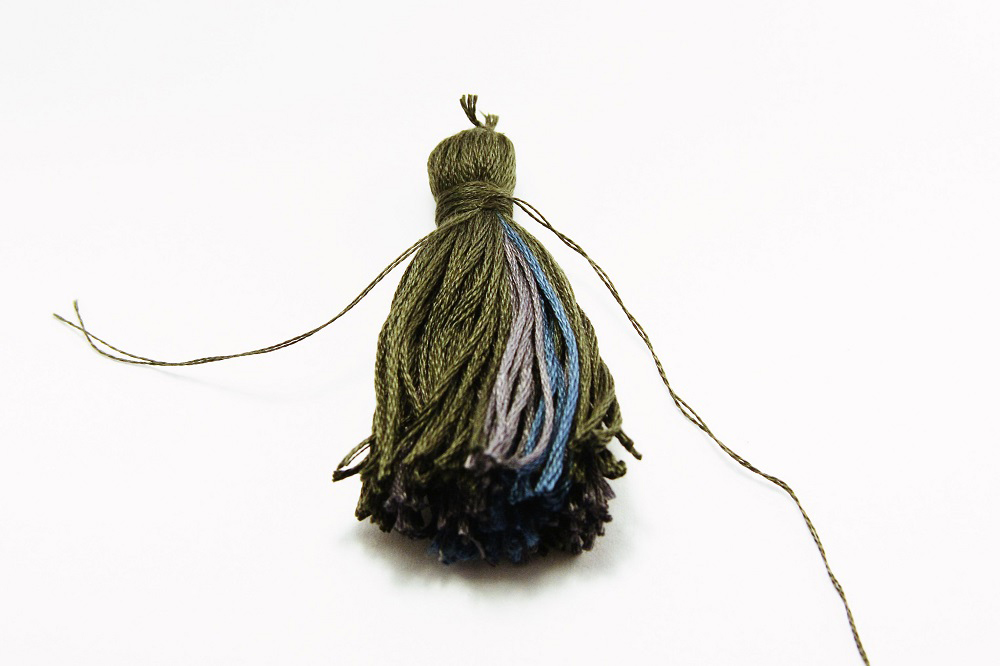
Step 5: Cut a 12-inch length of thread to wrap tassel neck: Fashion 1 end of thread into a loop shape, then lay loop on tassel. Grasp the other end, and wrap it tightly around tassel and over the top of the loop to secure it. Wrap slowly, working from the top of the neck down, so neck threads lie evenly next to one another. As you wrap, ensure all the threads in the head and skirt are neatly in place. After wrapping neck, pass end of thread through loop and gently close loop, tucking ends into the head of the tassel. Trim tassel ends, a few threads at a time, to even them if necessary. On top of the tassel, cut the thread tales of too.
Step 6: Wash the tassels with shampoo, brush and dry.
I like to use natural feathers for my sea glass necklaces. I usually glue the feather to the middle of leather strip, and fold the other end of leather on top of feather. Then I work in flat, odd-count peyote stitch to make a strip form glass seed beads to put it on top of leather.
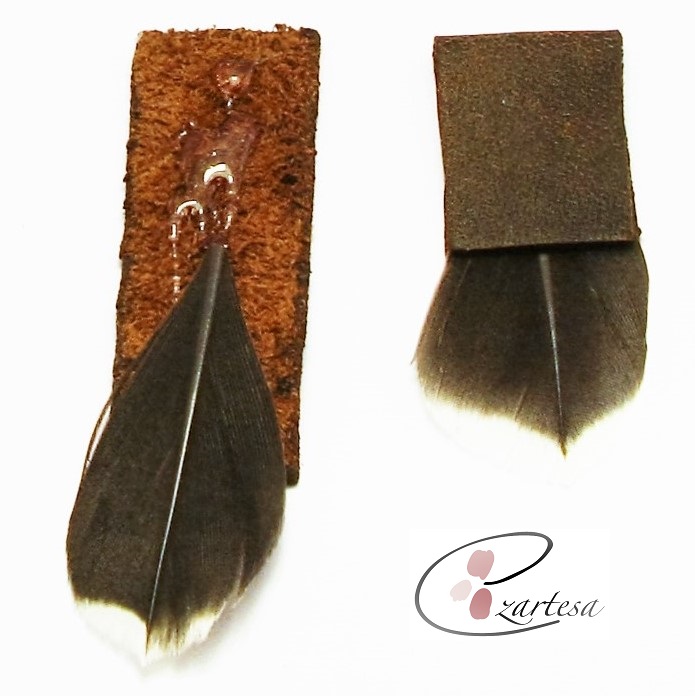
How to Work with Feathers, Leather and Glass Seed Beads, Tutorials by Ezartesa.
For my hand beaded one-of-a-kind sea glass necklace I use my hand painted original evil eye painted cabochons. I use an acrylic paint and natural bone hand cut cabochons.

Evil Eye Original Hand Painted Cabochons by Ezartesa for Sale.
My mostly all beachcomber, sea glass necklaces are reversible and adjustable. I use a cotton cord and glass seed beads to create sliding clasp, that necklace could be adjusted to desire length.
BUY THIS NECKLACE!
Genuine Beach Glass, Evil Eye and Beaded Cotton Tassel Necklace for Sale.
Making jewelry from beach found objects: sea glass, driftwood, shells and feathers is a real pleasure. No feather, sea shell or beach glass are identical, that’s the most interesting and exciting part of process creating sea glass jewelry.