Free Beading Tutorials with Instructions for Beginners | Ezartesa
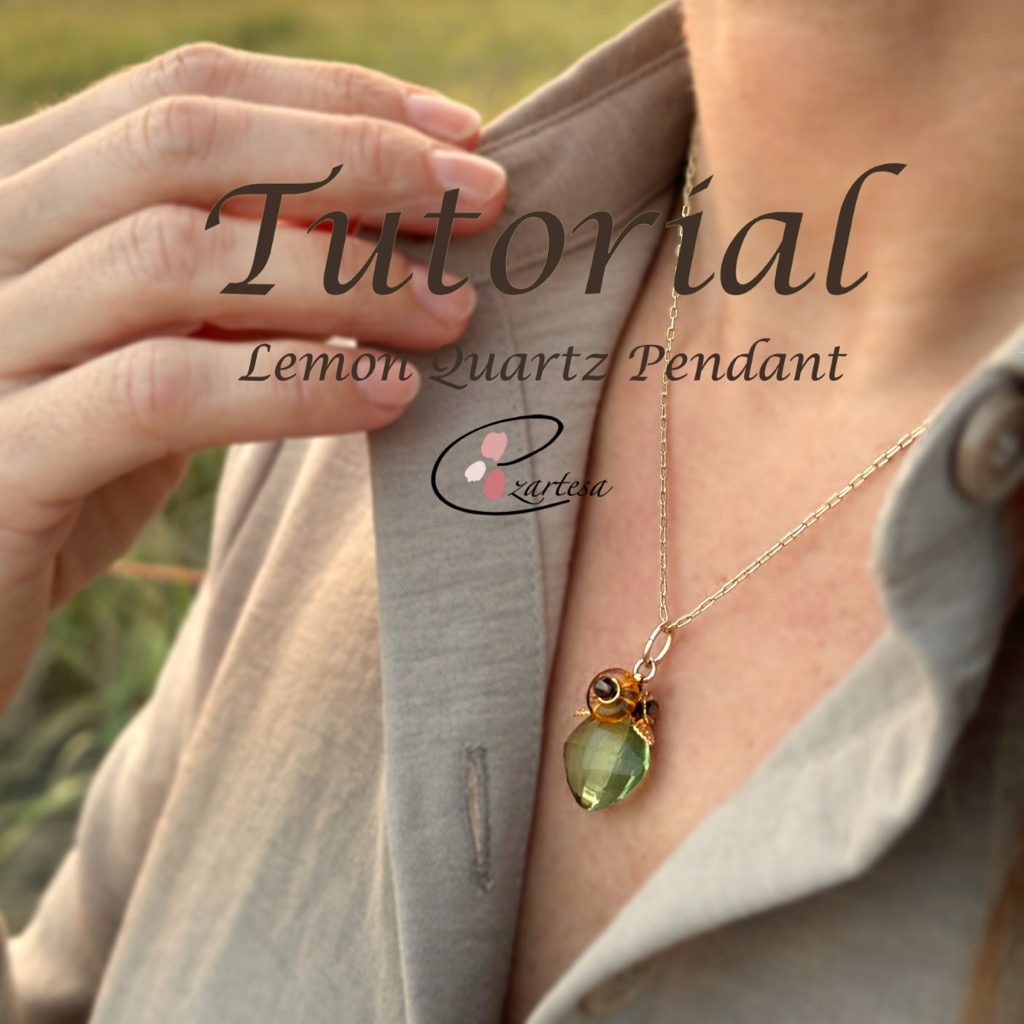
Lemon Quartz Beaded Pendant
Materials for a pendant.
- Nylon beading thread, green color (conditioned with beeswax) or Fireline 6lb.test
- Beading needles #12.
- Scissors.
- Pliers.
- Jump-ring tool.
- Bead, lemon quartz (heated), 17x17mm hand-cut top-drilled faceted puffed diamond, B grade, 1 bead.
- Bead, smoky quartz (heated / irradiated), light to medium, 3mm round, B grade, 1 bead.
- Bead, Czech pressed glass, honey, 8x2.5mm ring, 1bead.
- Bead, Zircon, avocado, 2mm faceted round, 3 beads.
- Bead cap, 14Kt gold-filled, 5x1mm flower, 2 beads
- Charm gold-plated brass, 6.5x4mm leaf, 2 beads.
- Jump ring, gold-plated brass, 4mm soldered round, 2.4mm inside diameter, 20 gauge, 1 bead.
- Jump ring, 14Kt gold-filled, 4mm round, 2.4mm inside diameter, 20 gauge, 1 bead.
- Jumpring – 14Kt golf-filled, open, 7.5x5mm oval, 6x3.3mm inside diameter, 18 gauge, 1 ring.
- Chain, gold-finished brass, 2mm cable.
- Bead, gold-plated brass, 2x1.5mm micro round, 2 beads.
- Rocailles Seed Beads
This is a step-by-step beading and jewelry making tutorial for beginners that will teach you how to make a very simple but super cute pendant.
Beaded Lemon Quartz Bead
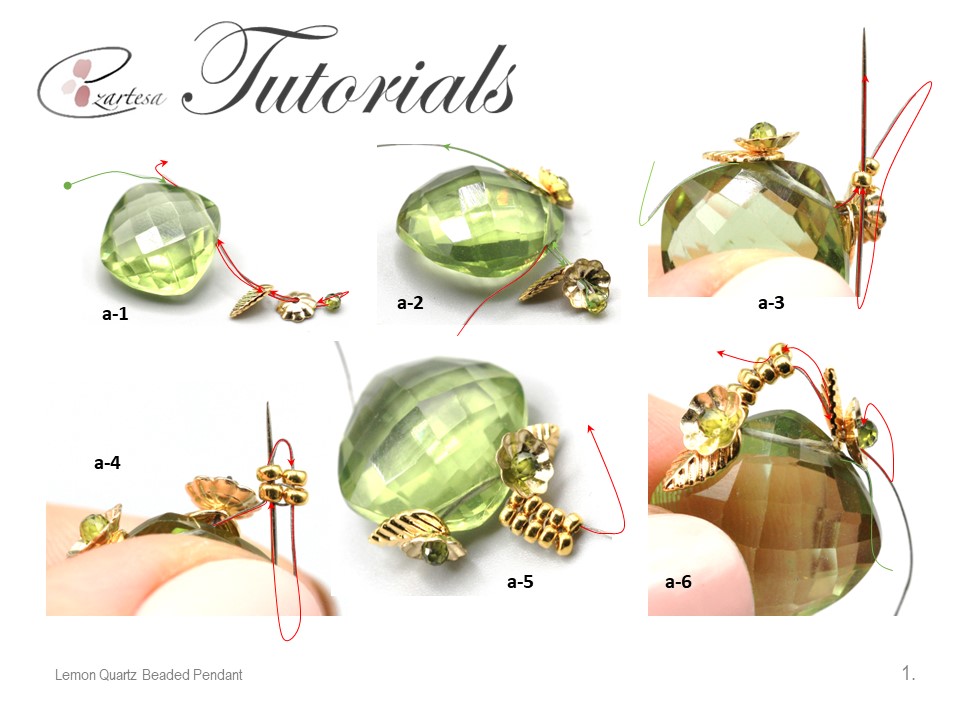
Step 1: On 1.5yd. of fireline and leaving a 12” tale, string 17x17mm puffed diamond lemon quartz bead, one 6.5x4mm leaf bead, one 5x1mm flower bead cap, one 2mm avocado Zircon bead (photo a-1) and sew the needle back through the 5x1mm flower bead, leaf bead and exit through the other end of the quartz bead (photo a-1).
Step 2: Then secure the other end (tale) of the thread and string one 6.5x4mm leaf bead, one 5x1mm flower bead cap, one 2mm avocado Zircon bead and sew the needle back through the 5x1mm flower bead, 6.5x4mm leaf bead and exit through the other end of the quartz bead (photo a-2).
Step 3: Next secure the other end of the thread, string two 15o As and sew the needle up through the first bead added to this step (photo a-3). Position the beads the closest you can near the quartz bead on the right side. Then use the square stitch:
- Be sure the working thread is emerging from the top of the first bead and pick up two 15o A beads.
- Pass down through the next bead to the right on the row below and up through the following two beads (photo a-4). Add a total of five rows of 15o A beads (photo a-5).
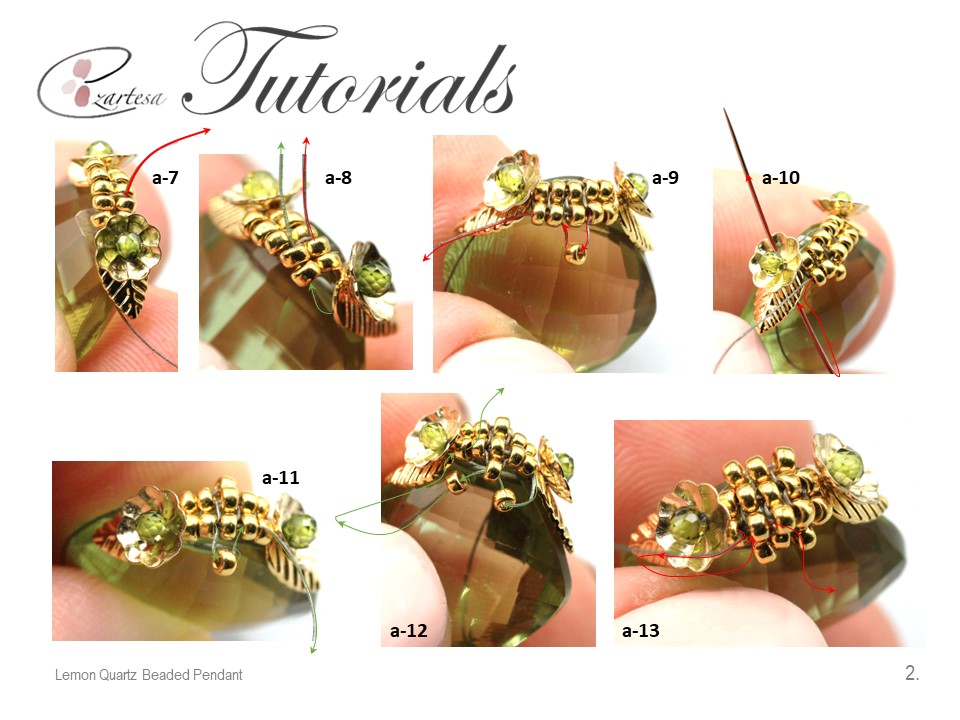
Step 5: Then pick up the other end of the thread and sew the needle up through the two 15oAs (at the left) of the beaded strip (photo a-8).
Step 6: Secure the other end of the thread, string one 15o A, skip one bead and sew the needle through the next two 15oAs (photo a-9). Then sew the needle up through the leaf bead, flower bead, 2mm zircon (photo a-10), then sew back through the leaf bead, flower and exit through the opposite 15o A bead. Then secure the other end of the thread, string one 15o A, skip one bead and sew the needle through the next two 15oAs (photo a-11).
Step 7: Next exiting 15o A bead string one 15o A bead and sew the needle to the left through the 15o A bead you added at the step 6, then string 15o A bead and sew the needle to the right through the last 15o A (photo a-12).
Step 8: Secure the other end of the thread and repeat step 7 at the opposite side (photo a-13).
Step 9: Next exiting 15o A bead sew the needle up through the next 15o A bead (photo a-13) then string one 2x1.5mm micro round bead, skip the middle bead and sew the needle diagonally through the other rows 15o A bead (photo a-14). Then sew the needle to the left through the opposite 15o A bead, go diagonally through the 2x1.5mm micro bead (photo a-15) and exit through the 15o A bead (opposite 15o A bead you started) (photo a-15).
Step 10: Next sew the needle down to the left through the opposite 15o A, then string one 8x2.5mm glass honey ring, one soldered 4mm jump-ring, one 3mm smoky quartz bead and sew the needle back through the jump-ring, glass ring and exit through the opposite 15o A bead (photo a-16). Secure the thread tale in the beadwork and trim.
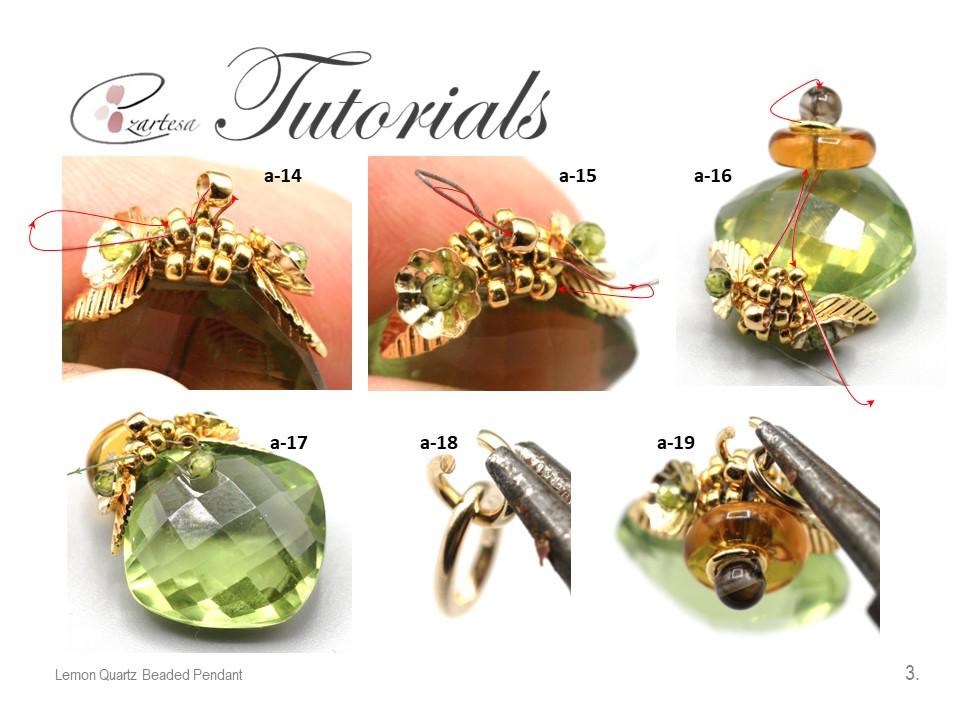
Step 11: Next secure the other end of the thread, exit one lower 15o A bead, string one 2mm avocado Zircon bead and exit through the next 15o A bead (photo a-17). Secure the thread tale in the beadwork with a few half-hitch knots and trim.
Step 12: Next pick up the 4mm jump-ring, open it, slide on it the 7.5x5mm oval jump-ring (photo a-18). Then slide the 4mm jump-ring through the micro bead and close the 4mm jump-ring (photo a-19,20).
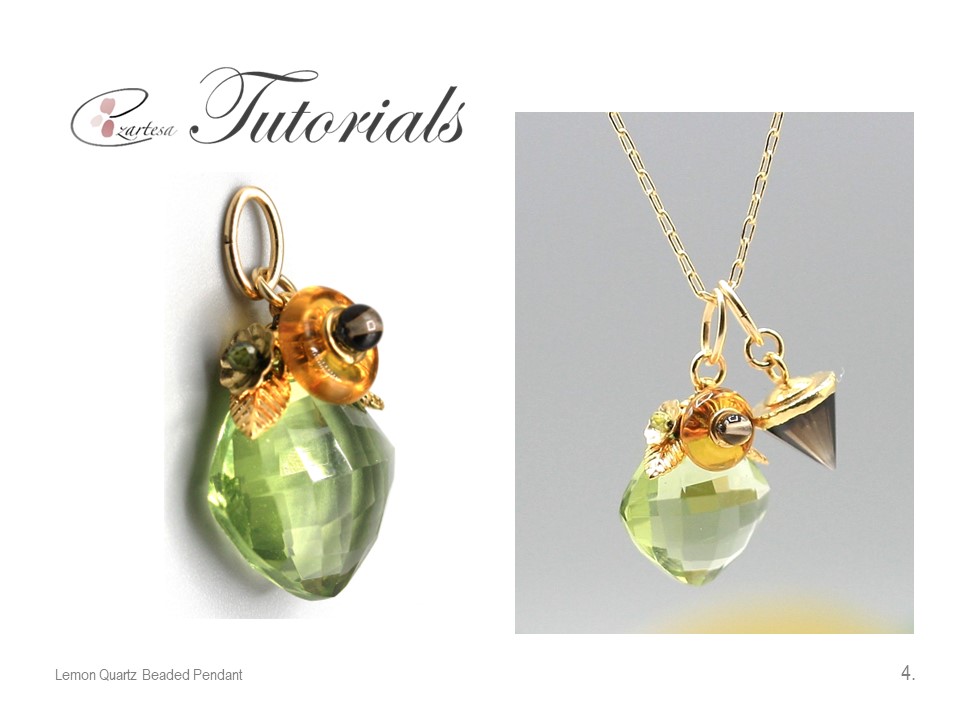
Suggestion: Instead of the 3mm Smoky Quartz bead you can add any other gemstone bead like amethyst or cranberry color 3mm zircon bead. Play with the pendant and add to the golden chain other pendants like the smoky quartz, gold-finished sterling silver, 9x8mm-11x8mm hand-cut faceted cone drop.
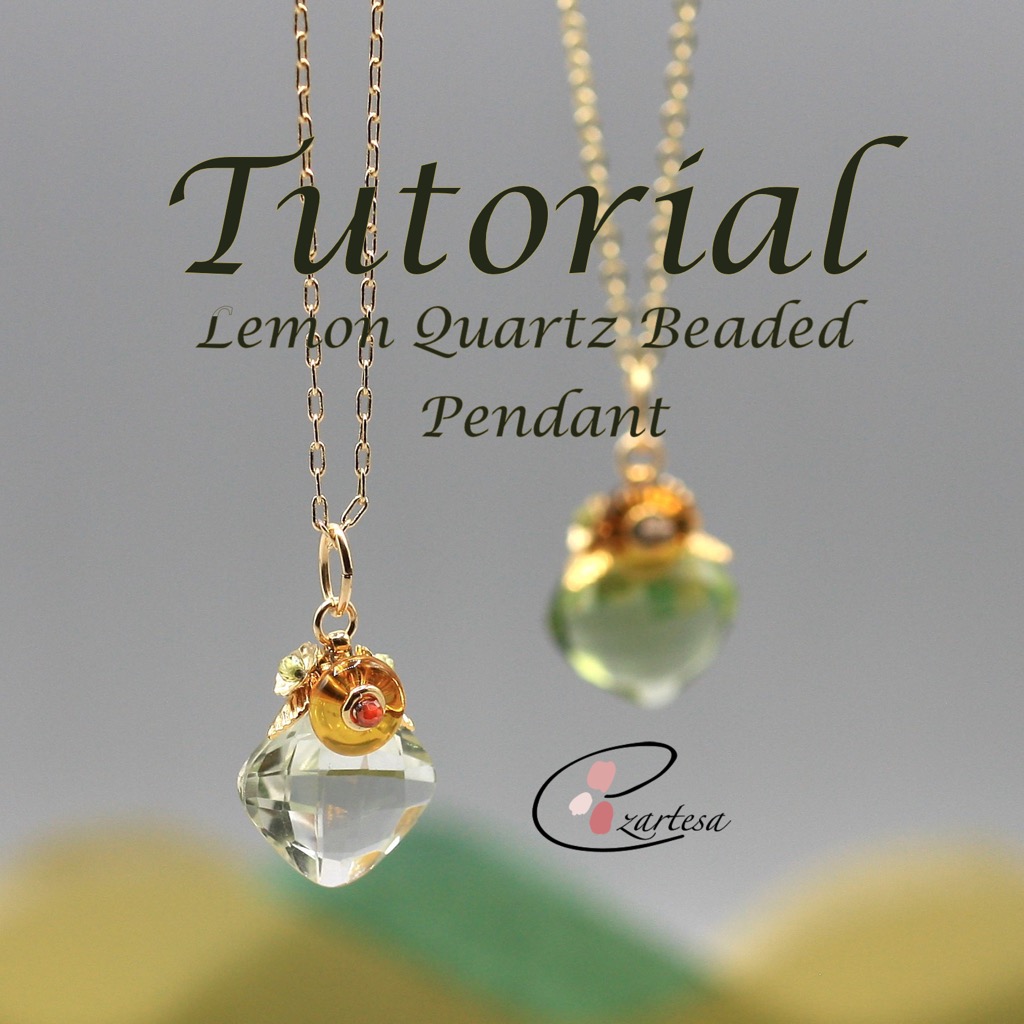
You can purchase and download this tutorial at my Etsy shop https://ezartesajewelry.etsy.com
Don’t forget to search in my shop for more advanced beading patterns.
What Can You Do With Glass Seed Beads Other Than Jewelry?
Today I’m embellishing my old hoodie drawstrings with sand, beige and linen glazed opaque and matte glass seed beads. I’m using neutral color palette just because I wanted to add to my hoodie a little bit of texture.
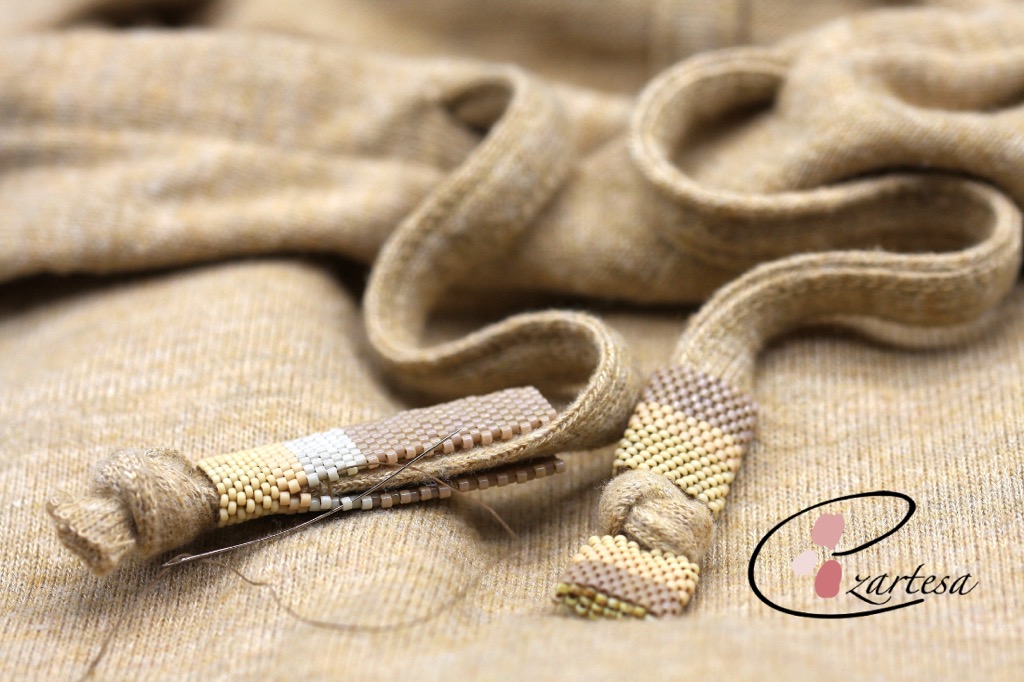
The Materials:
- Nylon beading thread color brown (conditioned with beeswax).
- Beading needles #12.
- Scissors.
- Japanese Cylinder, Delica Seed Beads
approx. 1g size 11o B – Opaque beige (DB2105).
approx. 1g size 11o C – Linen glazed (DB0261).
- Rocailles Seed Beads
approx. 0,5g size 15o E – Mate pear (RR4512).
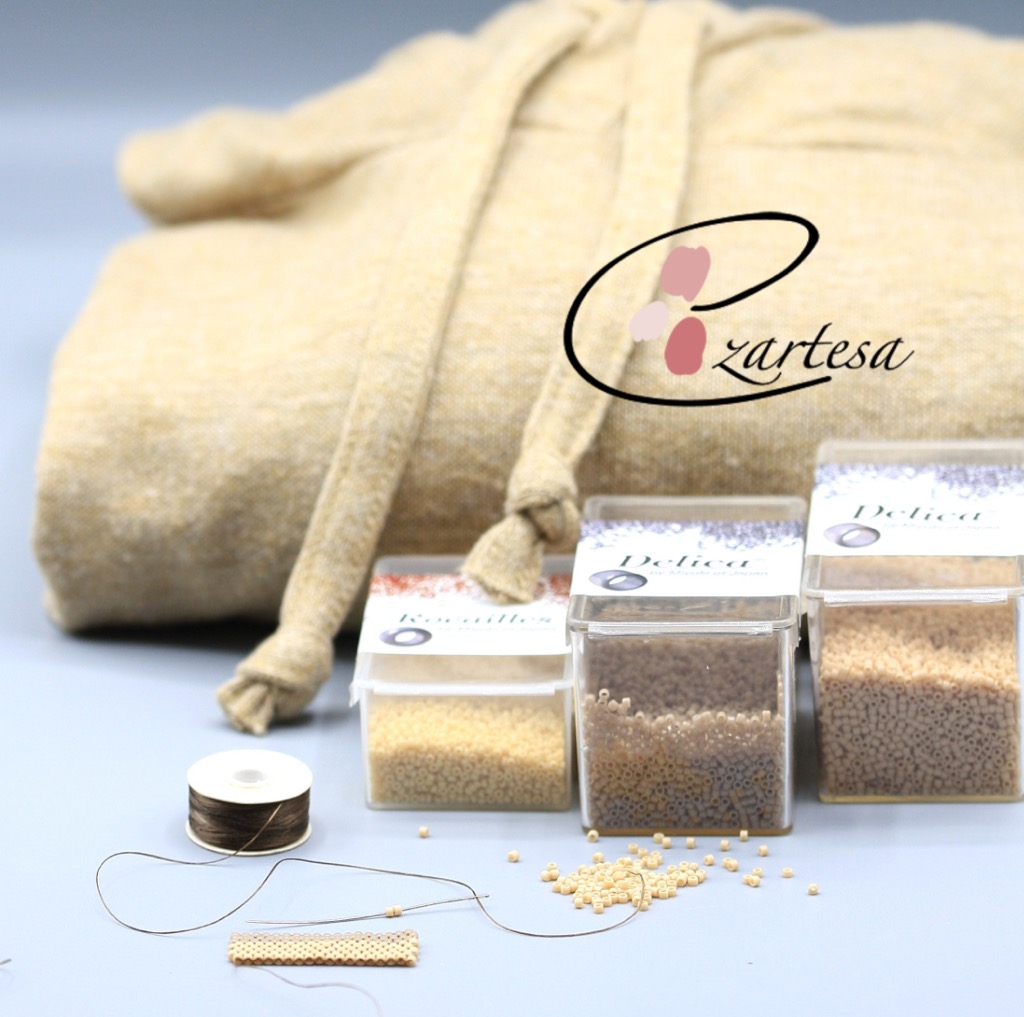
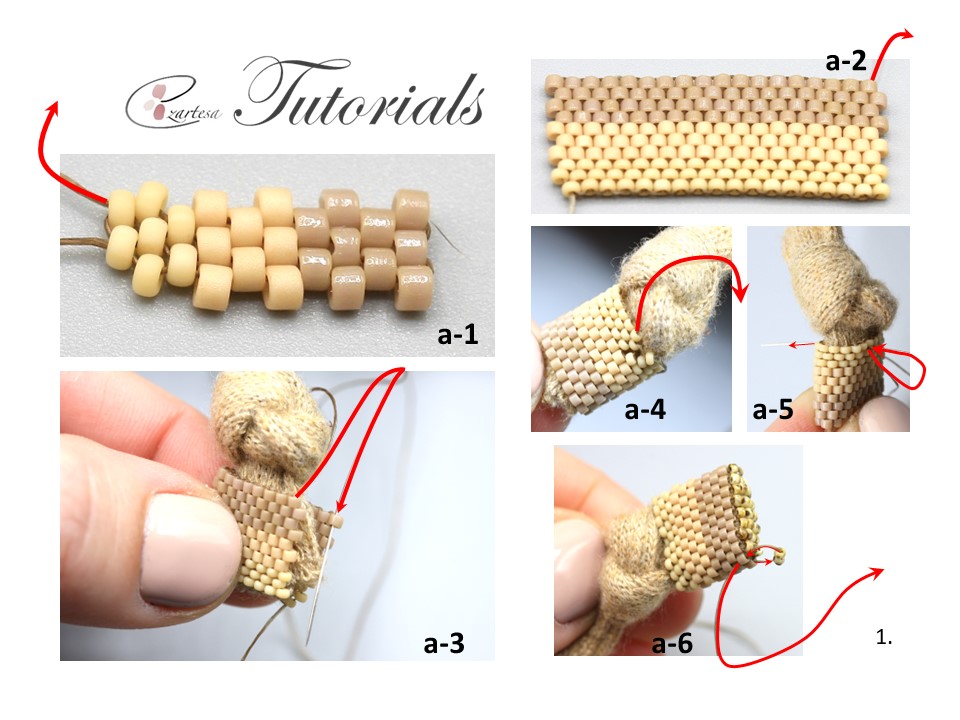
Step 1. Make a peyote strip (flat peyote stitch) that is the 10 beads wide and 36 rows long (photo a-1,2). Start by stringing three 15o Es, three 11o As, four 11o Bs.
Step 2. After you finished the strip, wrap it around the one end of the drawstring. Next Zipp-up the jagged edges of the strip (photo a-3,4). Then sew with the needle through the beadwork and the drawstring (repeat couple times) (photo a-5).
Step 3. Next weave the working thread through the beadwork and exit one edge 11oB bead, pick up the two 15o Ds, and sew down through the opposite 11oB bead of the front side beadwork. Come back through the next 11oB bead and repeat using four 15o Ds per stitch, work till the end and finish with two 15o Ds (photo a-6). Secure the thread tales in the beadwork with a few half hitch knots and trim.
Step 4. Make a peyote strip (flat peyote stitch) that is the 16 beads wide and 36 rows long (photo a-7,8). Start by stringing seven 15o Es, three 11o As, six 11o Bs.
Step 5. After you finished the strip, wrap it around the drawstring you are already working on. Zipp-up the jagged edges of the strip (photo a-9). Then sew with the needle through the beadwork and the drawstring (repeat couple times).
Step 6. Make a peyote strip (flat peyote stitch) that is the 36 beads wide and 36 rows long (photo a-10,11). Start by stringing seven 15o Es, three 11o As, six 11o Cs, twenty 11o Bs.
Step 5. After you finished the strip, wrap it around the second drawstring. Zipp-up the jagged edges of the strip (photo a-12). Then sew with the needle through the beadwork and the drawstring (repeat couple times). Secure the thread tales in the beadwork with a few half-hitch knots and trim.
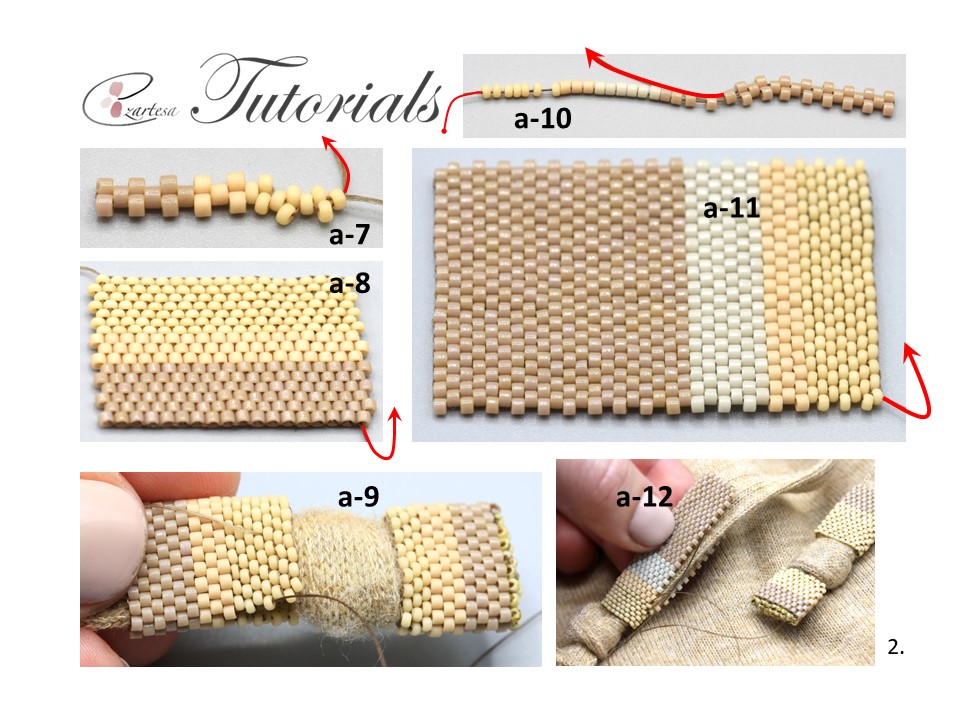
This is a supper simple idea what you can do with glass seed beads other than jewelry.
Discover the art of beading with my beading tutorials!Learn the basics and create beautiful peaces.
Learn to Bead with my Step-By-Step Free Beading Tutorial.
Get started on your beading journey with my step-by-step tutorial. Create stunning jewelry in no time!
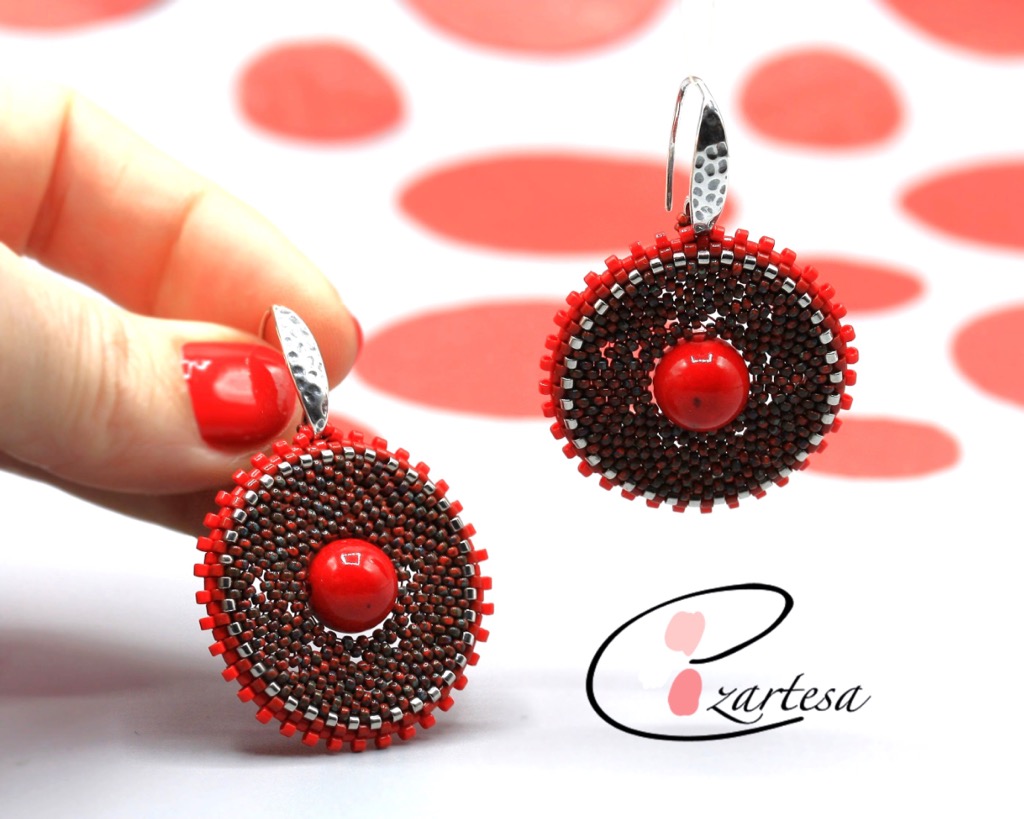
Materials For a Pair of Beaded Circle Earrings.
- Nylon beading thread color red (conditioned with beeswax).
- Beading needles #12.
- Scissors.
- 30mm Gold-Plated, Cooper-Plated or Steel, Double-Sided Hammered Open Round, 2 rings.
- 10mm round, red coral bead or any other material bead, 2 beads.
- Japanese Cylinder, Delica Seed Beads
approx. 0,5g size 11o B – Opaque brick red (DB0654).
approx. 0,5g size 11o C – Opaque vermillion red (DB0727).
- Rocailles Seed Beads
approx. 1g size 15o E – Opaque red (RR408).
- Ear-wire, sterling silver 18mm fishhook with open loop.
Step-by-step instruction
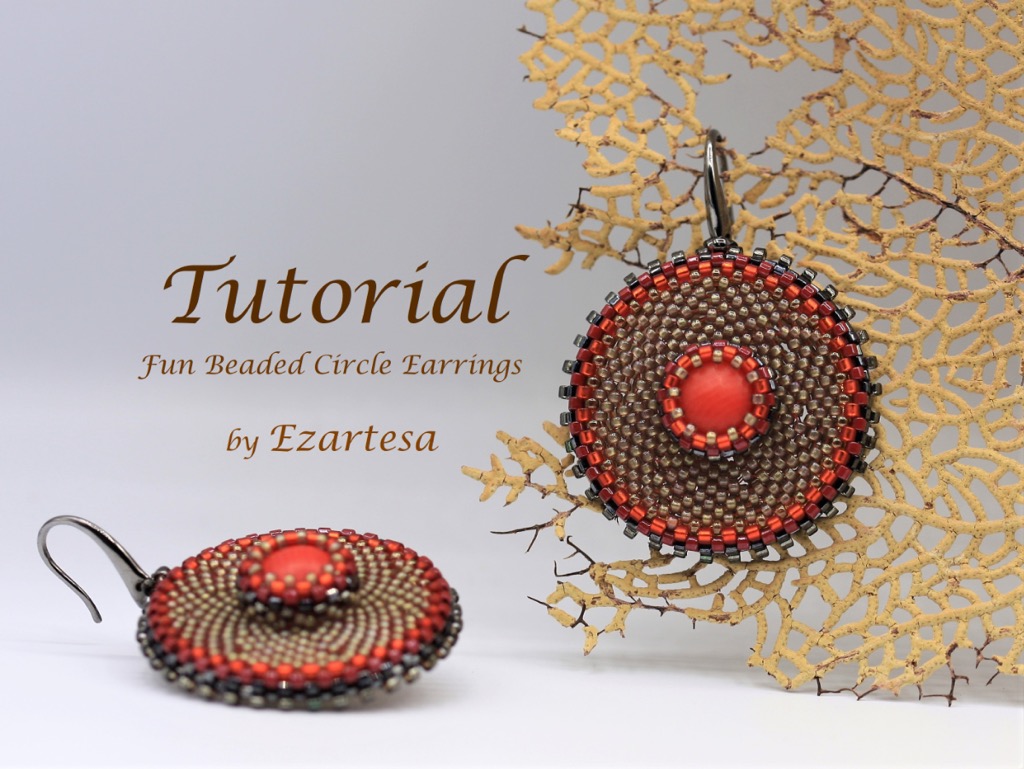
Beaded Circle Earrings
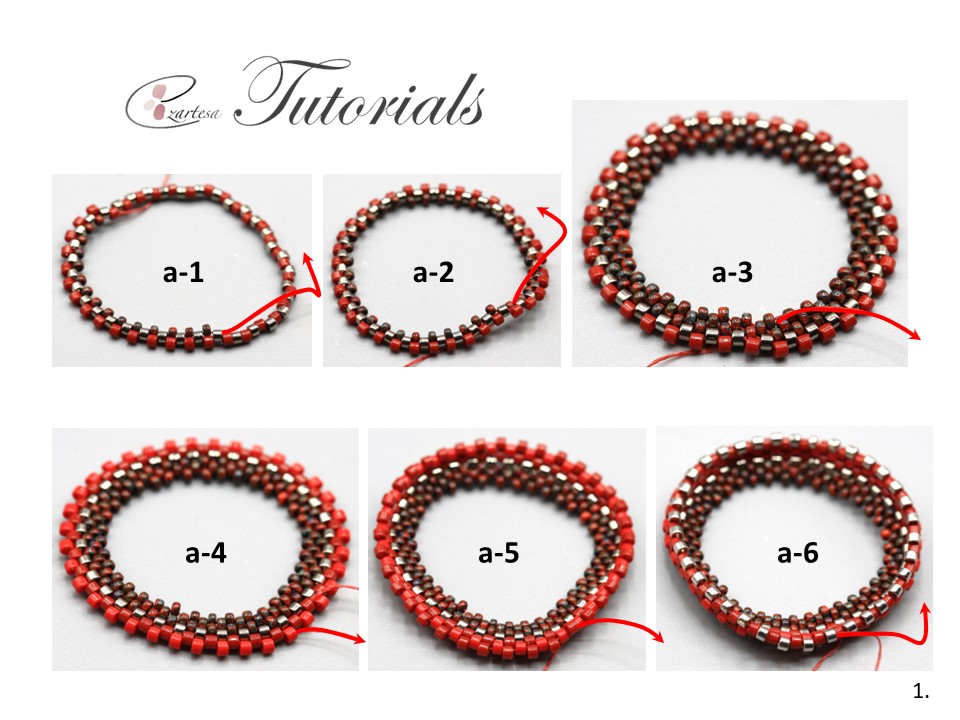
Step (1) On 2yd. of conditioned thread pick up seventy-two Delicas (changing between one 11o A and one 11o B bead) and form a ring in the middle of thread (photo a-1).
Step (2) Working in peyote stitch, exiting one 11o A pick up a 15o D, and sew through the next 11o A (photo a-2). Repeat around the ring for a total of thirty-six stitches and step up.
Step (3) Work two rounds with 15o D s, of tubular-peyote stitch around the ring and step up (photo a-3).
Step (4) Pick up the thread at the other end of the beadwork an existing one edge 11o B bead work one round with 11o Cs of tubular-peyote stitch around the ring and step up (photo a-4).
Step (5) Exiting 11o C bead work one round with 11o B s of tubular-peyote stitch around the ring and step up (photo a-5).
Step (6) Exiting 11o B bead work one round with 11o A s of tubular-peyote stitch around the ring and step up (photo a-6).
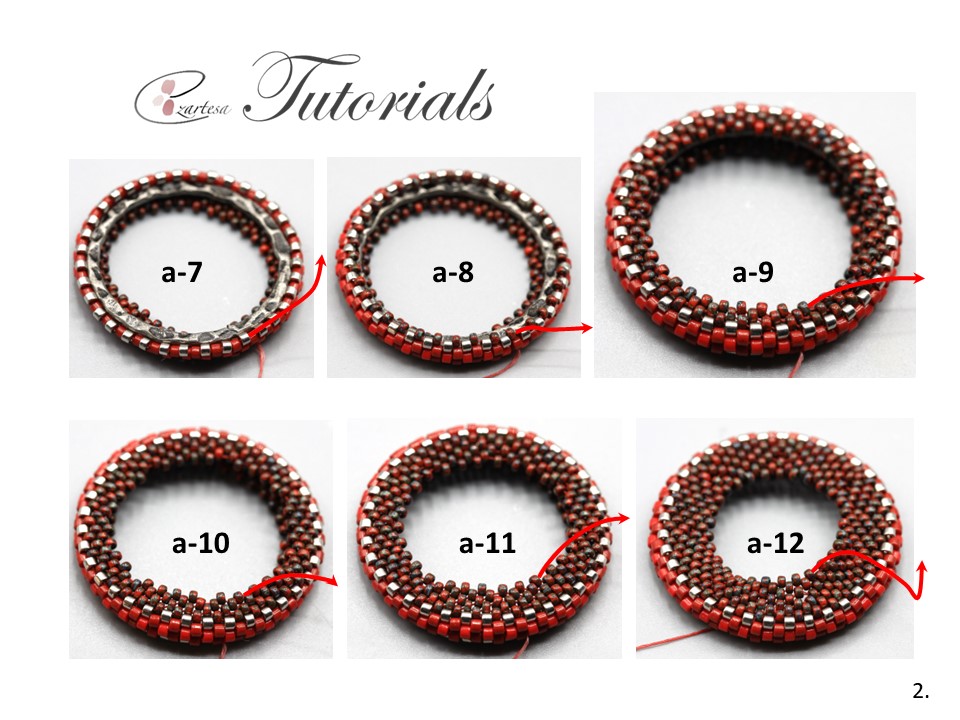
Step (7) Next pick up 30mm open round component, and put on the beadwork, and holding the ring on the beadwork (photo a-7) work one round with 15o D s pulling tight so that the beadwork begins to come up around the ring (photo a-8).
Step (8) Work two rounds with 15o D s, of tubular-peyote stitch around the ring and step up (photo a-9).
Step (9) Start to decrease the width of a piece and work one round with 15o D s skipping fifth space without adding a bead, repeat around the ring (you will have a total of 29 beads around the ring), (photo a-10). Pull the thread firmly to narrow the gap between beads.
Step (10) On the following round work a single 15o D bead above the decrease (you will have a total of 29 beads around the ring), (photo a-11).
Step (11) Work two rounds with 15oD s of peyote and step up (photo a-12).
Step (12) Start to decrease the width of a piece and work one round with 15o D s skipping third space without adding a bead, repeat around the ring (you will have a total of 19 beads around the ring), (photo a-13). Pull the thread firmly to narrow the gap between beads.
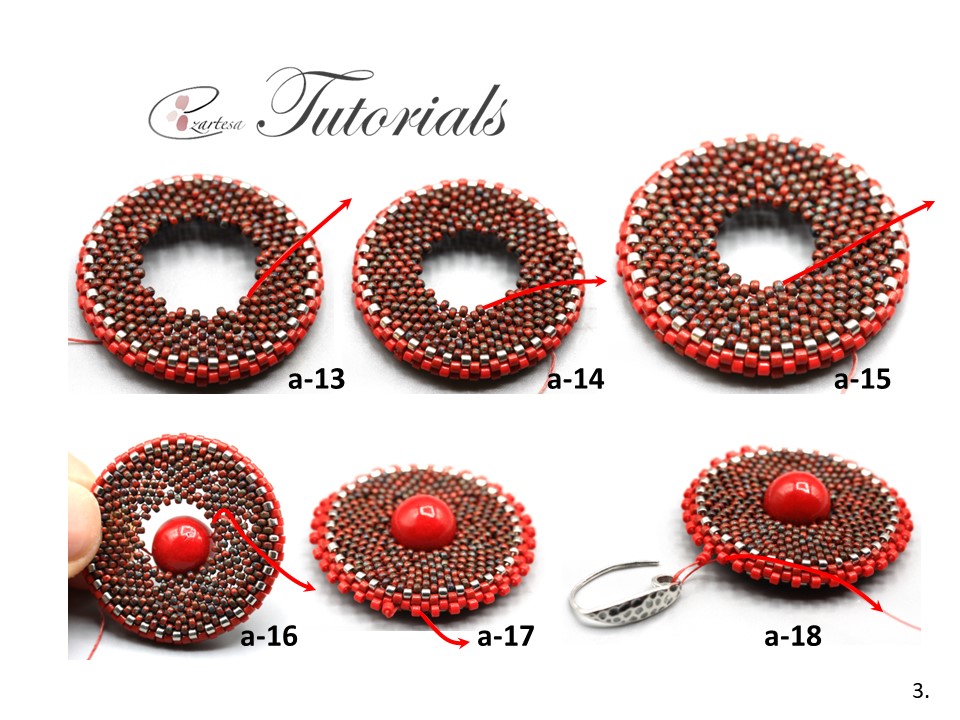
Step (13) Work two rounds of peyote with 15o Ds (photo a-14,15).
Step (14) Next string one 10mm round coral bead and exit through the nineth opposite 15o D bead, weave the thread through the couple beads, sew the needle through the next tenth 15o D bead, sew the needle back through the 10mm coral bead and exit through the opposite 15o D bead at the other side (photo a-16).
Step (15) Then weave the thread through the beads to the one edge 11o C bead. Work one round of peyote around the beaded circle edge with 11o Cs (photo a-17).
Step (16) Next exiting one edge 11o C bead string one 15oE bead, ear-wire, one 15o E bead and sew through the next 11o C bead (photo a-18).
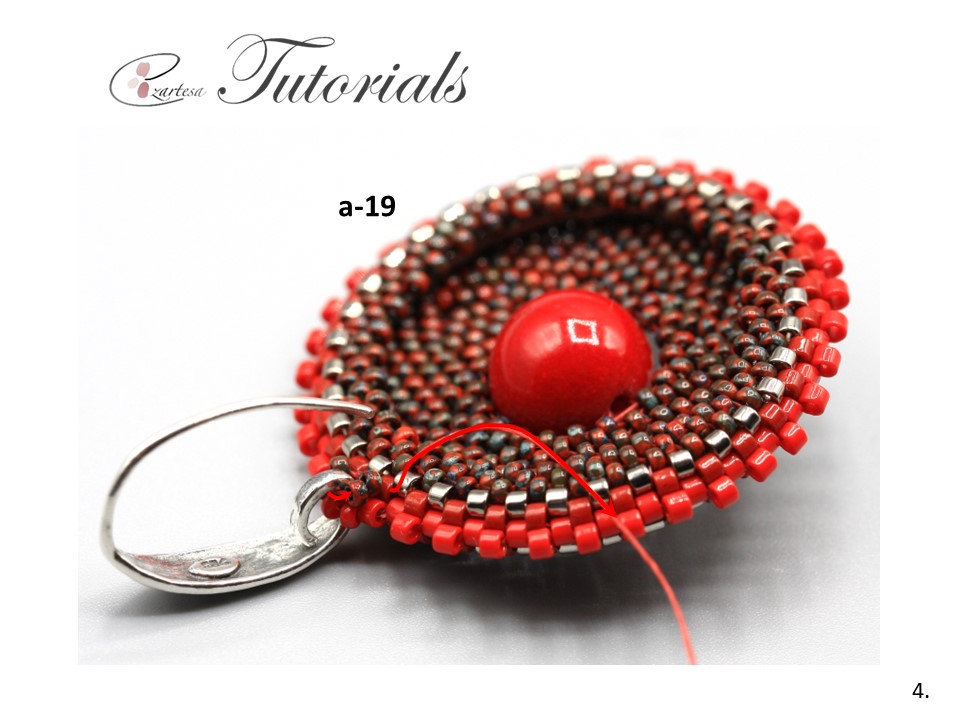
Step (17) Weave the thread through the beadwork and exit through the opposite 11o B bead (opposite to 11o C bead where you added the ear-wire) at the back side of the earring. Then string two 15oD beads, sew the needle through the ear-wire, string two 15o D beads and exit through the next 11o B bead (photo a-19). Secure the thread tales in the beadwork with a few half-hitch knots and trim. Make the second earring.
I made this free beading pattern just to share with you my passion for the beaded jewelry. I hope to show you that it is easy to make your own jewelry.
If you loved this free beading pattern and would like to learn and discover more of my creations, you can visit my Etsy shop.
Beaded Heart Pendant Free Beading Tutorial by Ezartesa
Free Beading Tutorial. Beaded Heart Pendant by Ezartesa
I am very happy to share with you this free beading tutorial of “Purple Heart Pendant”. It’s easy project with simple peyote and square stitches and is suitable for beginners.
Hello everybody, just finished making the Beaded
💜 Pendant Tutorial. The material list and directions are available at my blog #HandmadeHour @HandmadeHour #InternationalWomensDay https://t.co/PkRwWXugL8 pic.twitter.com/jQsW8HvAse
Materials
- Nylon beading thread in red color, size D (conditioned with beeswax).
- Beading needles #12.
- Scissors.
- Roundnose pliers.
- Jump-rings - open 4mm 20ga, 2.4mm, 13 beads.
- Jump-rings - open 7.5x5mm, oval, 1 bead.
- Gold plated brass rounds, 2mm micro round bead, 1.3mm hole, 1 bead.
- Drop in green and pink (red or burgundy color), 22x13mm faceted pear pendant.
- Chain, gold-finished brass, 2mm flat cable, 36 inches with 1-1/4-inch extender chain and lobster claw clasp.
- 2mm faceted Rhodolite Garnet round beads, 20 beads.
- 3-3.5mm round Garnet beads, 2 beads.
- Japanese Cylinder, Delica Seed Beads
approx. 3g size 11o B – Silver lined wine (DB0611).
approx. 3g size 11o C – Silver lined dk rose (DB1342).
approx. 1g size 11o D – 24Kt light gold plated (DB00340).
- Rocailles Seed Beads
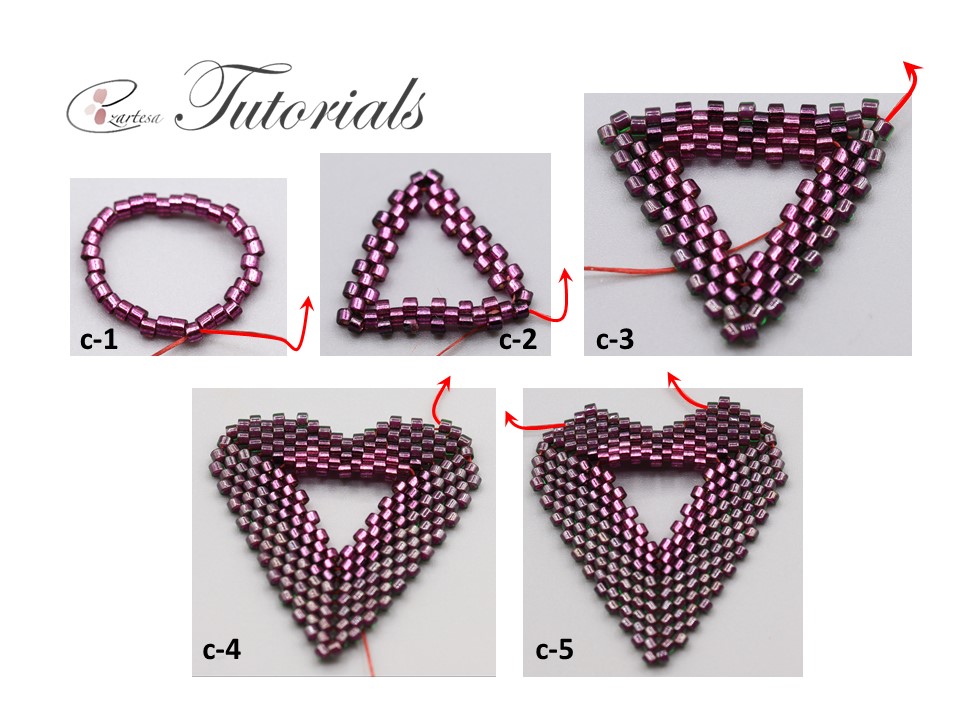
(1) On 1.5 yd. of thread, and leaving an 8-in. tail, pick up thirty-three 11o Cs and form a ring (photo c-1).
(2) Exiting one 11o C bead string two 11o Bs and sew the needle through the next 11oC bead (start forming the triangle shape). Next work two stitches with 11o Cs, one stich with 11o B, two stitches with 11o Cs, at the corner work two 11o Bs per stitch. Then work five stitches with 11o Bs, then string two 11o Bs and sew the needle through the next 11oC bead and finish with five stitches of 11o Bs (photo c-2). Step up through the first one (of the pair) bead added to this round.
(3) At the corner add two 11oAs per stitch, next work one 11o B, one 11o C, two stiches with 11o Bs, one 11o C bead, one 11o B bead and at the corner work two 11oAs per stitch. Next work with 11o Bs and at the corner adding two 11oA beads (photo c-3). Step up.
(4) Exiting one 11o A bead add two 11oAs per stitch, next work one 11o A, two 11o Bs, one 11o A, two 11o Bs, one 11o A and at the corner work two 11oAs per stitch. Next work with 11o As and at the corner adding two beads per stitch (photo c-3). Step up.
(5) At the corner add two 11oAs per stitch, next work two 11o As, one 11o B, two stiches with 11o As, one 11o B bead, two stitches with 11o As and at the corner work two 11oAs per stitch. Next work with 11o As and at the corner adding two 11o A beads per stitch (photo c-4). Step up.
(6) At the corner add two 11oAs per stitch, next work four stiches with 11o As, then weave the thread down through two beads and go up through the one bead, work four 11o As and at the corner work two 11oAs per stitch. Next work with 11o As and at the corner adding two 11oA beads per stitch (photo c-4). Step up.
(7) Next sew the needle through the two beads of the corner, then work four stitches with 11oAs. Weave the thread down and up through the 11o As, work four 11o As, sew the needle through the two corner beads and exiting 11oAs work down ten stitches with 11o As. Next add at the corner two 11o As and finish this step with ten 11oAs (photo c-4). Step up through the first bead added to this round.
(8) Then work three stitches with 11o As. Weave the thread down through the one 11o A and 11o Bs (photo c-4) weave the thread up through the beads and exit 11o A bead from previous step (I suggest not to weave the thread through the upper 11o As, because you won't be able to pass the thread through these beads in future) and work three 11o As, sew down through the two corner and one more 11o A bead. Next work with 11o As and at the lower corner adding two 11oA beads per stitch (photo c-4). Step up through the first bead added at this round.
(9) Exiting 11oA bead work two stitches with 11o As. Weave the thread down through the couple 11o As and then follow the path from step (8) and exit one 11o A bead from previous step. Next work two stitches with 11o As, sew the needle down through the four beads, work ten stiches with 11o As, work two 11oAs at the corner and finish with ten stitches of 11oAs (photo c-5). Step up.
(10) At top of beaded heart beadwork exiting 11oA bead work one stitch with one 11o A bead and repeat at the opposite side (photo c-5).
Check my Pinterest @artshopping for Beaded Heart pendant tutorial videos and learn how to make beaded chain links with 2mm and 3mm Garnet gemstone beads.
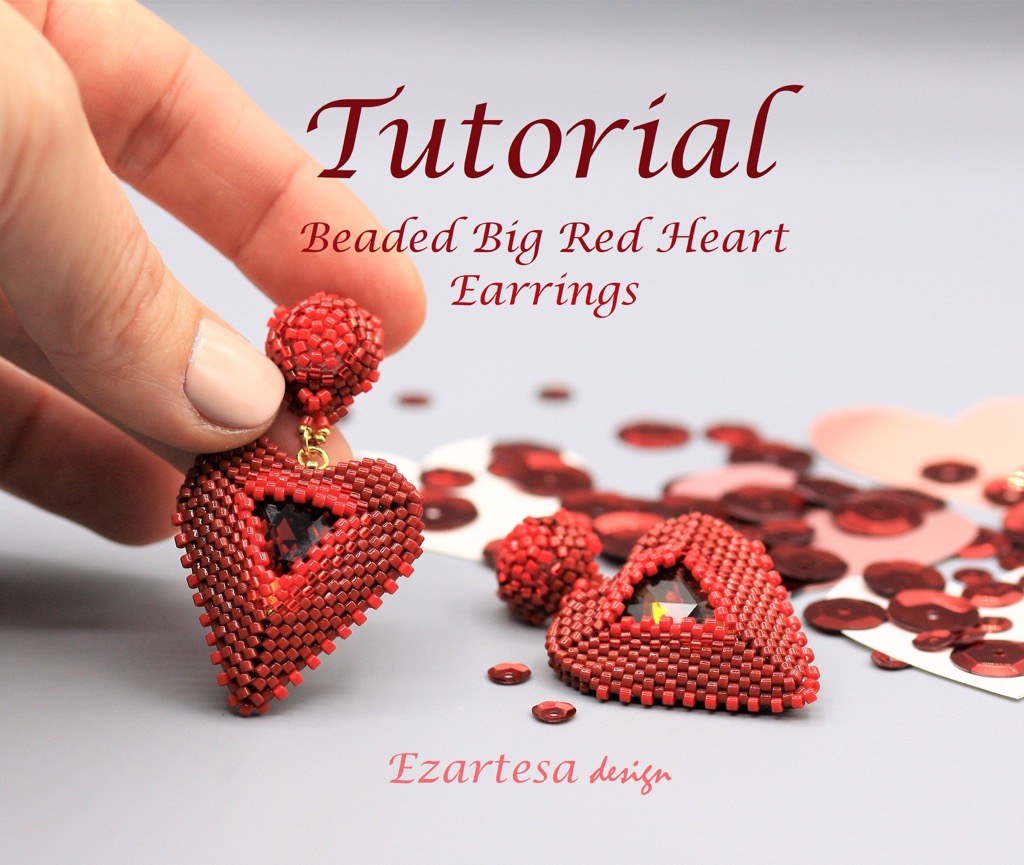
Detailed instructions for the Beaded Heart earrings
Please check my all beading tutorials.
Happy beading!
Ezartesa.
How To Make Sea Glass Necklace From Your Beach Walk Finds
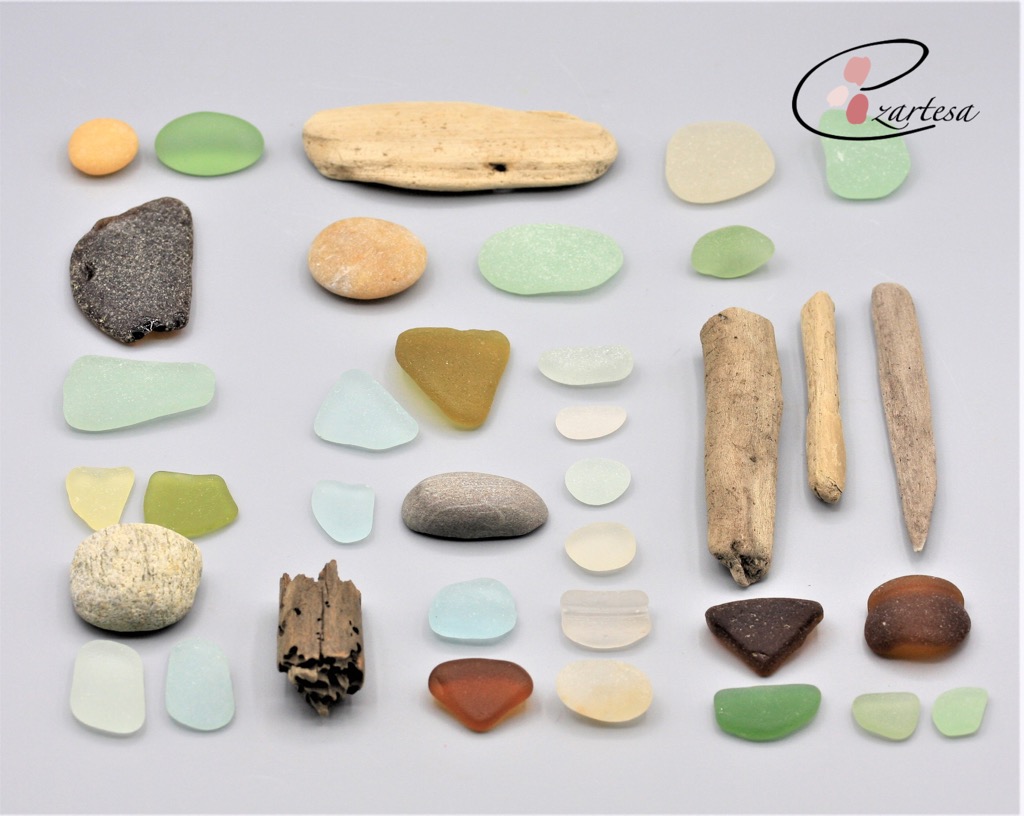
Over the years on my beach walks I have acquired a large collection of jewelry quality sea glass, driftwood, and shells. The sea glass gems I choose for my beachcomber necklaces must be already nicely shaped and free of any obvious flaws. Most important I don’t need to cut, shape, or alter the sea glass, the sea, sand and waves do the job.
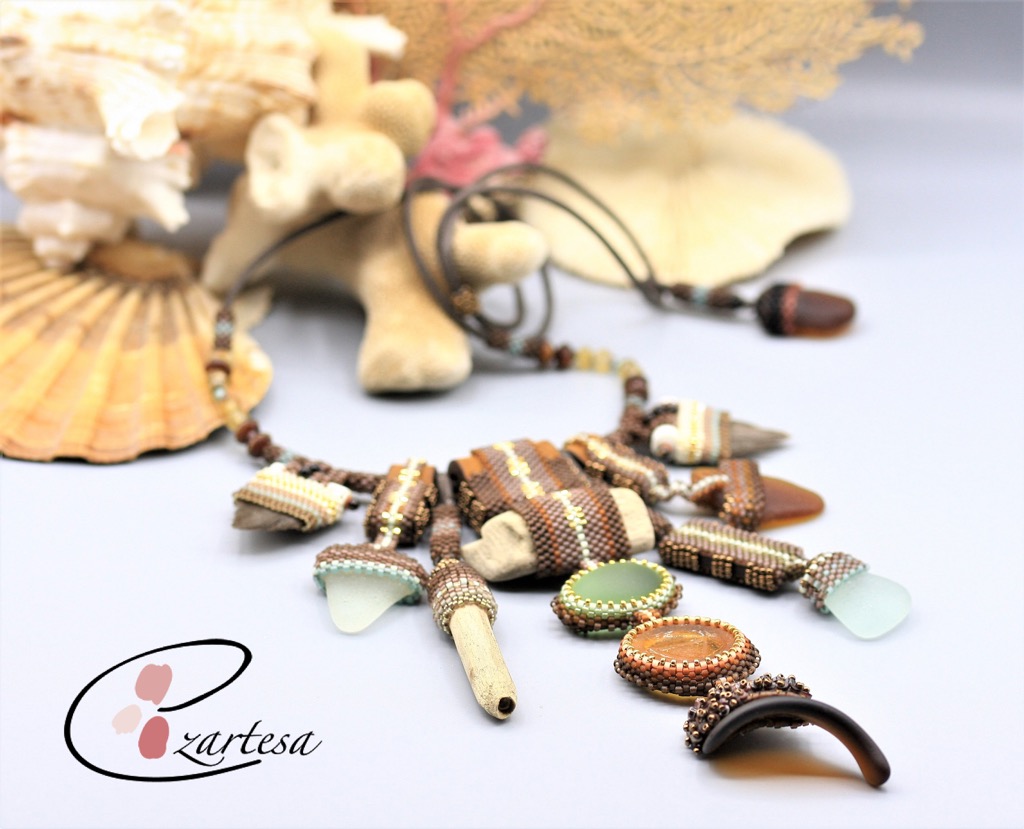
When I have the idea for the necklace, I just go through all my sea glass collection and look for the shapes and color I need for my adornment. Sometimes it takes a long time to decide which pieces will go to my design…
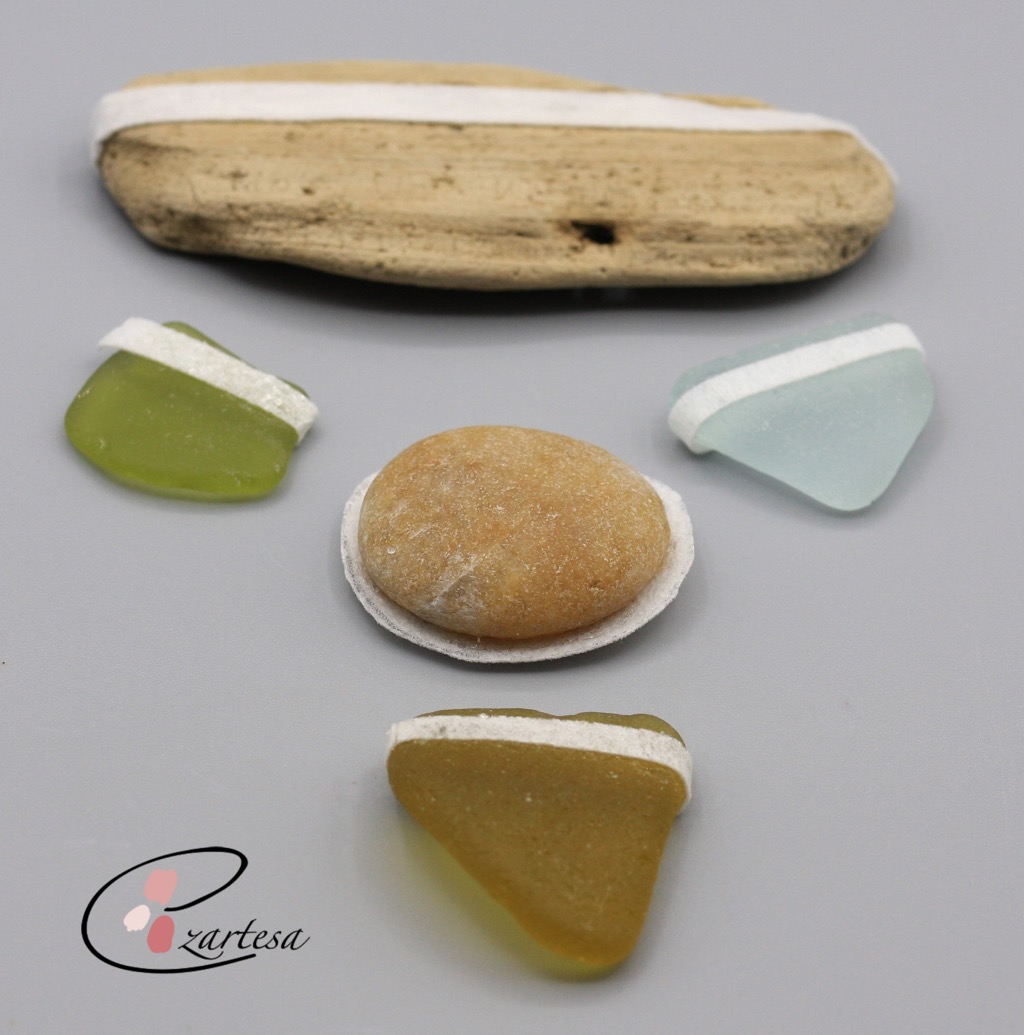
Once that decision is made, the fun part of designing sea glass jewelry begins. When it comes to planning and creating, a lot of times it’s simply intuition …
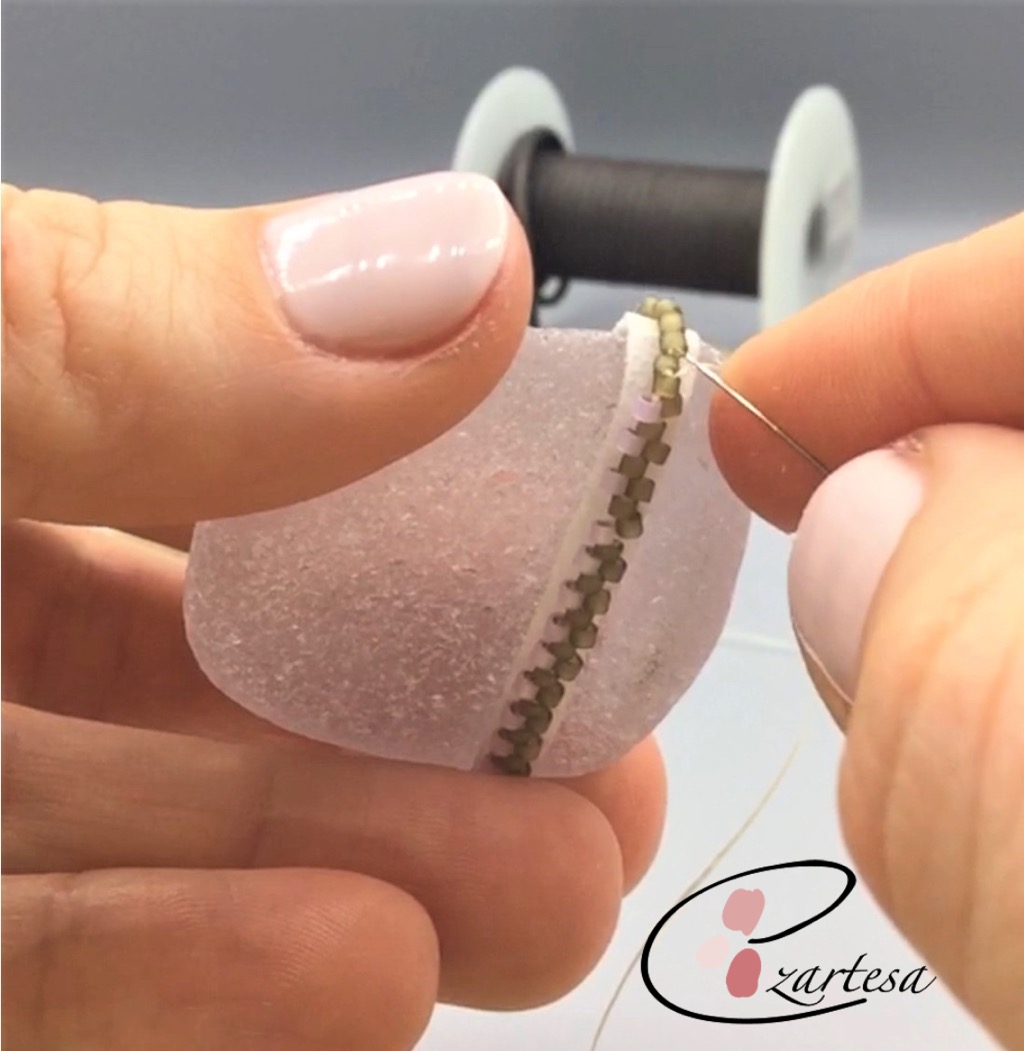
My technique for making the beaded bezels and connecting the separate pieces are the even and add-count peyote, brick, and tubular peyote stitches. These are the very simple and easy bead weaving technique stitches.
The Queen of the underworld beaded necklace is available here
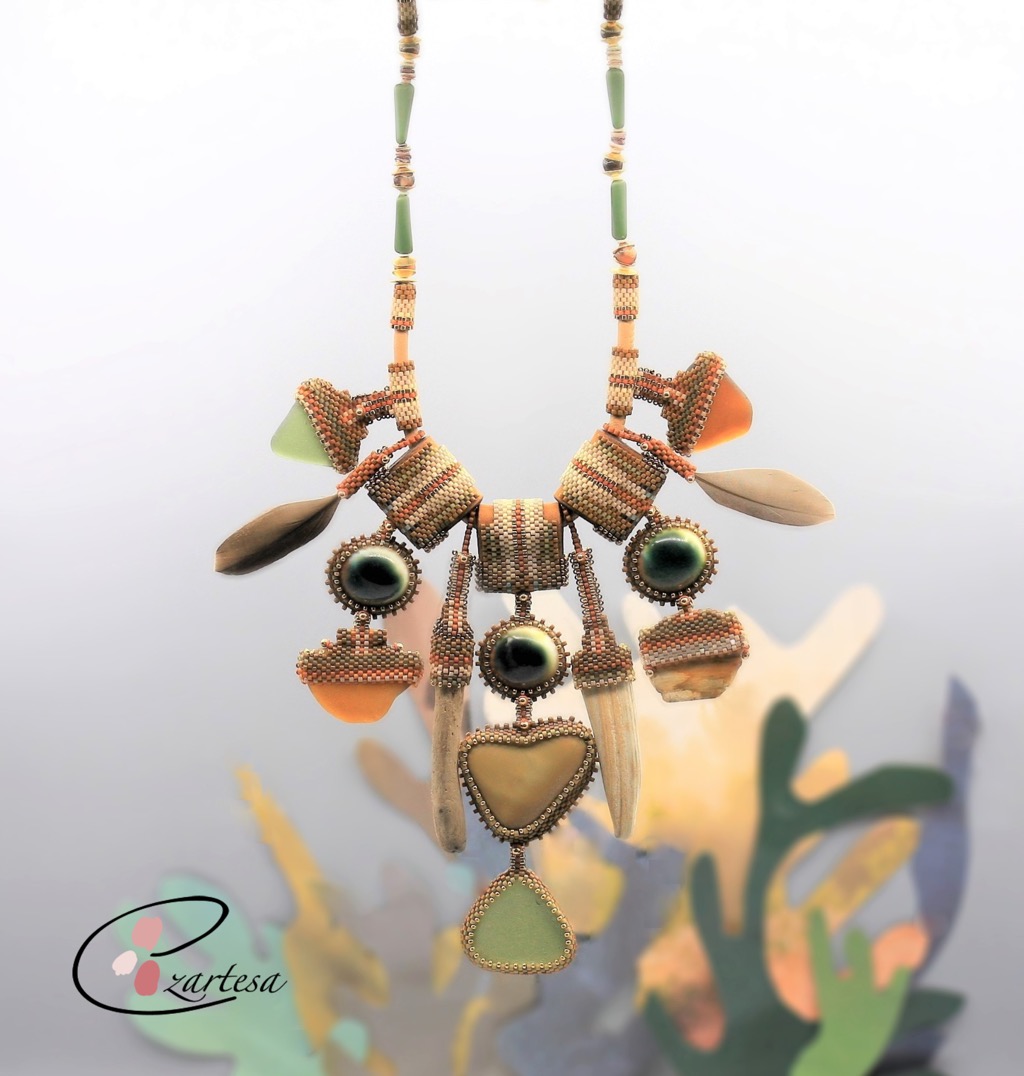
I really love working with tiny Japanese glass seed beads and natural gemstone beads. I love the texture that tiny beads create. There are many different finishes, colors and shapes of glass seed beads, just by combining them in different color combinations makes each piece one of a kind.
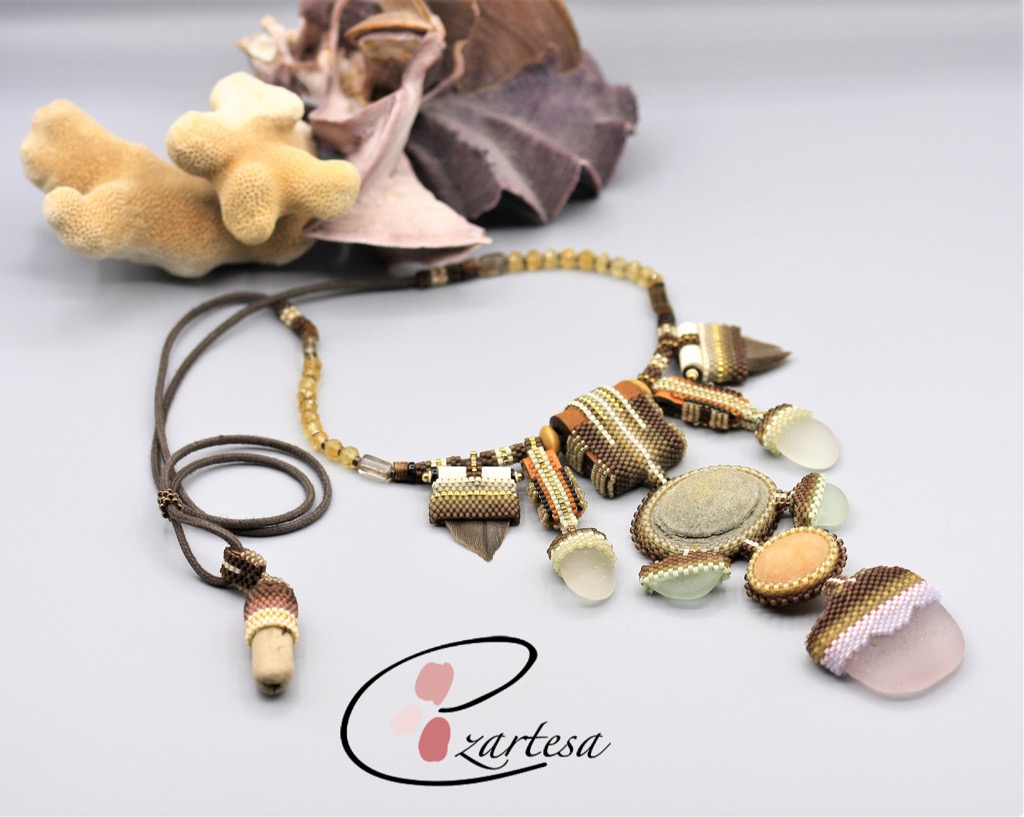
I like to use the matte finished beads for the sea glass pieces. It just compliments so beautiful the frosted sea glass texture. And I use the gold finished beads as an accent. There is something about the look of frosted glass and the gleam of gold as well as the way it showcases the common light blue, green and translucent whites.
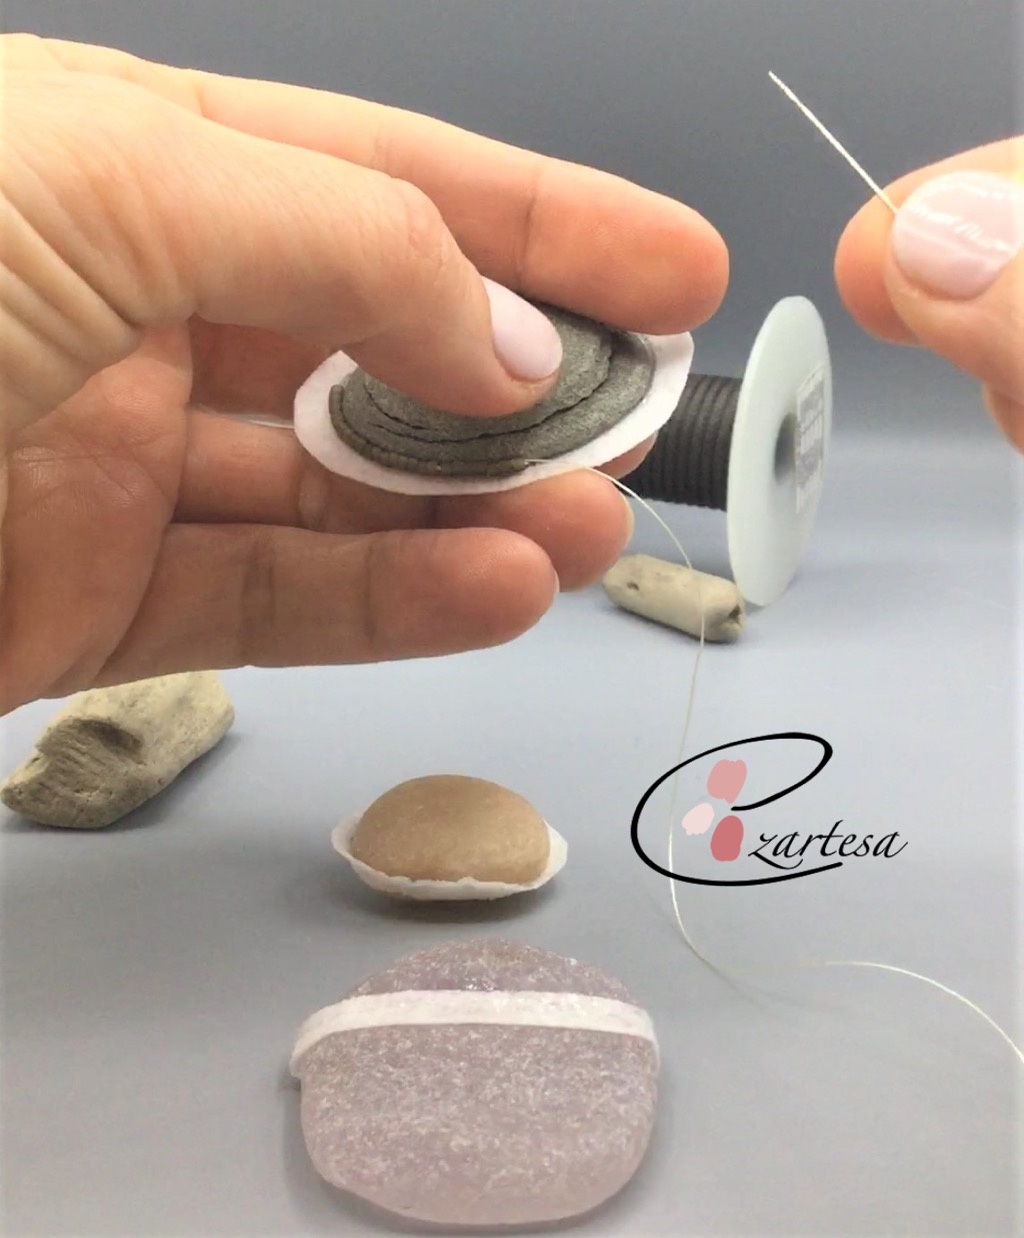
After choosing the couple main elements for the necklace and playing with them around little bit. I decide what kind of shape my necklace will be: simple pendant hanging from the leather cord, the choker style or a long-beaded necklace.
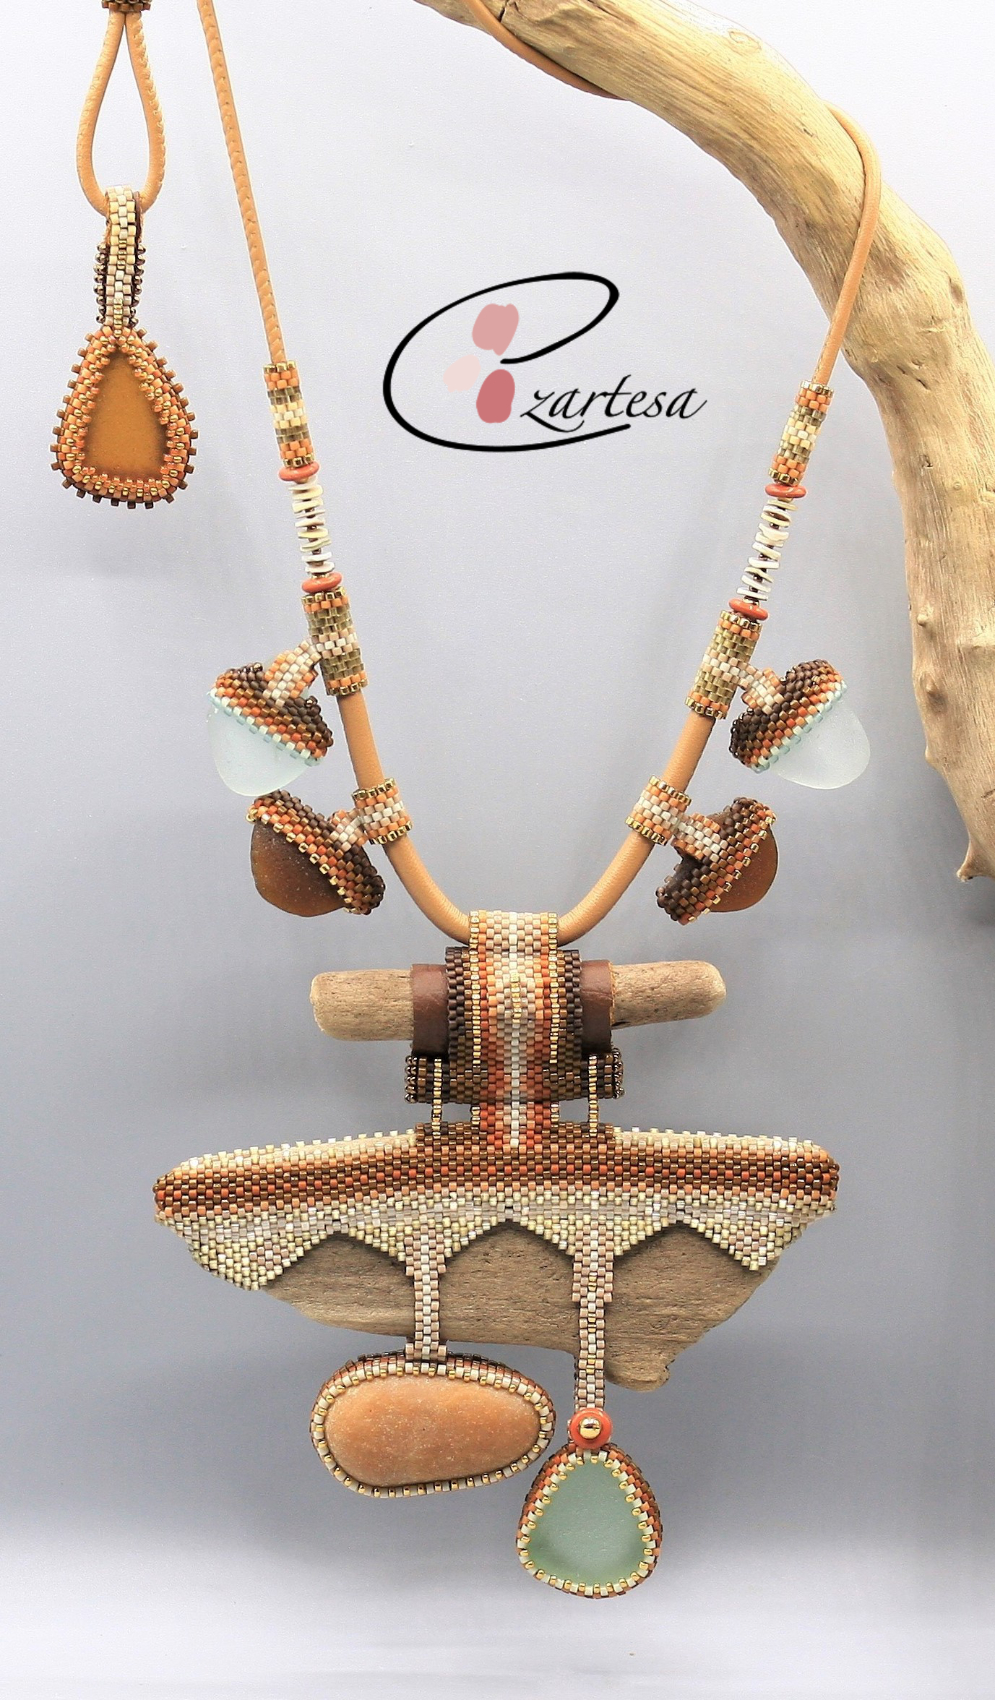
If you collect the beach gems, why not learn how to make your own jewelry to showcase your beautiful finds?
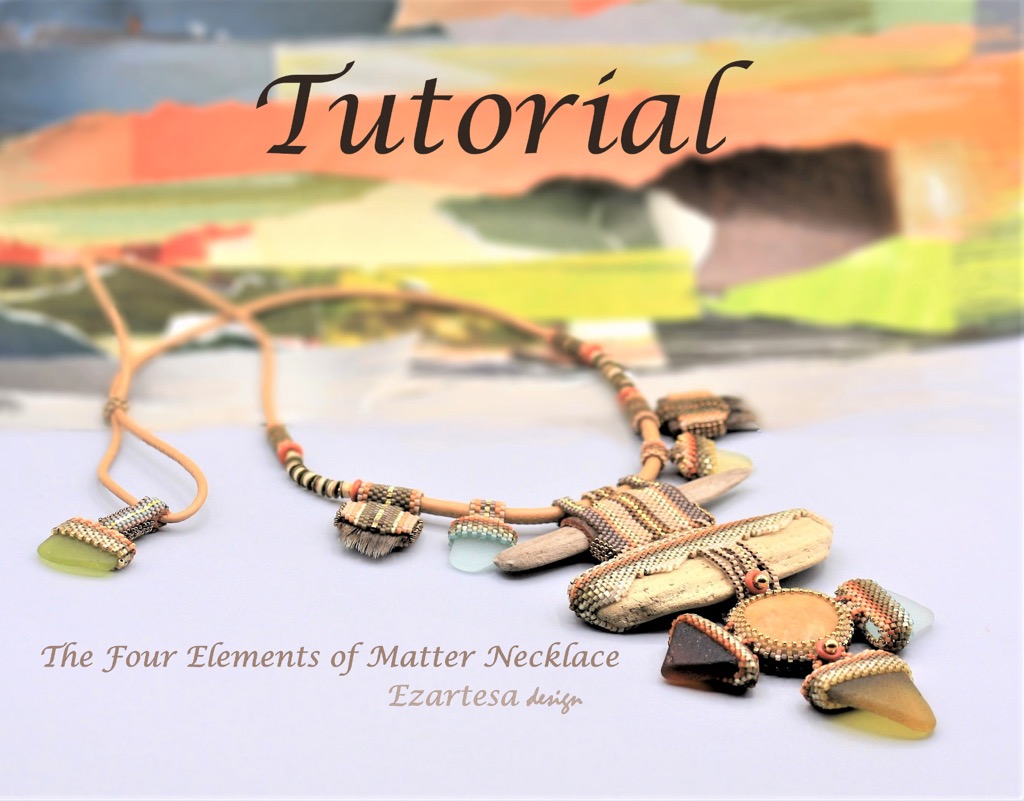
This “The Four Elements of Matter” beading tutorial shows how to use a very simple peyote stitch to create a stunning necklace. It has many tips for beading paths to combine the elements. You’ll be amazed by how much you can accomplish with just needles, thread and beads.
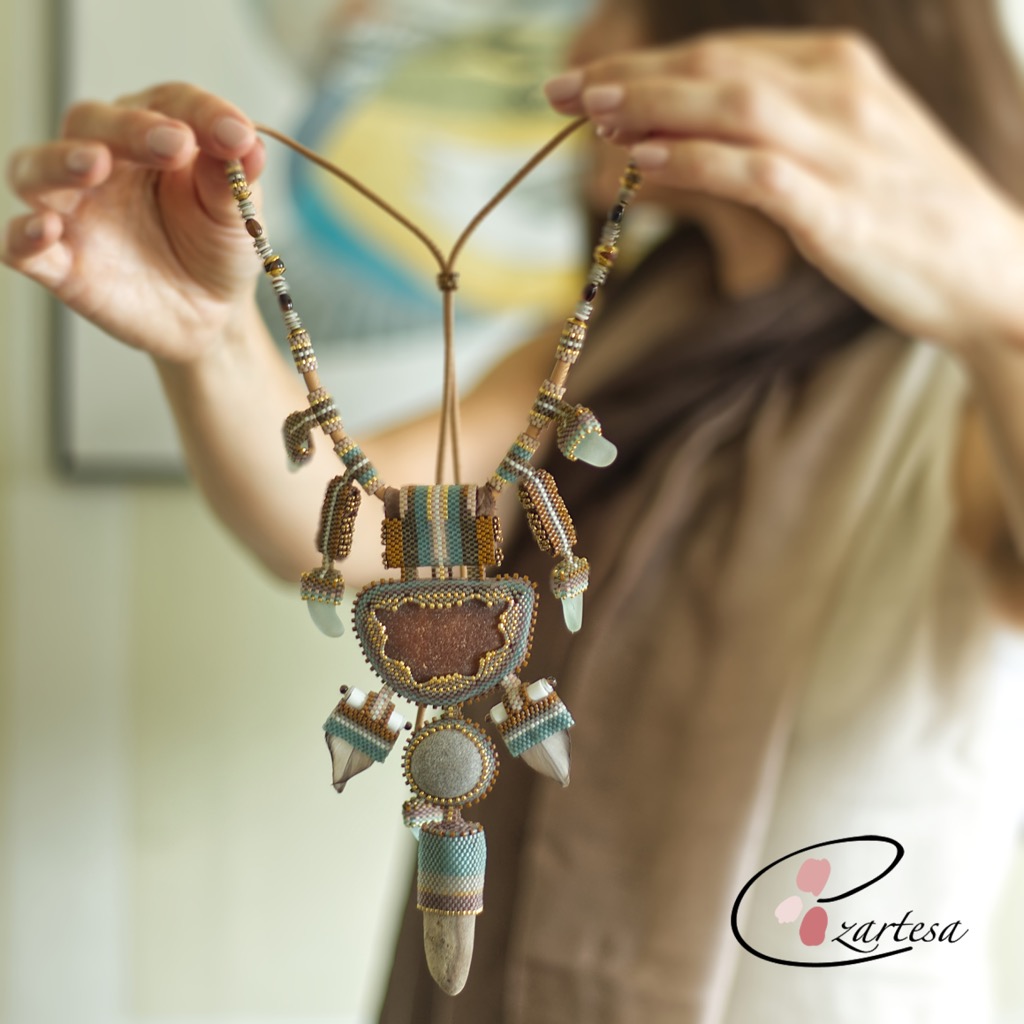
Discover a new world of creative possibilities with bead weaving technique! It’s fun and easy to make artsy and unique jewelry with beach find objects.
EZARTESA Beading Tutorials.
Free Beading Patterns with Instructions for Beginners | Ezartesa
Free Beading Patterns with Instructions for Beginners by Ezartesa
Bead weaving is my passion, and I am incredibly happy to share with you this free beading pattern of “Turquoise Beaded Circle drop dangle earrings”. It is easy project with basic stitches and is suitable for beginners.
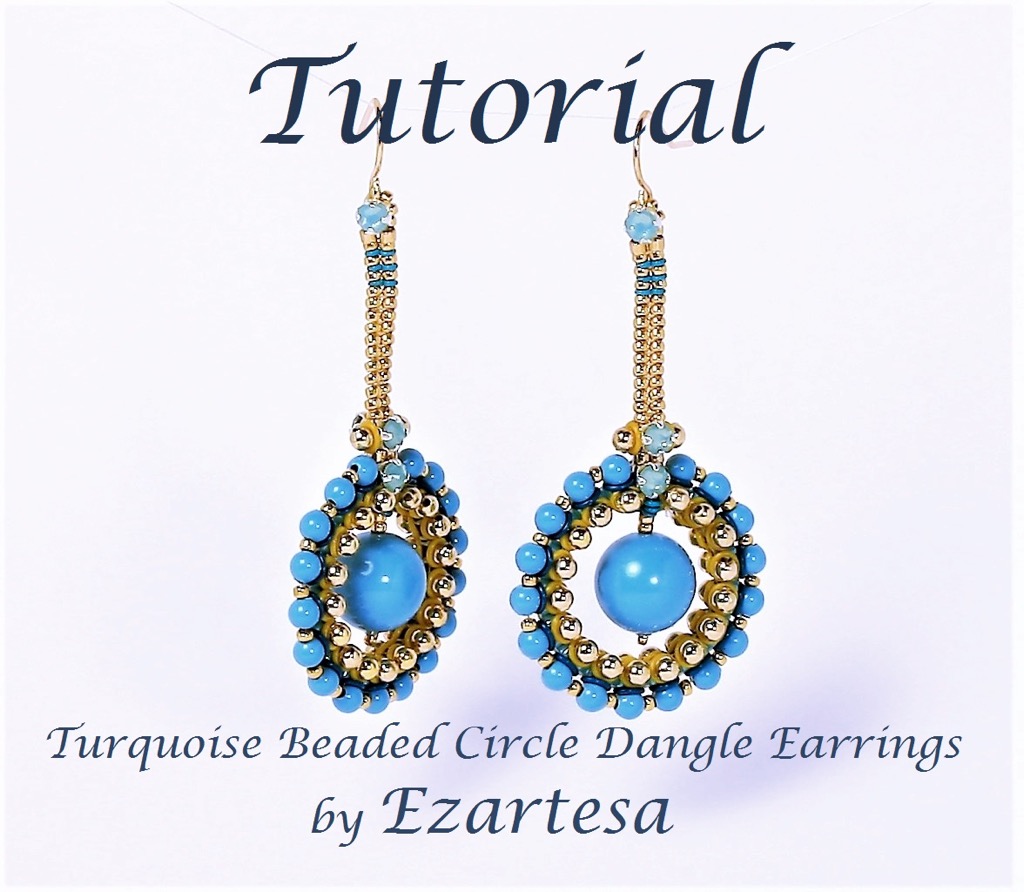
Materials for a pair of earrings.
- Nylon beading thread (conditioned with beeswax).
- Beading needles #12.
- Scissors.
- 10mm Turquoise Swarovski Crystal Pearls, 2 pearls.
- 3mm Turquoise Swarovski Crystal Pearls, 34 beads.
- 3x3.2mm Pacific Opal Swarovski Crystals Rose Montees, silver-plated pewter, 10 beads.
- 2.5mm round gold plated bead, 72 beads.
- Component, Oh! Ring, rubber, light green, 1.5mm round with 0.5mm hole, 24 beads.
- Component, Oh! Ring, rubber, light blue, 3mm round with 2mm hole, 34 beads.
- Component, Oh! Ring, rubber, yellow, 3mm round with 2mm hole, 72 beads.
- Component, antique brass-plated brass, 18mm open round with 16mm hole, 2 rings.
- Japanese Cylinder, Delica Seed Beads
approx. 0,5g size 11o B – light gold-plated beads
Rocailles Seed Beads
approx. 1g size 15o C – 24Kt gold plated.
- Ear wire, gold plated stainless steel, 11mm fishhook with open loop.
This is a step-by-step beading and jewelry making tutorial for beginners that will teach you how to make these beautiful, beaded circles drop dangle earrings. Learn how to use tiny glass seed beads to form the base around the metal rings and how embellish it with crystal pearls, metal beads and rubber rings.
Step-by-step instruction
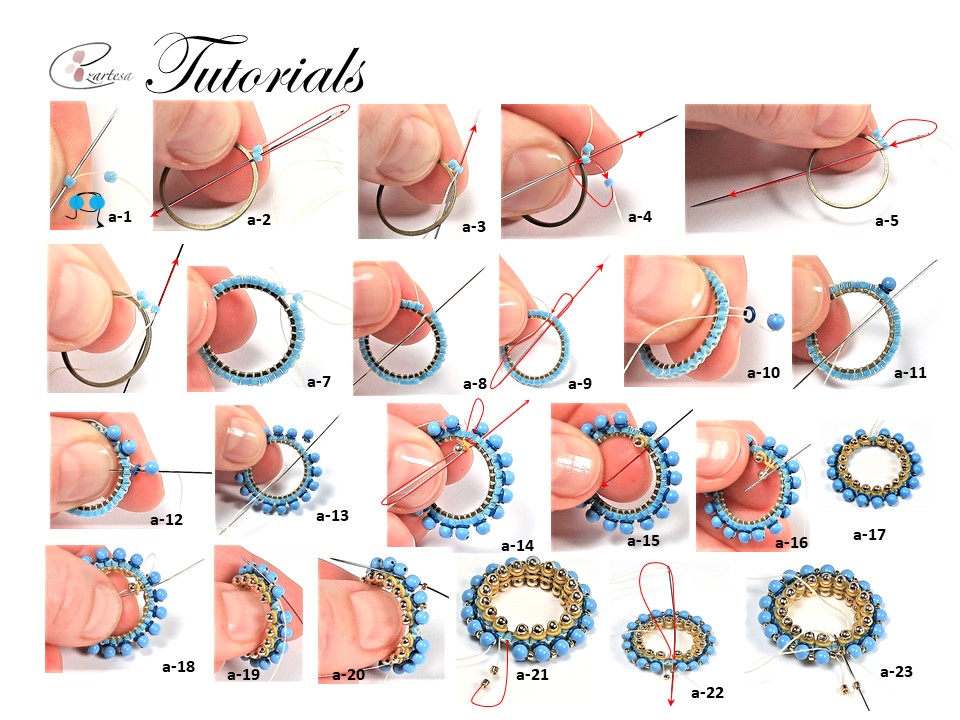
(1) On about 1yd. (.9m) of (ivory) thread, and leaving an 32in.(84cm) tail, make a two-bead ladder with 11o A color seed beads (photo a-1).
- Then pick up 18mm open round, and those two 15o A beads, hold them outside the ring (photo a-2), go with the needle through the ring and exit up through the second bead (photo a-3).
- Then pick up one 11o A and sew up through the second 11o A (photo a-4), then sew through the ring, and sew up through the last bead (photo a-5).
- Repeat around the ring for a total of 35 11o A beads.
(3) Then pick up one 3mm light blue Component, Oh! Rubber Ring, one 3mm Swarovski turquoise crystal pearl, and sew back through the rubber ring and down through the next bead (photo a-10), come up through the next bead to the right (photo a-11). Repeat around the ring for a total of seventeen turquoise Swarovski pearls and rubber rings (photo a-12, a-13).
(4) Then secure the other end of the thread and sew down through the next bead to the right. Pick up one 3mm yellow Component, Oh! Rubber Ring, one 2,5mm round gold platted bead, and sew back through the rubber ring and up through the next bead (photo a-14) and sew down through the next bead to the right (photo a-15). Repeat around the ring for a total of seventeen 2,5mm round gold platted beads, and rubber rings (photo a-16, a-17).
(5) Then secure the thread tail and sew down through the next bead to the right (work at other side of ring). Pick up one 3mm yellow Component, Oh! Rubber Ring, one 2,5mm round gold platted bead, and sew back through the rubber ring and up through the next bead (photo a-18) and sew down through the next bead to the right. Repeat around the ring for a total of seventeen beads and rings.
(6) Then sew up through the blue rubber ring and 3mm turquoise Swarovski crystal pearl (photo a-19), pick up one 15o C, and sew through the next 3mm turquoise pearl. Repeat around the ring for a total of sixteen 15o C s (photo a-20). and sew down through the next bead to the right. Repeat around the ring for a total of seventeen beads and rings.
(7) Secure the other end (that exiting 11o A bead) of the thread and pick up two 11o B s (photo a-21), skip one 11o A, and sew down through the next 11o A. Then skip one 11o A and sew up through the next 11o A and 11o B that you just added (photo a-22).
(8) Then pick up two 11o B s (photo a-23), and sew down through the one 11o B bead, come back up through the next (opposite) 11o B bead, and one 11o B that you just added. Then work thirteen pairs with 15o C s (photo a-24).
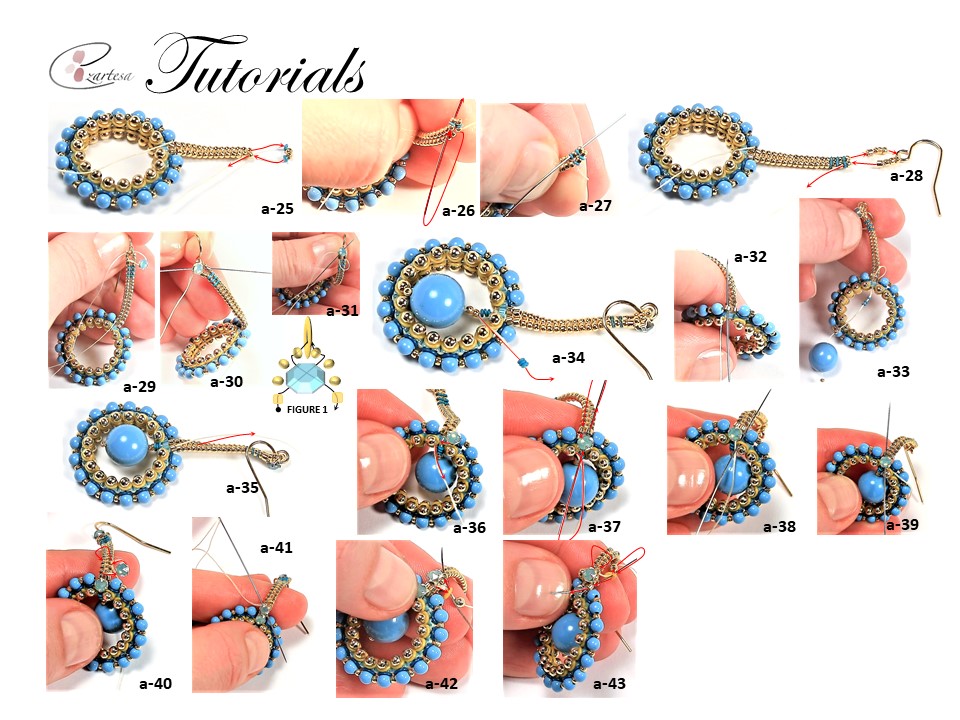
(9) After you added thirteen pairs of 15o C s (photo a-25), pick up one light green 1,5mm rubber ring, two 15o C s, one light green 1,5mm rubber ring and sew down through the one 15o C bead, come back sewing up through the next (opposite) 15o C bead, rubber ring, and 15o C that you just added (photo a-26). Repeat step (9) two more times (photo a-27, a-28).
(10) Then pick up 11o B, tree 15o C s, ear-wire, three 15o C s, one 11o B, and sew through the opposite 15o C, and rubber ring (photo a-28).
(11) Sew up through the opposite rubber ring, 15o C and one 11o B bead, pick up one Swarovski 3x3.2mm Pacific Opal montee, and sew diagonally through the one 15o C, ear-wire, 15o C (photo a-29). Then sew diagonally through the other end of Pacific Opal montee and exit through 11o B (photo a-30) (FIGURE 1).
(12) Reinforce the Swarovski 3x3.2mm Pacific Opal montee by sewing through the opposite 11o B (photo a-31), sew diagonally through the montee, one 15o C, ear-wire, 15o C, then diagonally through the other end of Pacific Opal montee, and 11o B. Secure the thread in the beadwork and trim.
(13) Then secure the threat (tail) and sew up through the 11o B (photo a-32), then sew down through the opposite 11o B, down 11o A, and pick-up tree light green rubber rings, two 15o C s, 10mm Swarovski pearl and one 15o C (photo a-33).
(14) Sew back through the 10mm pearl two 15o Cs, pick up three light green rubber rings (photo a- 34) and turn the beadwork upside down, and sew through the 11o A bead, and go up through the 11o B (photo a-35).
(15) Pick up one Swarovski 3x3.2mm Pacific Opal montee and sew diagonally through the yellow rubber ring (photo a-36), then sew back through the same hole of montee and up through 11o B (photo a-37). Sew through the opposite 11o B, other end of montee, and go diagonally through the other yellow rubber ring (photo a-38). Then sew back through the Swarovski 3x3.2mm Pacific Opal montee (photo a-39) and exit up through 11o B (photo a-39).
(16) Exiting the 11o B, pick up one Swarovski 3x3.2mm Pacific Opal montee, and sew up diagonally through the third 15o C (photo a-40). Then sew through the opposite 15o C, the other end of Pacific Opal montee, and diagonally (skipping two15o Cs), through the 11o B (photo a-41).
Repeat steps (15), (16) to the other side of earring.
(17) Exiting the second 11o B, pick up one yellow rubber ring, one 2,5mm gold plated round, and sew back through the rubber ring, and exit up through the third 15o C (photo a-42). Then turn the beadwork upside down and sew down to the right through the opposite 15o C, pick up one yellow rubber ring, one 2,5mm gold plated round, and sew back through the rubber ring, and exit down through the 11o B (photo a-43).
Secure the thread tail in the beadwork with half-hitch knots, and trim.
Repeat to make a second earring.
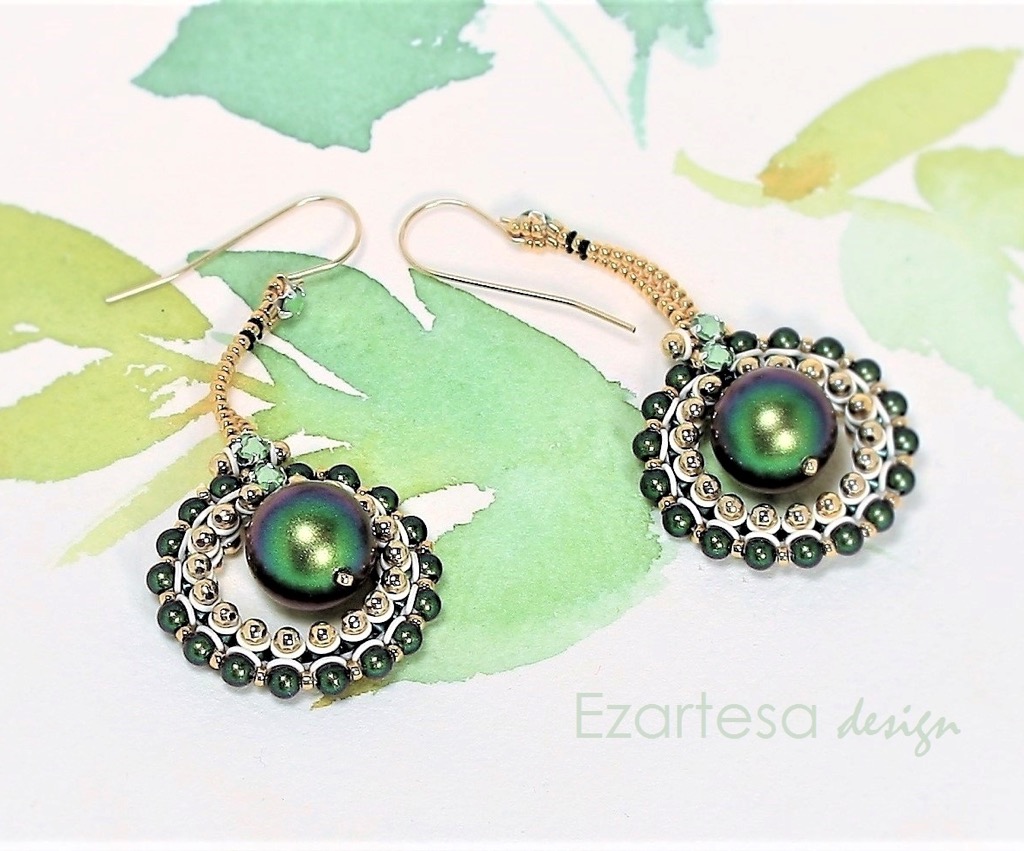
I created these earrings in turquoise blue color palette, but you can mix and match different colors and materials to create the different look and feel of these earrings.
Do not forget to search in my shop for more advanced beading patterns.
© Ezartesa.
Free Beading Patterns with Instructions | Ezartesa
I love beading and making tutorials very much, and I cannot wait to share with you this free beading pattern of evil eye beaded drop dangle earrings. It is easy project and earrings are so much fun to wear!
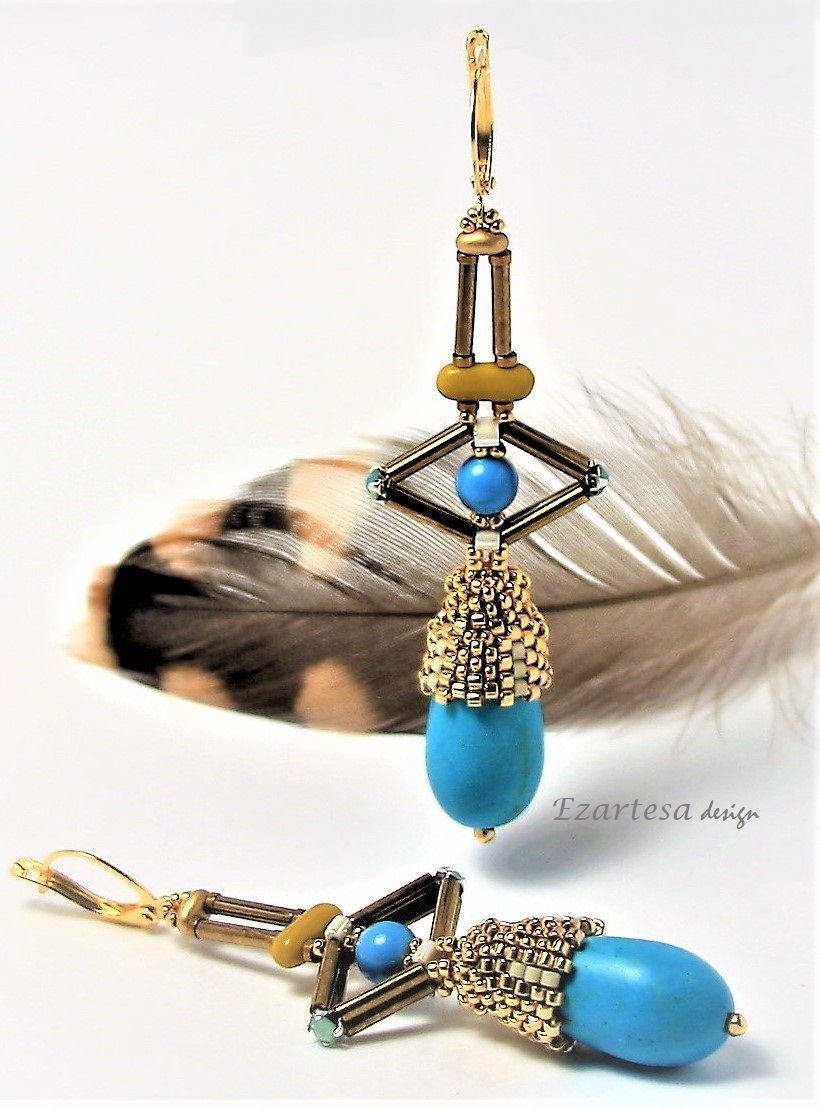
This is the list of Materials for a pair of earrings.
- Nylon beading thread (conditioned with beeswax).
- Beading needles #12.
- Scissors.
- Preciosa twin roller, Czech pressed glass, opaque mustard yellow 9x3.5mm capsule with two holes, 2 beads.
- Preciosa Czech Twin, two-hole seed bead 5x2.5mm opaque gold, 2 beads.
- 2x1mm Hemalyke (manmade) antique gold, heishe beads, 12 beads.
- 6mm Turquoise Swarovski Crystal Pearls, 2 pearls.
- 3x3.2mm Pacific Opal Swarovski Crystals Rose Montees, silver plated pewter, 4 beads.
- Miyuki, Half Tila beads, half-cut 5x2.3mm, Ceylon opaque antique ivory pearl, 4 beads.
- 2mm Squared Round bead (gold plated brass), 2 beads.
- Bugle bead, Miyuki, glass, opaque dark gold, (#457), 9x1.9mm tube, 20 beads.
- 26x12mm Magnesite teardrop beads, 2 beads.
- Japanese Cylinder, Delica Seed Beads
approx. 0,5g size 11o B – 24Kt light gold plated
- Rocailles Seed Beads
- approx. 0,5g size 15o C – 24Kt gold plated
- Ear-wire, gold-plated brass, 17mm lever-back with open loop.
Evil Eye
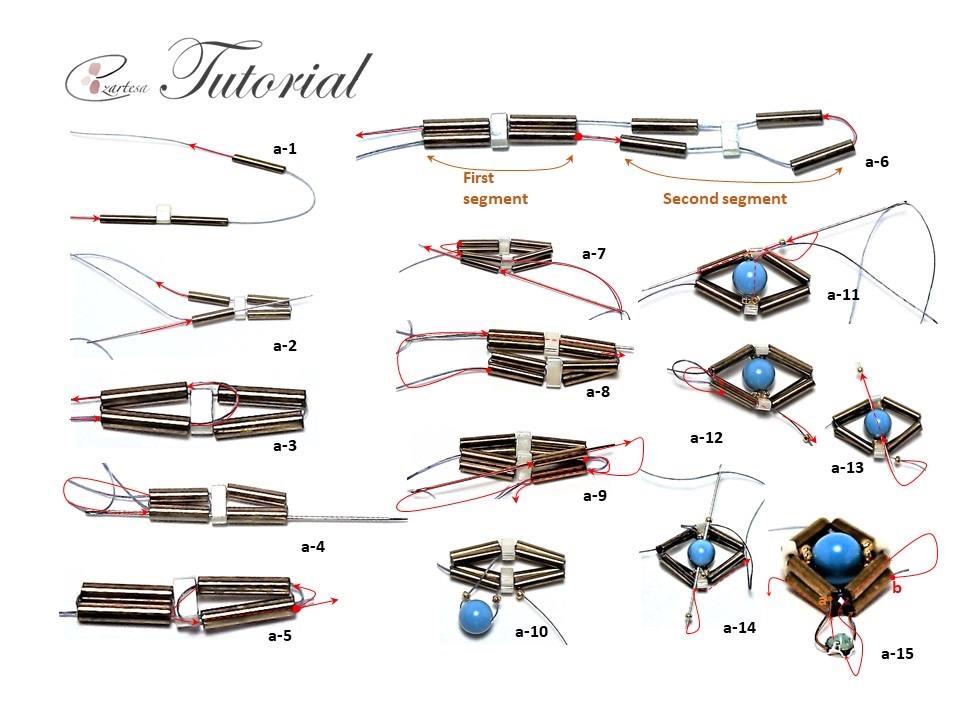
- (1) On 1 yd. of conditioned thread, pick up one bugle bead, one Ivory color 5x2.3mm Miyuki Half Tila bead, two bugle beads (photo a-1). Leaving 8-in. tail, go back through the other hole of Half Tila bead, and pick up one bugle bead (photo a-2).
- (2) Then sew back through the first bugle bead and go back through the last bugle bead that you just added (photo a-3).
- (3) Sew back through the first bugle bead, Ivory color Half Tila, and bugle bead (photo a-4). Snug two bugle beads together (photo a-5): sew back through one bugle bead and exit through the other bugle bead.
- (4) Then pick up one bugle bead, one Ivory Half Tila bead, two bugle beads, sew through the second hole of Half Tila bead, pick up bugle bead and sew through bugle bead, Half Tila bead and exit through the last bugle bead (photo a-6).
- (5) Then fold the second bugle bead segment (just added grope of beads) on top of firs bugle bead segment and sew through second bugle segment firs bugle bead (photo a-7) and exit back through the next bugle bead.
- (6) Sew through the first bugle segment one bugle bead, Half Tila bead and next bugle bead (photo a-8). Then go through the second segment one lower bugle bead and sew up through the next bugle and then come back through lower bugle bead (photo a-9).
- (7) Sew through Half Tila bead, and pick up one 15o C, 6mm Turquoise Swarovski Crystal Pearland, 15o C, and sew through lower Half Tila bead (photo a-10). Pick up one 15o C, sew back through the Turquoise pearl, string one 15o C, and sew through upper Half Tila bead and bugle bead (photo a-11).
- (8) Turn the beadwork upside down, sew through the upper bugle bead and Half Tila bead (photo a-12). Pick up one 15o C, and sew through 6mm Turquoise Swarovski Crystal Pearland, pick up 15oC (photo a-13), and sew through Half Tila bead, pick up 15oC, sew back through the Turquoise Pearl pick up 15oC and exit through the Half Tila bead and bugle bead (photo a-14).
- (9) String one Swarovski Rose Montee in pacific opal color and sew diagonally through next bugle bead (photo a-15 a). Then sew through the upper bugle bead, go diagonally through Swarovski Rose Montee, and bugle bead (photo a-15 b) (photo a-16).
- (10) Secure the 18-in tale and repeat the step (9) to another end. Secure the thread in the beadwork and trim.
- (11) Pick up the working thread and string one 15o C, 2x1mm Hemalyke bead, 9x3.5mm Preciosa twin roller, Hemalyke, bugle bead, Hemalyke, Preciosa Czech 5x2.5 gold bead, two 15o C s, ear-wire, two 15o C s, go through the second hole of Preciosa bead, and string one Hemalyke, bugle bead, Hemalyke, then sew through the second hole of twin roller, string one Hemalyke, 15o C, and exit through the bugle bead, and come up through lower bugle bead (photo a-17).
- (12) String one 15o C, and go through the Hemalyke heishe bead, and up through the all-bead combination from step 11 just at the end skip 15o C, and add one 15o C, exit through the bugle bead (photo a-18).
- (13) Retrace the pathway from step 12 one more time, just this time start with Half Tila bead, and exit through Half Tila bead (photo a-19). Secure the thread in the beadwork and trim.
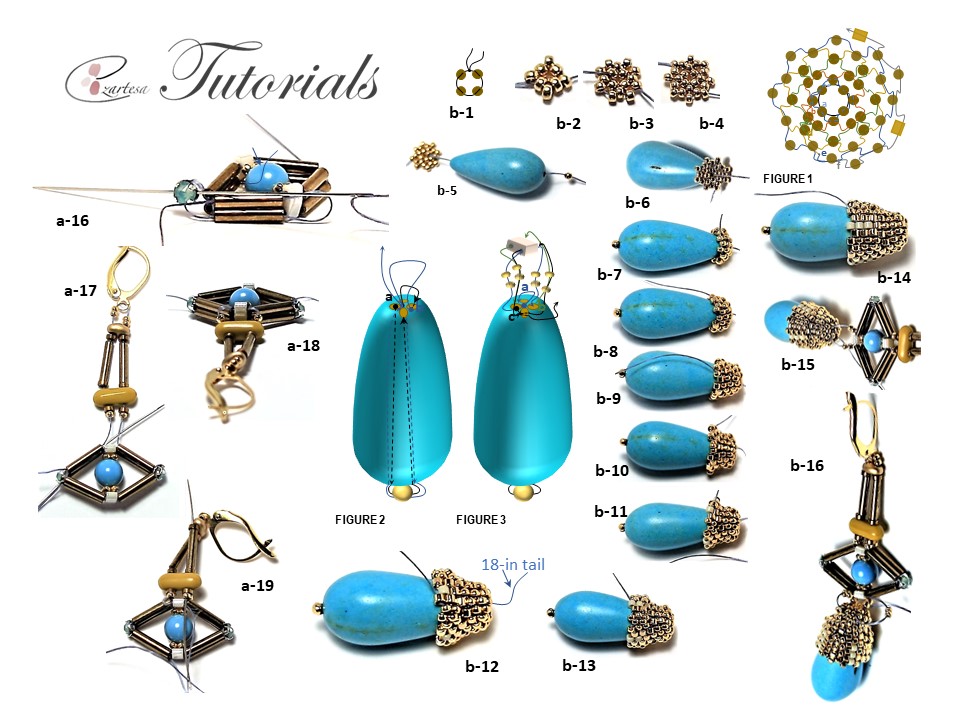
Beaded Turquoise Drop
- (1) On 1 yd. of thread, and leaving an 18-in tail, pick up four 15o C seed beads. Tie the beads into a ring using a square knot and sew through the first 15o C picked up (photo b-1).
- (2) Working in circular peyote stitch, pick up a 15o C, and sew through the next 15o C (figure 1 a) (photo b-2). Repeat around the ring for a total of four stitches and step up.
- (3) Working in peyote stitch, pick up a two 15o Cs, skip a 15o C on the ring, and sew through the next 15o C (figure 1 b) (photo b-3). Repeat around the ring for a total of four stitches. Step up through the first 15o C of the first pair picked up in this round.
- (4) Pick up a 15o C and go through the second 15o C of the pair (figure 1 c) (photo b-4). Repeat around, inserting one 15o C in the middle of the pairs and one 15o C between each pair. Step up through the first added in this round.
- (5) Secure the 18-in tale, string Magnesite teardrop, 2mm squared gold plated bead, and sew back through the Magnesite bead, exit through the middle of 15o C beadwork (photos b-5,6) (figure 2 a). Exit one 15o C (figure 2 b) and retrace the thread pathway one more time and come back through the middle of beadwork.
- (6) Secure the thread at another end of beadwork (from step 3) and work two rounds of peyote with 15o C s around the teardrop, step up (photo b-7) (figure 1 d, e ) .
- (7) Work one round of peyote changing between one 15o C, and one 11o B (photo b-8), (figure 1 f). Step up.
- (8) Work one round of peyote with 11o B s. Step up.
- (9) Work one round of peyote changing between two 15o C s per stich and one 11o B per stich (photo b-9). Step up through one 15o C of last two 15o C s.
- (10) Work one round of peyote changing between one 15o C between pairs and two stitches with 11o B s around the drop (photo b-10).
- (11) Work one round of peyote changing between two stitches with 15o C s and one stich with 11o A around the drop (photo b-11).
- (12) Work one round of peyote changing between two stiches with 11o B s and one stitch with 15o C around the drop (photo b-12).
- (13) Work one round of peyote changing between two stitches with 15o C s and one stich with 11o A around the drop (photo b-13).
- (14) Work one round of peyote with 11o B s around the drop (photo b-14).
- (15) Work one round of peyote changing between two stitches with 11o B s and one stich with 11o A around the drop (photo b-14).
- (16) Repeat step (14). Secure the thread with a few half-hitch knots,
- and trim.
- (1) Secure the 18-in tail, exit one 15o C seed bead (figure 3 a), pick up two 15o C s and sew through the Half Tila bead first hole, then string two 15o C and sew through opposite 15o C bead in the same direction how you started with the first bead (photo b-15). Then pick up two 15o C s (figure 3 b) and sew through the other hole of Half Tila bead, string two 15o C s and exit through 15o C (the bead where you started this step) (photo b-16).
- (2) Sew through the one 15o C (figure 3 c) then go up through the two 15o C s added in step (1), sew through the first hole of Half Tila bead, go through two 15o C s, and exit through the 15o C. Weave the thread through the beadwork to another side of beadwork and repeat (this time you will sew through the second hole of Half Tila bead. Secure the thread in the beadwork with a few half-hitch knots, and trim. Repeat to make a second earring.
If you enjoyed this free beading pattern and would like to learn and discover more of my designs, you can visit my Etsy shop.
Beading Tutorials, Jewelry, Crystal Stones and Colors Based on Cancer Zodiac Sign
Beading Tutorials, Jewelry, Crystal Stones and Colors Based on Cancer Zodiac Sign
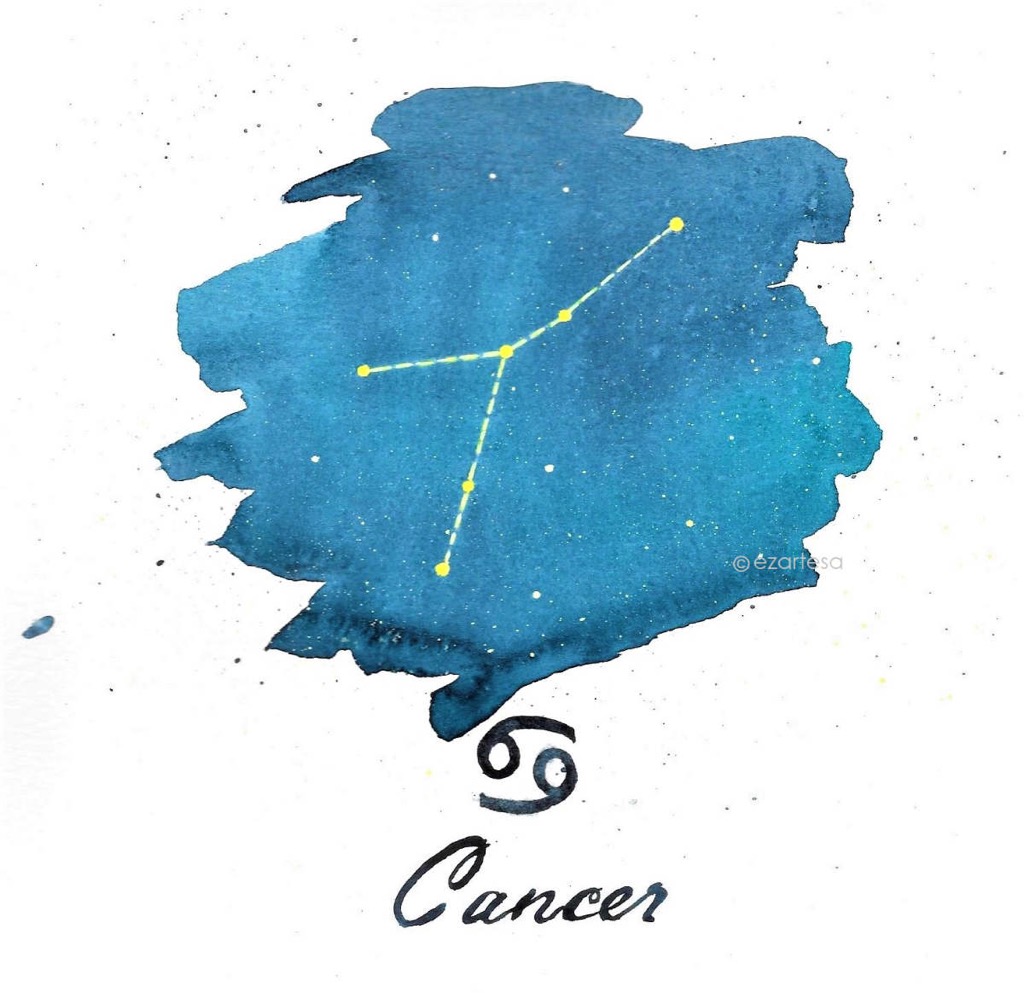
Cancer is both peaceful and passionate. Deeply intuitive and sentimental, Cancer can be one of the most challenging zodiac signs to get know. You are very emotional and sensitive, and care deeply about matters of the family and home. Cancer is sympathetic and attached to people they keep close. Those born with their sun in Cancer are very loyal and able to empathize with other people’s pain and suffering.
This is the list of some stones that are recommended for everyone who was born under this star sign.
Ruby, moonstone, labradorite, rose quartz, smokey quartz, emerald, malachite, carnelian, Opal, Abalone shell, amber.
Ruby stone provides strength, vitality, boosts self-esteem, it acts as a positive energy and a great support in handling relationships. Ruby stone helps protect its wearer from the evils in the world. It signifies Love and passion, while attracting good friends and good luck.
I created fun and easy beading tutorial inspired by Cancer zodiac sign birthstones and colors. This “Sea Dragon Wrap Bracelet Tutorial” includes 14 color pages, with 133 color pictures and 4 diagrams.
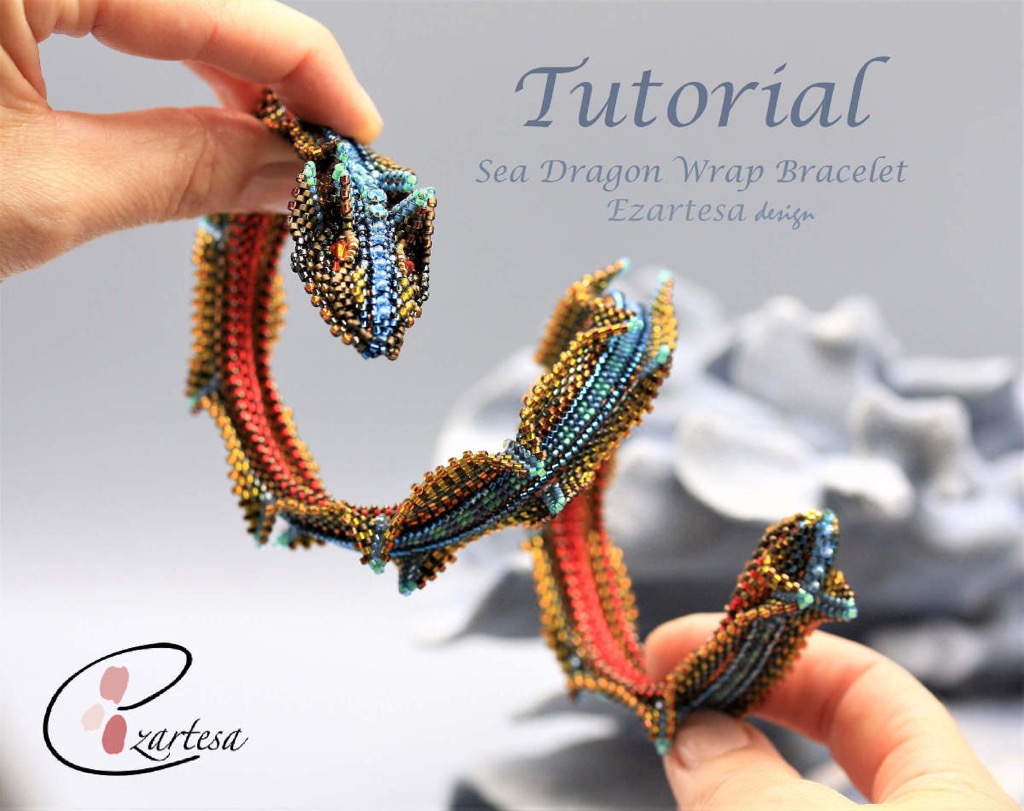
Learn how to make beautifully beaded, detailed Dragon wrap bracelet. Bracelet is quite easy to put it on or take it off. I used simple tubular herring bone, brick stitch, circle and flat odd count peyote stitches. For this bracelet I used ruby Swarovski crystal bicones, seed bead Delicas in red, topaz, blue zircon, neon green and blue colors.
In the art of the Feng Shui, Dragon represents fortune, luck, growth and development.
There is a sense of mystery tied to Dragons…
Labradorite Stimulates intuition and raises consciousness. Increases energy flow to all chakras, stabilizing your aura. Reduces anxiety & stress.
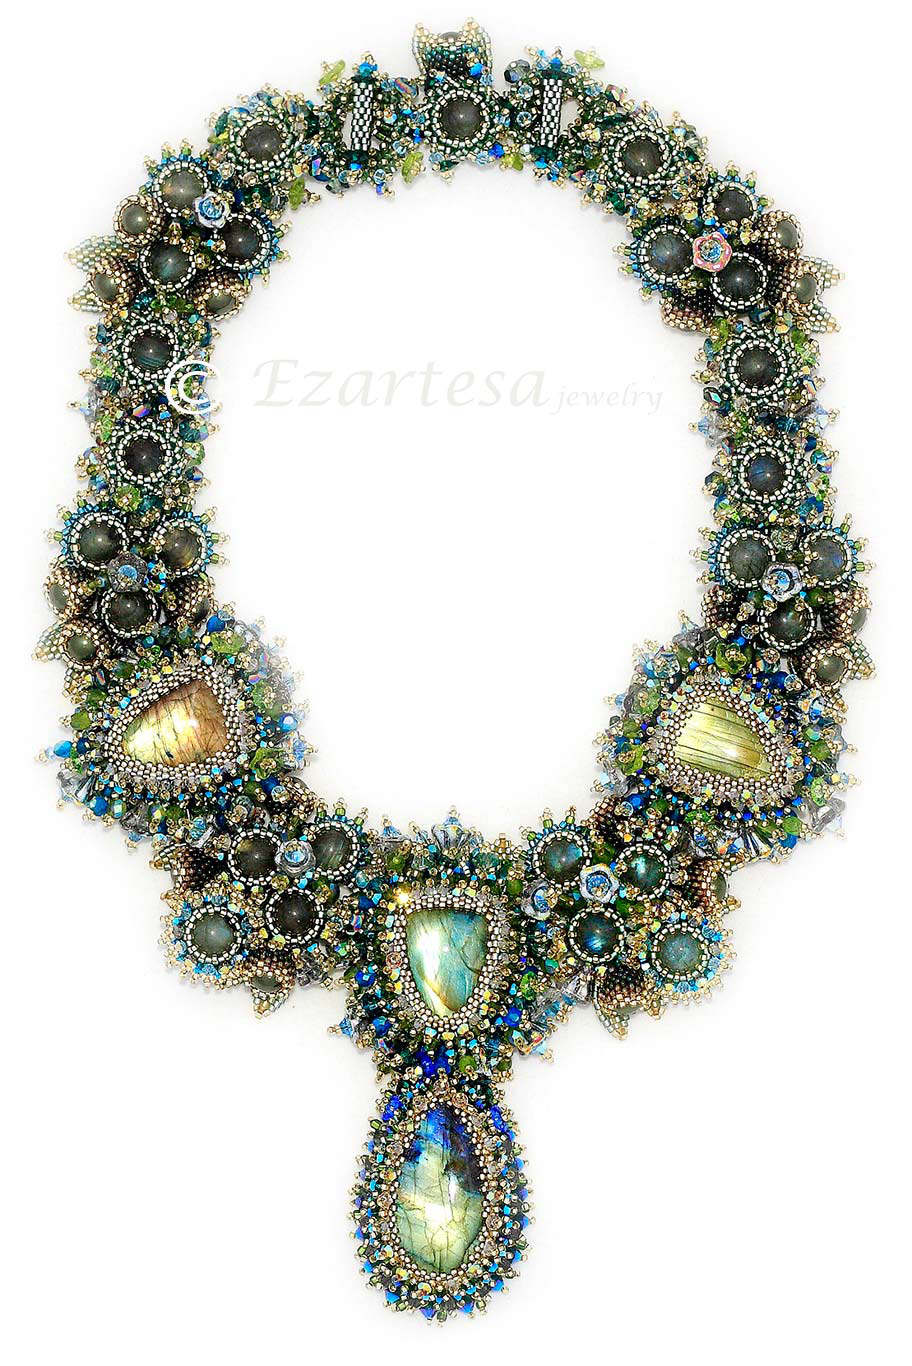
This gorgeous statement necklace is created by using natural Labradorite cabochons and beads, faceted Czech glass beads and tiny glass seed beads in green, grey, dark olivine, silver lined light green and blue.
Moonstone the nurturing moon energy and vibrant water energy to the ground. It can also help develop and inspire your psychic intuition.
Opal removes fear during the times you are doubting yourself and encourages personal power when you are feeling confident. It is another stone that enhances your intuition.
This dragonfly pendant beading tutorial is quite easy to follow and has many clear colorful pictures. It is made of 11/0 and 15/0 seed beads using peyote, herringbone and square stitches. I have used Swarovski pearls for the body and opal beads for the eyes. It is a versatile design. You can try different color combination of beads to create your own style. It can be used for brooches, pendants, ornaments, charms and so on.
Dragonflies are the keepers of the dreams, the energy within that sees all our true potential and ability. Dragonflies inspire spirituality and creativity; they help us on the path of discovery and enlightenment. They remind us that everything is possible. This material includes 8 color pages.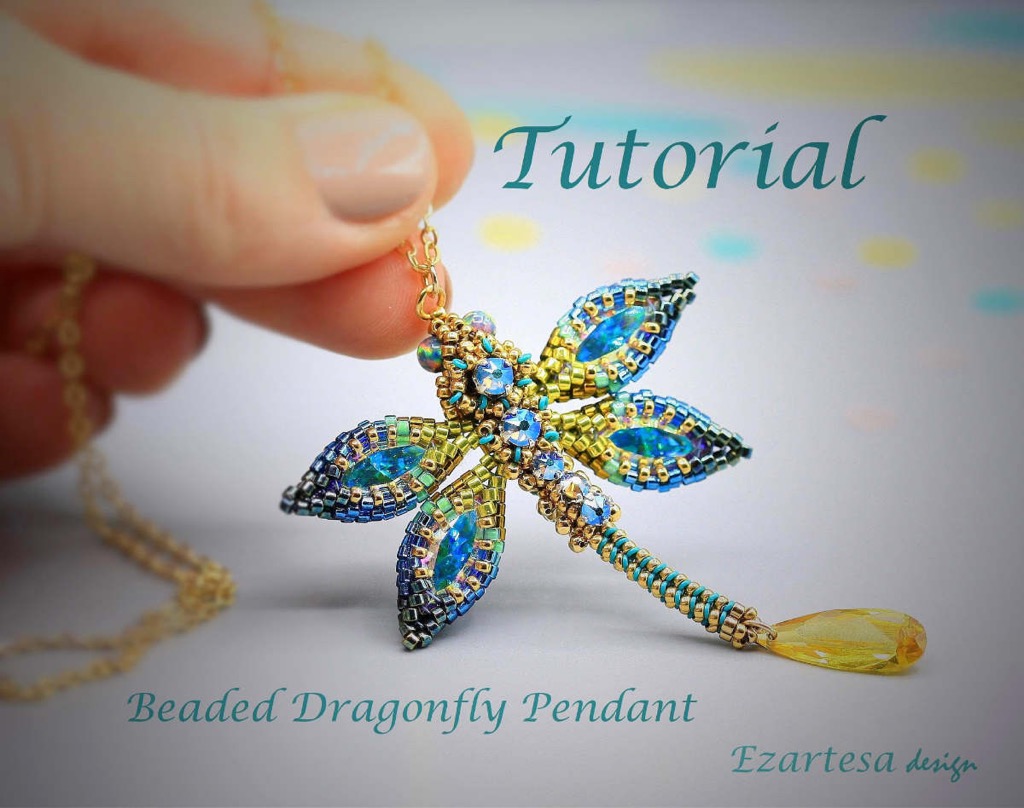
Purchase this pattern at my EzartesaJewelry Etsy shop.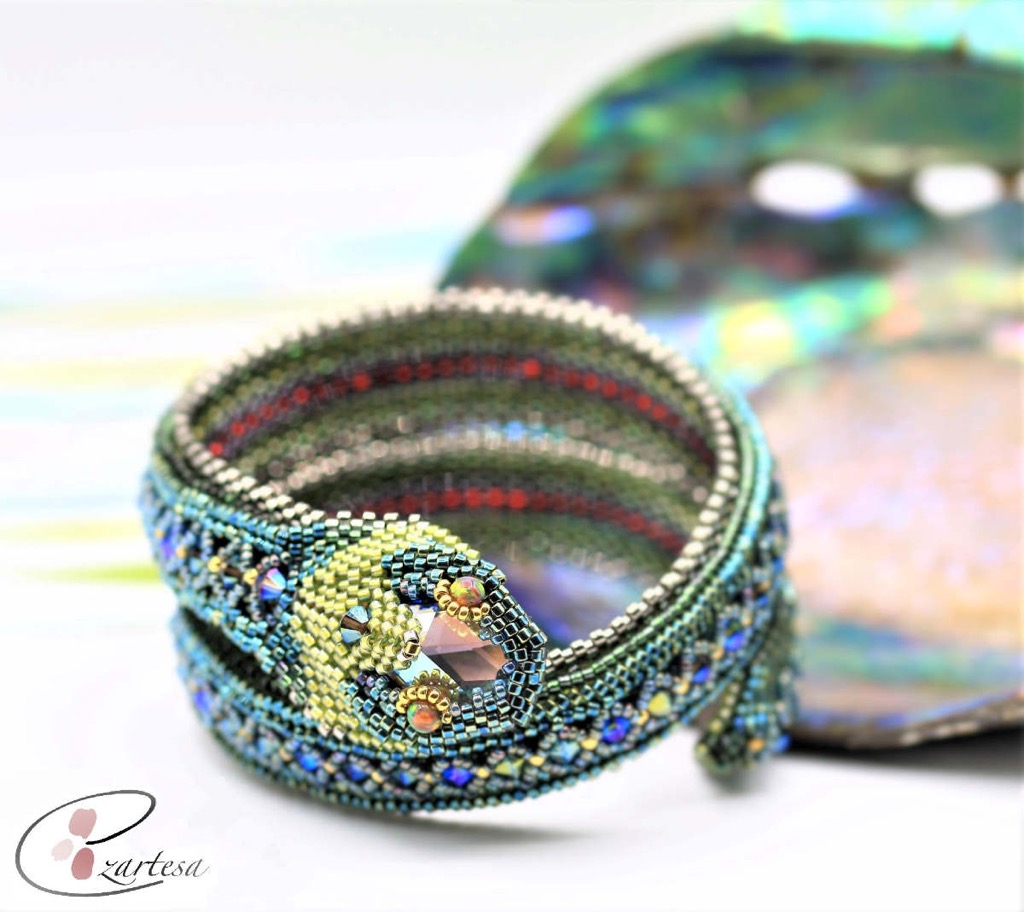
Fun and gorgeous beaded green serpent wrap bracelet tutorial / pattern. Created from tiny glass seed beads, opal beads and Swarovski emerald crystals.
Bracelet is comfortable and looks stunning on! Inspired by the one of the best-known Lithuanian fairy tales Eglė the Queen of Serpents.
The serpents (žaltys) of the tale are grass snake in Lithuanian, but because they inhabit the sea, the word may mean a mythical water snake.
This material includes 12 color pages, with 112 color pictures and 6 diagrams.
Emerald helps dealing with stressful situations by boosting spiritual growth and effective communication with others. Emerald promotes emotional stability and peace, helping Cancer signs to balance their emotional state.
This necklace is created from tiny Japanese glass seed beads, Malachite cabochons and beads, Swarovski crystals and Emerald beads.
Amber stone has great qualities to heal the physical and emotional body and if negative comes from undesirable sources, it is especially useful to help you.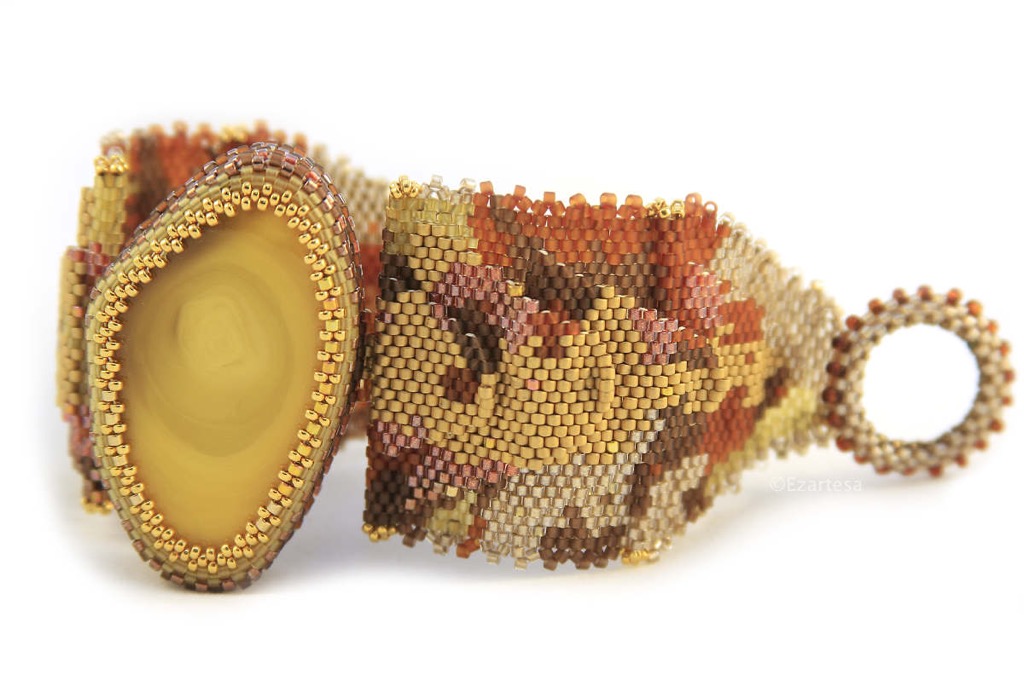
This Sunny Amber Bracelet is created from glass seed beads and large natural amber bead.
I created this “Austėja the Queen of Bees” Bracelet from glass seed beads, Swarovski crystals and Czech amber color glass beads.
Austėja is the Bee Goddess of Lithuania where the honeybee is a symbol of friendship. According to Baltic mythology she offers special protection to brides, pregnant women, and beekeepers too.
Learn how to create honeycomb beads, clasp, and bees of different sizes from tiny glass seed beads and Swarovski crystals. This sunning beaded bracelet is perfect for the party time!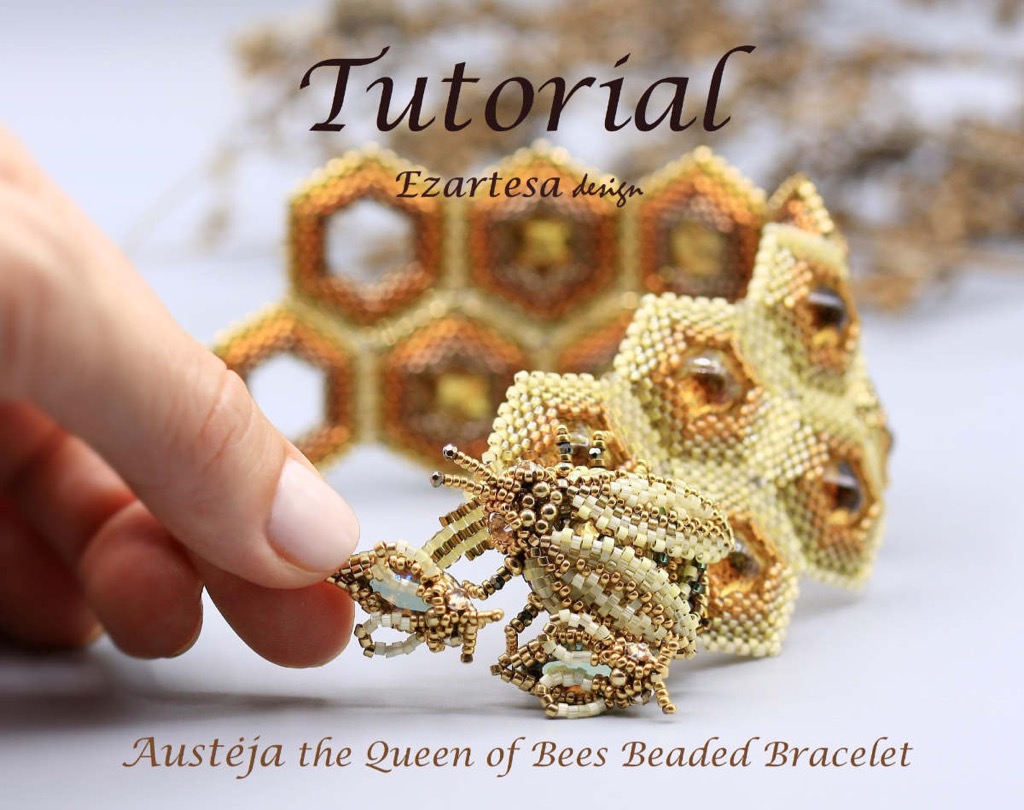
Purchase this pattern at my EzartesaJewelry Etsy shop.
Cancers love to bring brightness and life to any situation, and the right color can give them the courage and confidence they need to face the world.
Here are five colors that are best for the Cancer zodiac sign.
- Color for cancer zodiac sign: Seaweed Green. The color represents harmony and health, freshness, fertility, growth and the environment.
- Sea Glass Blue. This color represents truth, confidence, faith, coolness and intelligence.
- Sky Blue. The color represents ocean where the crabs live. Blue also offers direction and empathy.
- Sand-Brown. Brown is a stable and grounded color which means stability and orderliness.
- Whitish Gray. This color represents cleanliness, safety and successful beginnings. It is a diplomatic color. Light grays can carry some of the attributes of the color white.
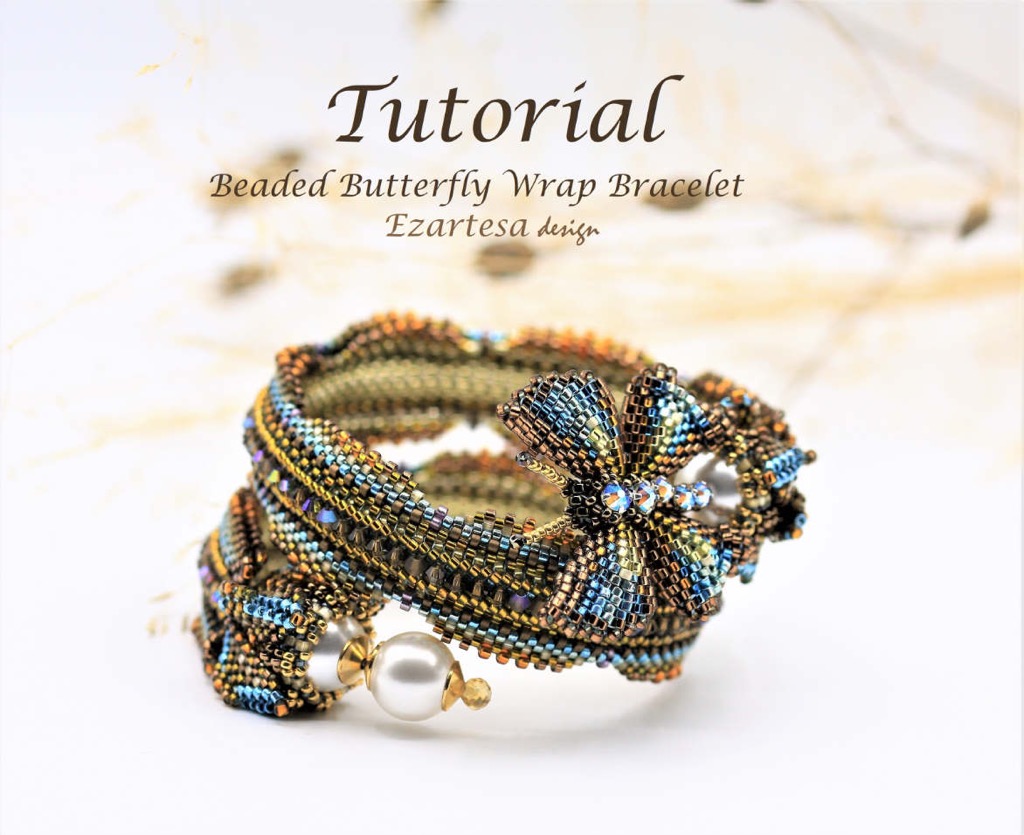
This butterfly wrap bracelet beading pattern includes many color pictures and clear instructions to make a gorgeous bracelet. Purchase this pattern at my EzartesaJewelry Etsy shop.
Your Zodiac sign can give you powerful insight into your past, present and future, but it is not an isolated system. Your body and mind form a complex matrix that responds to colors and crystals. The way you respond to color is usually very individual and is related to your own past experiences and your personality. I would suggest experimenting with colors and jewelry designs and try to understand what feels wright to you and your soul.
Check out all my beading tutorials here
FREE Beading Tutorials
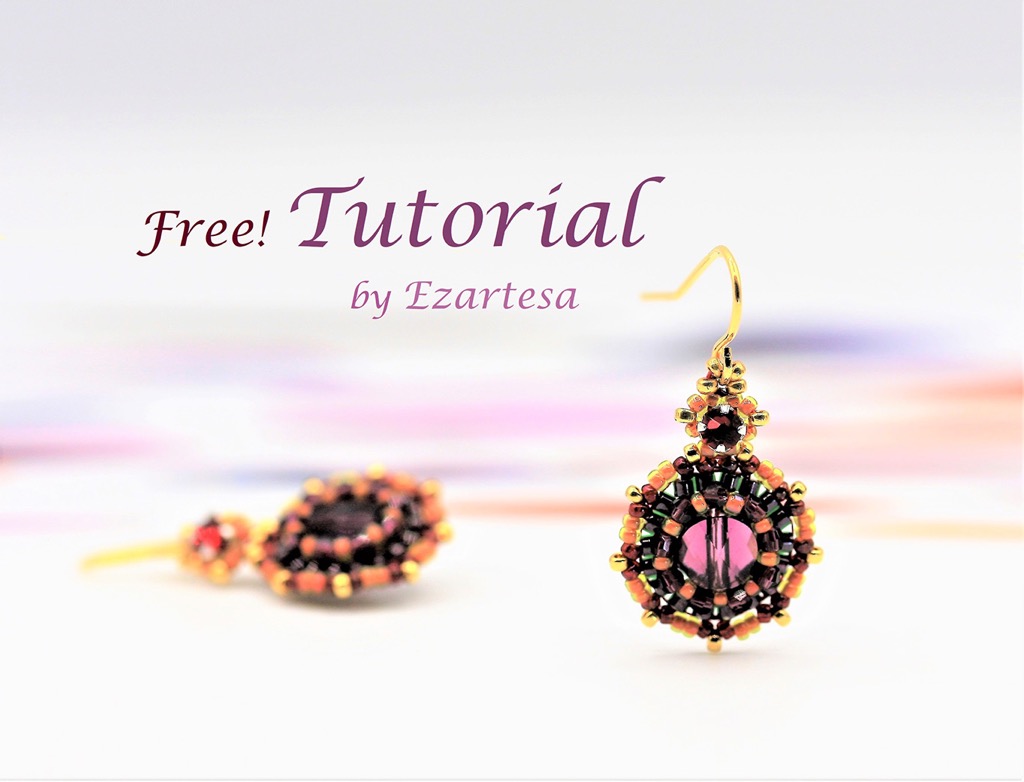
I created a fun and easy beading tutorial for advanced weavers and determined beginners. Learn how to incorporate in your beadwork Swarovski crystal rose montees, mini rounds and open round rings.
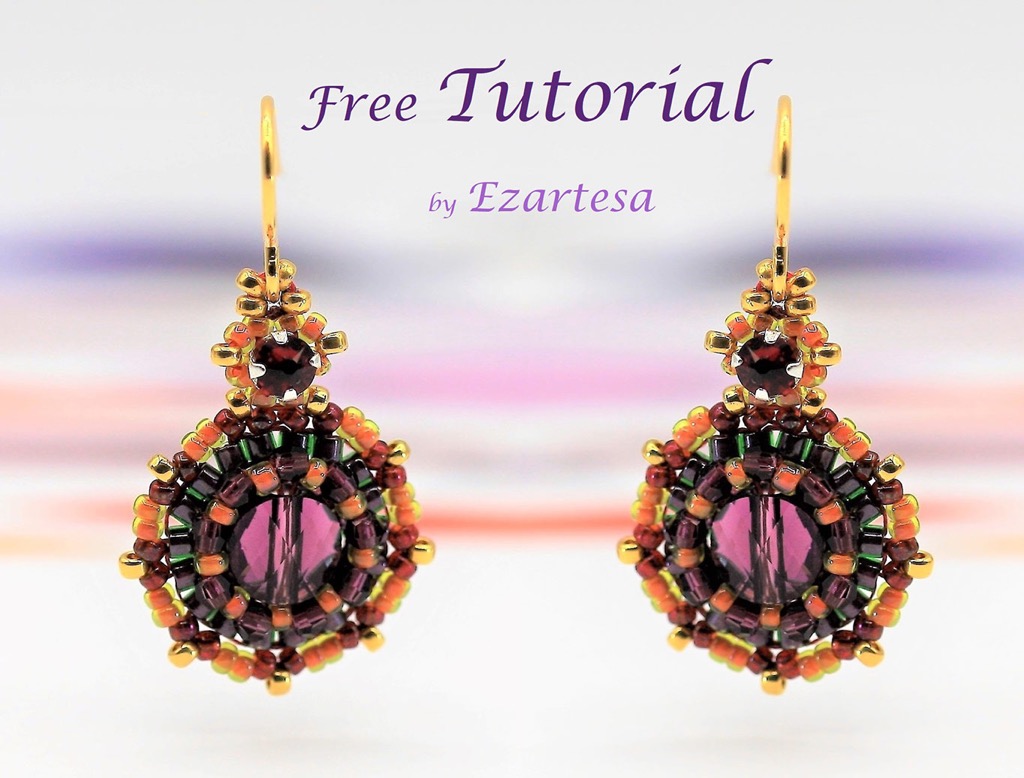
Materials for a pair of earrings.
- In this beading tutorial I’m using size D Nylon thread in reed color (conditioned with beeswax).
- Beading needles #12.
- Scissors.
- Bead, Swarovski® crystals, Crystal Passions® amethyst, 6mm faceted mini round (5052), 2 beads.
- Bead, Swarovski® crystals, Crystals, amethyst, 2mm faceted round with 0.6mm hole, 18 beads.
- Component, antique brass-plated brass, 9mm open round with 7mm hole, 2beads.
- Swarovski crystals and silver-plated pewter, scarlet, 3-3.2mm rose montees with 0.4-0.6mm hole, 2 beads.
- Japanese Cylinder, Delica Seed Beads
Rocailles Seed Beads
approx. 0,5g size 15o B – transparent color-lined fancy rose gold.
approx. 0.5g size 15o C – Transparent color-lined rainbow purple.
approx. 0.5g size 15o D – Translucent gold luster cranberry.
approx. 0.5g size 15o E – 24Kt gold plated.
- Ear wire 13.5mm fishhook with open loop.
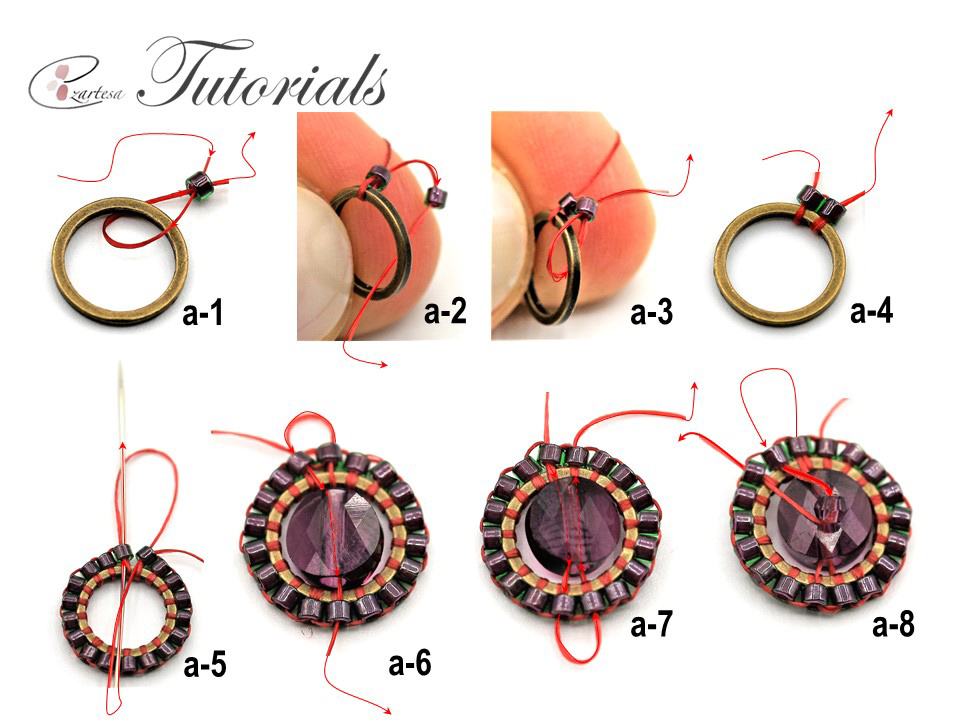
- On about 1yd of (red) thread, and leaving an 18in tail string one 11o A color seed bead,
- Connect two last beads by sewing the needle down through the next 11o A bead (photo a-5) and come up through the bead where you started.
- Sew the needle down through the next 11o A and string 6mm mini round (photo a-6) sew down through the opposite 11o A bead (at the other end of the ring), turn the beadwork up side down, sew the needle to the left through the next 11o A bead, go through the 6mm mini round bead and exit through the opposite 11o A bead (at the other end of the ring) (photo a-7).
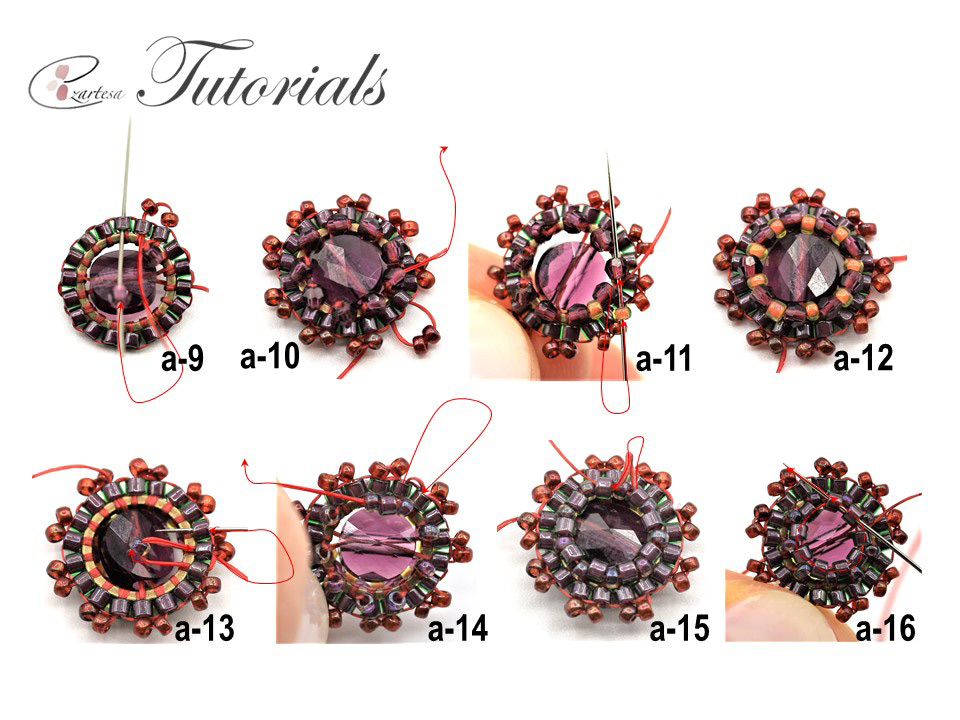
- Sew the needle down to the left through the one 11o A bead, pick up one 2mm amethyst Swarovski round bead and sew up through the next 11o A bead (photo a-8), then string two 15o D beads and sew down through the next 11o A bead (photo a-9). Work around the ring till you have a total of nine 2mm beads and nine 15o D pairs (photo a-10).
- Then exiting one 2mm amethyst bead string one 15o B bead and sew through the next 2mm bead (photo a-11). Work around the ring till you have a total of nine 15oB beads (photo a-12).
- Secure the thread at the other end of the beadwork, sew the needle down through the 11o A bead, string one 15o C bead and come up through the next 11o A (photo a-13). Repeat around the ring.
- Then exiting last 15o C string one 11o A bead, sew through the next 15o C and work around the ring till you have a total of nine beads (photo a-14,15) and sew the needle through the all nine beads two times (photo a-16).
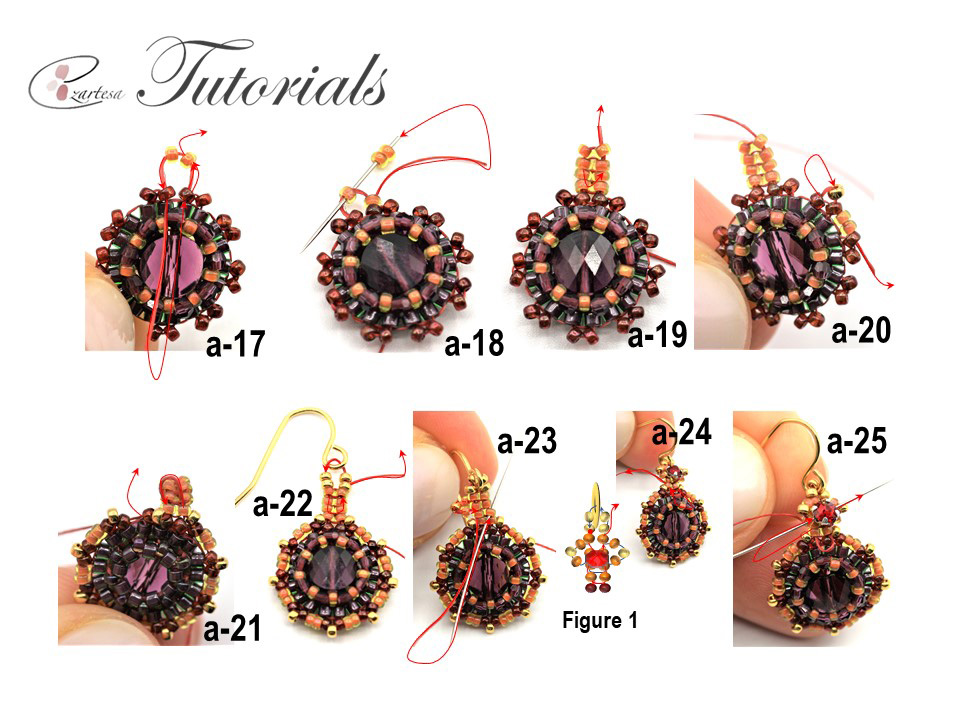
- Secure the thread at the other end of beadwork and exit 11o A and 15o D at the top of earring (photo a-17), string two 15o Bs and sew down through the next 15o D, come up to the right through the 15o D and 15o B beads. Work three more 15o B pairs (photo a-18, 19).
- Secure the thread at the other end of beadwork and exiting 15o D bead (photo a-20,21) work one 15o E bead between the pairs, and then two 15o B s…repeat around the ring. Then secure the thread in the beadwork and trim.
- Secure the thread that exits 15o B bead and string two 15o Es, ear-wire, two 15o Es sew down through the 15o B and come up through the next 15o B and 15o D beads (photo a-22).
- Then sew the needle up through the 15o E, ear-wire, down through the two 15o Es and 15o B bead, string 15o B, 15o E, 15o B skip one bead and sew the needle through the 15o B (photo a-23), come up through the next 15o B, and repeat to the other side (FIGURE 1).
- Weave the thread up through the two 15o Es, ear-wire, two 15o Es, one 15o B and string the Swarovski rose montee, skip two beads, and sew diagonally through the one 15o B, come up through the next 15oB, sew diagonally through the Swarovski montee and exit through the opposite 15o E bead (photo a-24, 25) (FIGURE 1). Secure the thread in the beadwork and trim. Repeat to make a second earring.
To sea more beading tutorials and patterns go to my beading tutorials page.
All text and photos copyright by jewelry designer Ezartesa.
